


How to Make a Sparkling Plastic Cup Christmas Tree Decoration

One afternoon last December, I found myself short on decorations but full of holiday spirit. I dug around my craft bin and came up with—wait for it—plastic cups. Yes, the humble plastic cup became the star of my DIY holiday decor that year.
If you’re craving something cute, creative, and crazy simple, this sparkling plastic cup Christmas tree might just become your new favorite holiday project!
It’s budget-friendly, easy to personalize, and a total showstopper when lit up with fairy lights. And the best part? You probably already have most of what you need at home.

Tools and Materials:
- 21 plastic cups (clear works best)
- Stapler + plenty of staples
- Battery-operated fairy lights
- Tape (clear or decorative)
- 21 small ornaments or baubles
- Festive blanket, scarf, or pashmina
- Tree topper (star, bow, or anything cute)
- Tabletop or display area
Hometalk may receive a small affiliate commission from purchases made via Amazon links in this article but at no cost to you.


1. Build the Base Layer
Start by stapling 6 plastic cups together in a straight line. This will be your bottom layer, the foundation of your tree.

2. Create the Pyramid Structure
Now let’s work our way up like building a plastic cup pyramid!
- Take 5 cups for the second row.
- Begin with one cup: staple it to a cup in the first row.
- Take your second cup and staple it to the first one and to a cup below it in the first row.
- Continue this pattern, overlapping each new cup to the one before it and the one below.
Repeat this layering process with 4 cups, then 3, 2, and finally 1 at the very top. You should now have a sweet little pyramid tree.

3. Add the Fairy Lights
Here comes the magic! Wrap your battery-operated fairy lights around the tree, starting from the bottom and winding your way to the top.
- Use tape to secure the lights around each cup.
- Make sure every layer gets a bit of sparkle.
- Hide the battery pack under the blanket you’ll add later.

4. Style Your Tree Display
Time to set the scene! Drape a festive scarf or blanket over your table and place your tree on top.
- Arrange the fabric so it hides the battery pack.
- Add a festive topper of your choice: star, bow, or even a mini Santa hat.

5. Finish with Baubles
Pop a small ornament or bauble into each of the 21 cups. Go with a color theme or mix it up with fun, eclectic pieces.

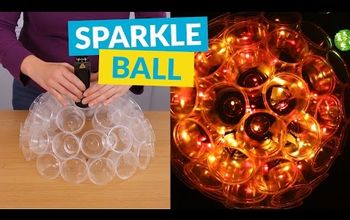
Light Reflection
Clear plastic cups reflect and amplify the glow of fairy lights, making your tree sparkle even more.
Kid-Friendly Craft
This is a safe and fun project for older kids with adult supervision, plus it’s a great way to teach about upcycling!
Customization Ideas
- Use colored cups for a bold look.
- Add glitter spray or snow spray.
- Swap baubles for wrapped candy (hello, edible decor!).

Light Up Your Holidays with a Plastic Cup Christmas Tree
And there you have it, a dazzling, affordable, and downright adorable Christmas tree made from 21 plastic cups!
Whether you set it up on your kitchen counter, office desk, or craft room table, it’s guaranteed to spread joy and spark conversation.
So go grab those cups and fairy lights and get to stapling!
Comments
Join the conversation
-
Need to see 100% complete/lighted
-
Me tooo


Frequently asked questions
Have a question about this project?
Since the tree is technically bent backwards due to the shape of the cups, how does it stand?
Did something get missed or is that the final product? I don’t get it.
I'd spray paint those cups in gold or silver!