Macrame Cat Hammock

by
Wendy at myfrenchtwist.com
(IC: blogger)
4 Materials
$50
4 Hours
Medium
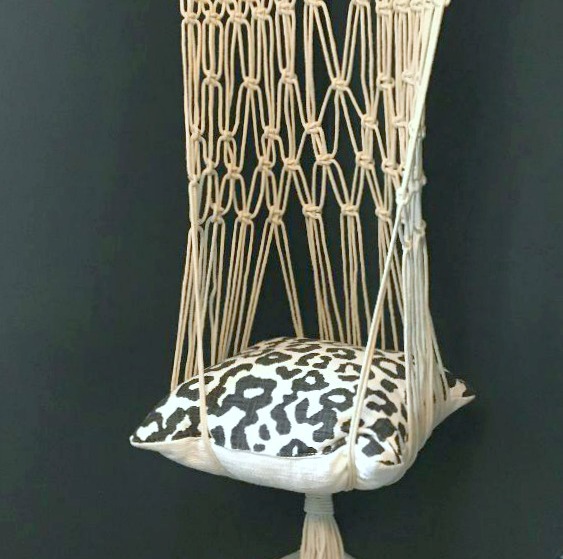
I have no cat, okay? But I promised my readers I’d give them a tutorial for a macrame cat hammock, so here it is. Besides, it turned out so sweet, it almost makes me want to adopt a kitten. Almost. Another nice thing about this hammock is that it’s comprised of mostly Square Knots, so it’s easy enough for macrame beginners.
Cut 24 pieces of rope, each measuring 20 feet long. Wrap a small piece of masking tape around each end of rope, to prevent fraying while weaving the design. Once the 24 rope pieces are cut and ends are taped (to prevent fraying), tie each one to the wooden pole using a Lark’s Head Knot.
You now have 24 Lark’s Head Knots tied onto the pole and 48 individual cords hanging. To follow the instructions correctly, you need to understand the following key. While knotting, try to keep each horizontal row even, and always go from left to right. To make a proper Square Knot, see the tutorial here.
Start with 1st cord: 12K (starting with 1st individual cord from the left, tie 12 Square Knots)
Start with 3rd cord: 11K (starting with 3rd individual cord from the left, tie 11 Square Knots)
Start with 5th cord: 4K – S8 – 4K
4th row: Start with 7th cord: 3K – S12 – 3K5th row: Start with 9th cord: 2K – S16 – 2K6th row: Start with 11th cord: 1K – S8 – 1K – S8 – 1K
7th: Start with 9th cord: 2K – S16 – 2K8th: Start with 7th cord: 3K – S12 – 3K9th: Start with 5th cord: 4K – S8 – 4K10th: Start with 3rd cord: 5K – S4 – 5K11th: Start with 1st cord: 12K12th: (Begin this row about 4″ lower than the previous row.) Start with 5th cord: 1K – S2 – 1K – S2 – 1K – S2 – 1K – S2 – 1K – S2 – 1K – S2 – 1K
13th row: (Begin this row about 3″ lower than the previous row.) Start with 2nd cord: 1K – S2 – 1K – S2 – 1K – S2 – 1K – S2 – 1K – S2 – 1K – S2 – 1K – S2
14th row: (Begin this row about 3″ lower than the previous row.) Start with 1st cord: 12K
15th row: (Begin this row about 3″ lower than the previous row.) Start with 3rd cord: 11K
About 20″ down from the last row of knots, make a Wrapped Knot (using a spare piece of cording). About 12″ below the bottom of the Wrapped Knot, trim the cords evenly.
Nestle a small cat bed or pillow within the cords just above the Wrapped Knot. Spread the cords evenly around the bed. I used a whimsical 18″ square pillow from Target. If you cannot find a drapery rod short enough, cut a larger one down to fit. For an extra touch, I mimicked the pattern on the pillow onto the finials, using a permanent marker. To hang the hammock, tie an extra piece of rope onto the two ends of the rod and hang from a ceiling hook. For more detailed instructions, sources, and knot tutorials, go to the Macrame page at myfrenchtwist.com
Enjoyed the project?
Suggested materials:
- 24″ long wooden drapery rod (1″ diameter) with two finials
- Five 100-foot rolls of cotton clothesline (3/16″)
- 18″ square throw pillow (Target)
- Masking tape & scissors

Want more details about this and other DIY projects? Check out my blog post!
Published January 7th, 2020 10:15 AM
Comments
Join the conversation
3 of 17 comments
-
 Kathy Phillips
on Feb 02, 2020
definently. I have a cat that I think would love it.
-
-










Frequently asked questions
Have a question about this project?
About how long is the finished "cat cradle"?
so where is a photo of a cat actually using this "cat's cradle?
How do you tie a square knot using four strings?