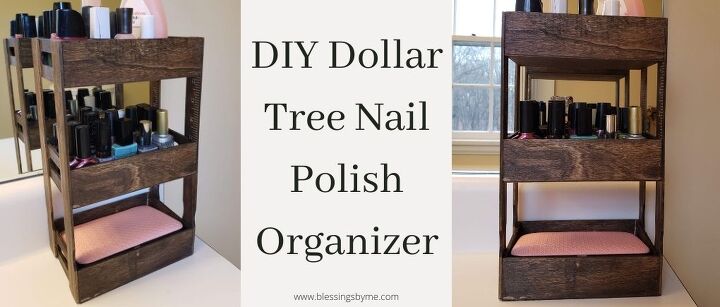
DIY Dollar Tree Nail Polish Organizer

Organize all of your nail polish bottles in one place with this easy-to-make DIY Dollar Tree nail polish organizer!
*Post contains affiliate links. They are free for you to click on, however, I will be compensated if you make a purchase. This supports my family and I thank you for your support! To learn more, click here.
There’s just something so refreshing about a new year. It’s like a chance to start over. Personally, I like to start the year off by getting things organized within my home. I’m not a fan of clutter and things being out of order. It’s just so overwhelming because it’s harder to find things when you’re looking for them.
The one place I wanted to start organizing was my bathroom. I needed to get my nail polishes together so I would quit buying the same colors that I already had! Plastic bins were working, but making it hard to see all the colors. So I decided to come up with a shelf using wooden trays from Dollar Tree.
What you need:
- 3 wood trays from Dollar Tree
- 4 wood paint stir sticks
- Wood glue
- Stain
- Sponge brush
- Clamps
- Old rags (I used an old t-shirt that was ripped up to make rags.)
What you do:
Step 1
Tip: Before starting any staining or painting, be sure to cover your work area. I use an old bed sheet and a plastic Dollar Tree table cloth, especially when I’m staining. Also, I like to wear gloves while staining wood because I tend to get stain all over my hands.
First, stain all 3 wood trays and all 4 wood paint stir sticks. I have no idea what color the stain was that I used. It was actually leftover stain from when we refinished the hardwood floors in our bedroom.
To stain the wood trays and stir sticks, use a sponge brush to apply the stain generously. Then use a rag, such as an old t-shirt, to wipe the excess stain off.
After all the pieces have been stained, let them dry completely before gluing.
Tip: If you would rather paint the Dollar Tree nail polish organizer instead of staining, I would suggest painting last after the entire thing is assembled to make it easier.
Step 2
After the stain has dried, it’s time to start gluing the pieces together. I used Elmer’s wood glue for a strong, long-lasting hold.
To glue the paint stir sticks to the wood trays, I started with the bottom tray and worked my way up. I lined up the bottom of 2 stir sticks with the bottom of one of the wood trays on one side. After they were lined up, I glued the sticks to the tray.
Next, I lined the top of another wood tray up with the top of the stir sticks and glued the tray down. Then, I eyeballed where I wanted the middle tray to go, and glued that one down as well.
I used clamps to hold the trays in place while the glue dried.
Step 3
After the glue has completely dried (follow drying instructions on the glue label), you can start organizing your nail polish bottles!
This is so easy to make! Other than waiting for the stain (or paint) and glue to dry, this is such an easy organizing project. Here are some other ways you can use your Dollar Tree nail polish organizer:
- hair ties and clips
- plastic spoons, forks, and knives
- organize pudding boxes, Jell-O boxes, Kool-Aid packs, hot chocolate packs, etc.
Those are only a few examples. What would you use the nail polish organizer for?
Be sure to check out my blog for more Dollar Tree DIYs, too:
Enjoyed the project?
Resources for this project:
See all materials
Comments
Join the conversation
-
 Smilingblond
on Jan 16, 2023
You could tack an old belt across the top--from side to side. Use the belt as a handle to carry the whole tray stack to do your nails & select the color of polish.
-
-
 Katen
on Jan 19, 2024
This is great idea. My vanity is full of little things that would love to have a home. Small enough to not overwhelm space and far more attractive than those stupid plastic stacking draws so many use. You could use 18” ruler if you wanted more space between. You could place uprights inside tray and add a pipe clamp to hold upright and makes it easier to take tray out to see/access items in bottom tray. Just to handy. Thanks for sharing
-








Frequently asked questions
Have a question about this project?
What are the size of the dollar store wooden trays?
How long are the stir sticks?
Looks like it would still be hard to see some of the colors.?