Combined Garden Modular Seating / Retaining Wall / Storage

by
Stephen Taylor
(IC: homeowner)
6 Materials
$400
3 Days
Medium
EDIT For all those who are saying it will rot, read the post
1. the framing is H4 (the stuff they make fence posts and telegraph poles from -- yes it will rot but not in my life time
2. The panels are MARINE GRADE ply - they build boats from that!!
3. The rest is decking - that is designed to be outside !! ;-)
4. I built it in Oct 2015 and no rot so far
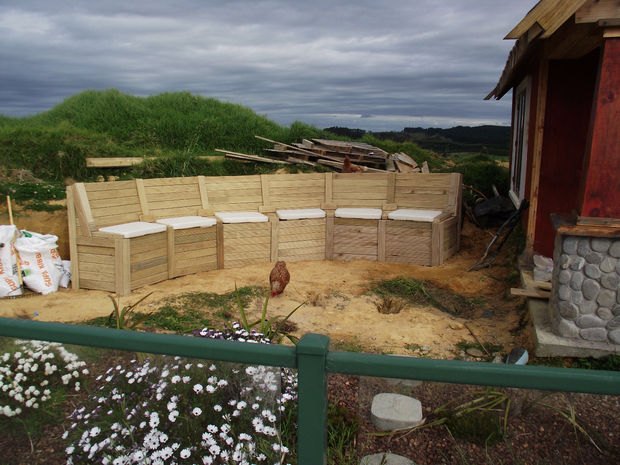
I had a large pile of spoil and topsoil from the build of our pool and wanted to put in some seating and storage as well as a retaining wall. So I thought why not combine the lot!
This was constructed using 4x2 and decking timber along with plywood sheeting, however it could be built from pallets (I just am too idle to dismantle that many pallets)
Firstly I had to dig out the area I wanted, this involved moving approx 12 cubic meters of sandysoil and clay. Unfortunately due to limited access this had to be done by hand and whellbarrow Fun!!
I made the frames ot of 4x2, initially I was going to have 4 seats but after looking at it it I decided that 6 would look better so 7 frames. Each frame had 1x1200 mm, 1x650mm,1x570mm,1x520mm and 1x530mm which had 5 degree angles as shown for the seat back
Assemble the frames, I used 100mm nails (fine carpentry skills there!)
Put in position and brace, note that the "feet" of the frames are buried to give the required sturdiness for a retaining wall
Start panelling out with decking timber
18mm marine ply for seat base cut to fit and screwed in position
12mm ply for seat backs before backfilling screwed into place
Plastic sheet stapled to 12mm ply as rot barrier and backfilled
Arms/drink rests screwed from underneath ( I put in the cushion squabs and then cut the arms to fit to ensure snug fit) The squabs were boat squabs from a local yacht chandler
Access to storage cut out with oscillating saw/jigsaw hole in centre to assist removal
Corner supports screwed in place, I only put one access per 3 seats in but may decide to put more later
Uprights put on to conceal screws
And thats it done, just need to tidy the area in front (a little more digging) and am going to put a fire pit in them plant
Here is a link to the finished area http://www.hometalk.com/diy/build/fire-pits/f...>
Enjoyed the project?
Resources for this project:
See all materials
Any price and availability information displayed on [relevant Amazon Site(s), as applicable] at the time of purchase will apply to the purchase of this product.
Hometalk may collect a small share of sales from the links on this page.More info
Published November 13th, 2015 12:47 AM
Comments
Join the conversation
3 of 165 comments
-
 Jill Krol
on Jul 28, 2020
I am inspired, but not before next year. I've too many other projects first! This is a beautiful seating area. I really like it. I thought your instructions were easily understandable and I am a novice with few tools.
-
 Stephen Taylor
on Jul 28, 2020
Thanks, post a picture if you build it
-
-
-
 Tina Meisenhalder
on May 19, 2021
Oh well
-













Frequently asked questions
Have a question about this project?
How many pallets would I need to build this? We live on a trust on a bluff. I want to landscape the bluff so my eldercare folks and family can safely fish in the river below.
How about the math in English instead of mm. I maybe old, but please use English. Thank you
Is that a chicken in the last photo?