Put Together an Easy Modern Farmhouse Barn Door in Only 8 Steps

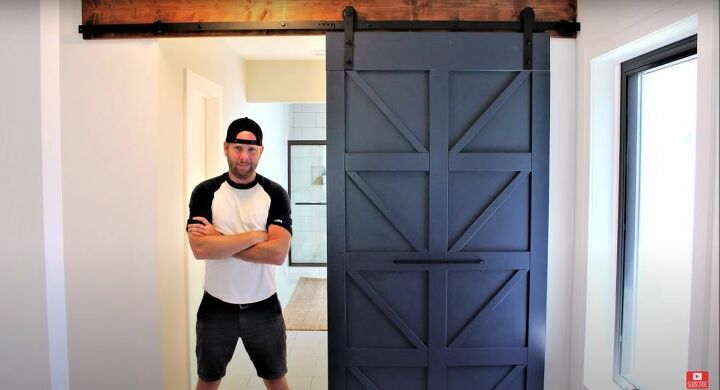
I’ve been slowly adding farmhouse touches to my home, and for a while I’d been wanting to try my hand at making my own sliding farmhouse door. Because I knew I wanted to paint it, I didn’t need to use wood for my door, and chose to work with MDF as it’s a bit lighter than plywood. This also cut down on the cost, and allowed me to make this door for only $80. Easy, quick, and cheap, what’s not to love? Let's learn how to build a barn door.
Tools and Materials:
- Four 1”x4” x8ft MDF board
- One 1”x8” x8ft MDF board
- Two 1”x2” x8ft MDF board
- One 4’x8’ sheet of ¾” MDF
- Circular saw
- Wood glue
- 1 ¼” trim head screws
- Drill and impact driver
- Miter saw
- Tape measure
- Wood filler
- Sanding block
- Paint
- Paintbrush
- Paint roller
- Barn door hardware
- Protective gear
Cut the MDF Boards
With all of my materials gathered, I needed to cut them to the right size for my barn door. Using the 1”x4” pieces, I cut them into three pieces that were 65 ½” long and six pieces that were 12 ¾” long. As always, measure twice, cut once. Make sure you have the proper measurements so that you don’t accidentally make the wrong cuts and have to run back to the store for more MDF board in the middle of a project. Then I took the 1”x8” board and cut it into two pieces that were each 36” long. I set the 1”x2” pieces aside for now.
Create the Backing for the Door
Next, I needed to measure and mark the board. I wanted to cut it down to 36”x80”. Once I had marked where I wanted to cut with a pencil, I took my circular saw and cut the board. This sheet will serve as the backing for the door, so if you need a different size door for your space, cut it to size.
Glue the MDF Boards to the Door
Taking one of the 1”x8” x36” pieces I had already cut, I applied some glue to the back of it. Make sure to apply just enough for it to stick without spurting out when you glue it on. Then I glued it flush to the short end of the MDF sheet.
Once in place, I secured it with trim head screws. I made sure that the screws were evenly placed, but we’re going to cover them up later so don’t worry too much about a lot of screws showing through on your farmhouse barn door.
With the top board in place, I moved on to the side. I took one of the 1”x4” x65 ½” MDF boards and glued it flush down the side of the MDF sheet. Then I secured it with trim head screws.
For the next step I had to find and mark the middle of my door. I measured down the side and found the center. Then I glued one of the 1”x4” x12 ¾” pieces right down the middle. As before, I secured it with trim head screws.
Next I found the midpoint between the piece I just glued down and the top of the door and repeated the previous process with another 1”x4” x12 ¾” piece of MDF board.
And then I did the same one last time on the bottom part of the door.
With one side of the board done, I started on the other side. First I attached one of the 1”x4” x65 ½” MDF boards down the center. Make sure that it’s flush against the boards that we just attached. Then I repeated the whole process again on the second side of the board.
And to finish off I attached the last 1”x8” x36” piece along the bottom of the door.
Add Cross Braces
Remember those two 1”x2” x8ft MDF boards we put aside at the beginning? Now we get to use them! I lay one of them across one of the squares on my newly created door. I made sure that one of the edges lined up with the corners of the square, and using a straight edge I marked where I needed to cut.
Then I matched up the angle of my miter saw to the lines I had marked and cut. Before making any more cuts, I checked to make sure that the piece I had cut fit snugly into the square on the door.
As always, Henry needed to give it his stamp of approval before I moved on to gluing and screwing it into place.
I cut seven more identical pieces, one for each square on the farmhouse barn door.
Fill in the Screw Holes
Now it was time to fill in all the screw holes I had made. Using my finger and some wood filler I applied a bit of wood filler and then smoothed it over. The color of the wood filler should be light, but it doesn’t have to match the MDF board because we’re going to paint the whole door when we’re done.
Sand
Once the wood filler had dried I lightly sanded the whole door. Make sure that nothing is poking out. It’s also important to make sure that there are no ragged edges along the door because you don’t want it snagging you as you walk through the doorway.
Paint
We’re almost done! I grabbed my paint and a paint roller and, starting with the back of the door, got to painting. I rolled on an even coat of paint.
Once the back and sides were dry, I flipped the door and painted the front. The paint roller worked well until I got to the inner corners of the cross braces.
To get into all of the nooks and crannies I used a regular paintbrush. Make sure you don’t leave any of the original color showing through. It helps to double check once the paint has dried for any areas that might need a touch up before you hang the door.
Hang
It was finally time to hang my beautiful farmhouse barn door. I followed the instructions from the barn door hardware kit I had bought online to hang it up. When doing this yourself, follow the instructions that come with the kit as each one may be a little different.
I’m simply obsessed with how the blue of the door contrasts with the beam it’s attached to. My goal was to make all my friends jealous and I think I easily achieved it! What color would you choose for your modern farmhouse barn door? Let me know in the comments below.
Enjoyed the project?
Comments
Join the conversation
-
-
 Pam Turley Lucido
on Apr 15, 2025
Awesome. Love it and thx for sharing.
-









Frequently asked questions
Have a question about this project?
Love this project. From what I'm seeing, MDF is almost twice as heavy as plywood but is less than half the price of plywood. What MDF did you use that weighed less than plywood? Thanks in advance.
What does the other side look like? The same or just flat backed?