Simple Epoxy Countertop

When I planned to finish the bathroom in my basement, I knew I didn’t want to spend a fortune considering this bathroom would rarely get used.
The vanity I wanted was $1200. There was no way I could justify that. So my solution was to put my DIY skills to use and build one myself.
Follow along with me, and I will show you how I did this epoxy countertop for less than $200
Materials needed
- 1” MDF 4x8 sheet
- 4L ecopoxy
- ecopoxy black pigment
- ecopoxy pigment -sandstone color
- ecopoxy white pigment
- stain blocking primer
- foam roller
- heat gun
- 3 paint sticks
Let’s get started - cut MDF to size
I cut my MDF to size. My countertop was going to be 5’ long x 21”deep. I cut two pieces this size and double stacked them and glued them together.
you do not need to double stack yours If you don’t want to. I did because I wanted to create the look of a thicker countertop.
I glued mine together and clamped them and allowed it to dry overnight.
Prime the MFD
I primed with two coats of Zinsser BIN stain blocking primer. Priming helps to seal the MDF and by priming you will get less air bubbles coming through when you do the actual epoxy flood coat.
Also, be sure your MDF sits level on your work surface, so when you pour your epoxy it doesn’t all run off one side.
Elevate your Countertop to allow the epoxy to run off and coat the sides. I used some 2x4 cut offs under mine.
Mix epoxy
For the size of my countertop, I needed just under 4L of epoxy. I used Ecopoxy. I poured 2L Of resin and 2L Of hardener into a plastic pail and mixed it up.
Be sure to measure exactly the same amount of part A (resin) and part B (Hardner) or your epoxy won’t cure properly.
Mix it together before adding pigment, so you can ensure it’s properly mixed. It will become crystal clear when it’s mixed fully.
Be sure to scrape the edges and bottom of the container while mixing. With my volume of epoxy, it took me about 7 minutes to mix.
Once it’s crystal clear, I added a few drops of white into it, and mixed thoughly.
For the lines on my counter I chose to use black and a sand color, I poured a small amount of epoxy into so small plastic dishes, and Mixed some pigment into them.
Pour the flood coat
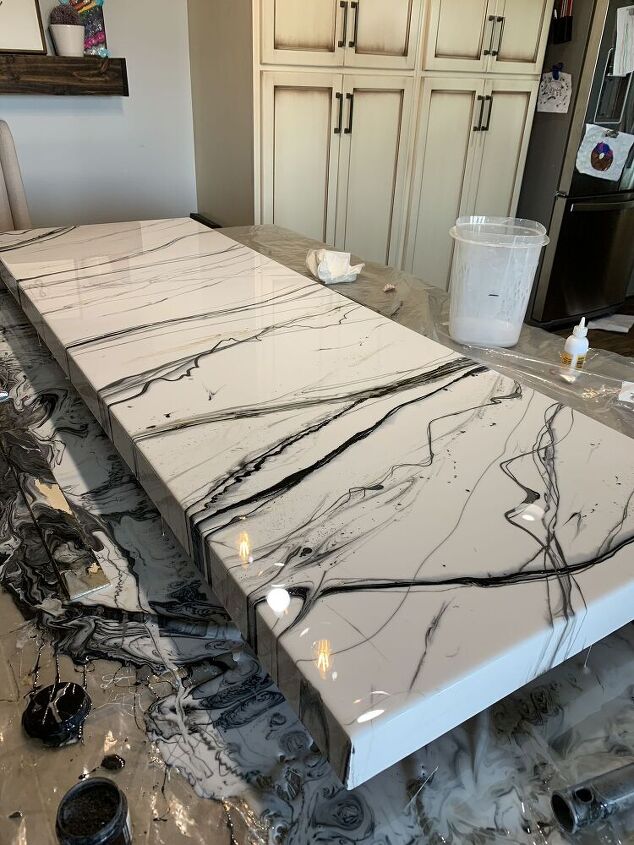
pour the white epoxy over the primed MDF. As you can see in the video I mixed the pigment in the small plastic dishes.
When your pour out the epoxy do not scrape the sides of the container to try get out every last drop. No matter how good you mix, there will always be some that stuck to the side that was not mixed and if you scrap the container you may end up with spots on your final piece that don’t fully cure.
Use your foam roller to spread out the epoxy. Once you have it all spread out, go over the entire piece with your heat gun to pop any air bubbles.
Add the detailed lines
Once your flood coat is on, let it sit for about 5-10 min before adding the detail, this will allow the epoxy to cure slightly and that way all your detailing you add won’t run off as much.
In the video you can see I did a combination of “splatters” with dry pigment on my paintbrush and line dips with my stir sticks.
The white epoxy will run off the edges. I simply dipped my stir stick into the white and color pigments and then moved it along over the countertop creating lines. Make sure when you do this you start and end off of the piece. Periodically use your heat gun to pop bubbles along the way.
Once you are happy with how it looks, check back on it for the next while and If you see any air bubbles come through pop them with your heat gun. I also scraped off the drips on the bottom as it cured.
There really is no wrong way to do this. However it ends up looking will be beautiful.
Leave this untouched for 24 hours to allow it to cure fully.
Stand back and admire your work
I absolutely love how this counter top turn out. This is the second one I have done and I can’t wait to do another.
if you have any questions please don’t hesitate to ask. I Will try my best to answer them.
Be sure to hit the follow button and also be sure to follow along with me on INSTAGRAM as well.
Cannot wait for our next DIY together
xo
Amber
Enjoyed the project?
Resources for this project:
See all materialsComments
Join the conversation
-
-
 Carolina's Art
on Jun 28, 2021
Wow!!! way to go!! Gorgeous!
-











Frequently asked questions
Have a question about this project?
Wow! Stunning! The whole bathroom is beautiful. Would you do this in a kitchen? How do you think it'll stand up over time?
Did you cut a hole for your sink ?
Absolutely beautiful would this be heat and cutting resistant for a kitchen?
how much do you charge to do that for me