Wicker-style Garden Obelisk From a Tomato Cage!

This craft is loaded with charm, sturdy and perfect for a garden that looks like something out of a fairy tale. And it started with an old tomato cage!
Materials: a tomato cage (ours was 42" tall), some 1/8th" wooden rods for the ribs/staves ( we used 36"), and fiber for the weaving … we used fiber rush which we were able to purchase from Amazon. We also used a bit of fabric glue. See the list below the next photo.
Tools you may need: A bucket of water, bolt cutters, fabric glue, clothes pins, twist ties, scissors, and a rubber band. If your cage is rusty, as was ours, you may want to wear gloves to protect your hands. Here we go! Ready to begin …
The tomato cage was 42" tall and was in good shape. For the weaving we used new fibre rush which came in a 210' coil and can be cut with ordinary scissors. We used approximately 150' for this craft.
Soak your rush fibre for about 30 minutes before weaving it and it will be easier to work with and dry nicely.
Here are the 1/8th" x 36" wooden rods that we purchased from Hobby Lobby for 30¢ each. Since our tomato cage was rusty, we used a baby wipe and brown chalk paint on them so that they would match. These also dried quickly.
Here's a little diagram of how to get started. We cut away the top ring of our cage with bolt cutters so that the obelisk would be more cone-shaped. You may not need to do this if your cage is naturally cone-shaped. We used a sturdy rubber band at the top, then tucked the rods under the rubber band, holding them in place on the middle ring with twist ties. The band and the ties are temporary until the weaving is complete.
You'll need an odd number of staves (or rods) so that your basket weaving will alternate front to back as you go around. We had a total of 13 staves. A total of nine or fifteen will also work for this craft.
We cut the fiber into about 10 foot lengths and coiled it so that it would be easy to weave around the staves. A simple slip knot will get you started.
Here we go around the middle ring first for about 18-20 rows. Slip knot the end of the cord to the middle ring and begin to weave around and around. Tuck in the ends of the cord whenever you start a new length. Alternate the cord front to back around the staves so that the finished weave will look like a basket pattern.
When we completed the center weaving, we used a few dabs of Aleene's Super Fabric Adhesive here and there to hold the work firmly in place. This product has "grab" to help hold things in place until dry. Push the weaving together, hold in place with a clothes pin as shown, then dab the glue here and there between the rows. The glue dries very fast. You could also use a bit of GE Silicone. Both glues are waterproof.
Here we were going around the bottom ring. Be extra careful that the staves don't pop out of place … they are free floating. We let ours overhang the ring a bit to keep them steady during the weaving process. We worked about 20 courses around this edge and secured it with a few dabs of Aleene's glue here and there for extra holding power.
You can see the clothes pin on the left above, holding the center weaving up while the dabs of glue dry. We wove the top of the cone, above right, until we couldn't fit the cord between the staves anymore, then wrapped the remainder and finished it with a rustic bow which was made from about 14" of cord. Trim the protruding metal legs of the cage to about 1 inch … so that they match the height of the wood staves.
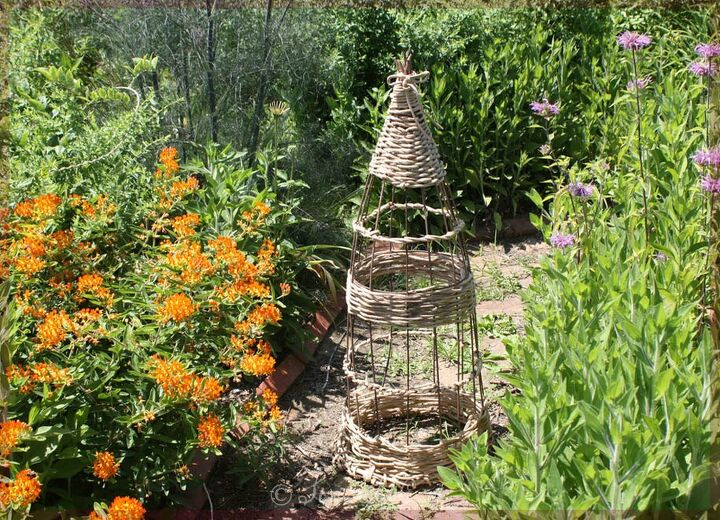
Here's a view of the finished obelisk showing how we wrapped extra fiber to make decorative rings to fill in the design. We also wrapped extra fiber around the bottom edge for a very rustic, but finished look. See the bottom edge in the next photo on the right.
And here it is! Ready to support small vines in a fairy tale garden. Good choices of small vines would be dwarf roses, dwarf clematis, or spring peas. To care for this obelisk, place it on a paver and bring it inside during harsh weather. Use it in a covered area. It can also be sprayed with a matte varnish for extra protection. V isit our blog for more rustic home and garden ideas, click here! -- Stephie
Enjoyed the project?
Resources for this project:
See all materials
Comments
Join the conversation
-
-
 Stephie McCarthy
on Jul 01, 2020
Thank you so much, E!
-
-
-
 Barbara Buchan
on Jul 09, 2023
I've found that the sprouts/suckers coming from my hazelnut trees make great rods for weaving, or even for hoops for natural fencing, or horizontal woven fences
-


Frequently asked questions
Have a question about this project?
Can a person paint fireplace brick?
Beautiful! Do you think this could be done with jute? Then maybe sprayed with a polyurethane of some sort for protection? I think I might try this. It would really add to my garden!
Can you put clear lights on it , or is that a no no ? 🙂