Makeup Organizer Idea: How to Build an Affordable Cosmetics Holder

Are you tired of your makeup cluttered all over the bathroom counter?
It's time to get organized and create your very own DIY makeup organizer. Not only will it help you keep your cosmetics in check, but it's also an excellent way to get creative with your bathroom accessories.
This post was transcribed by a member of the Hometalk editorial team from the original HometalkTV episode.
In this step-by-step guide, we'll show you how to make a DIY makeup organizer using affordable items from Dollar Tree.
Tools and Materials:
Hometalk may receive a small affiliate commission from purchases made via Amazon links in this article but at no cost to you.
Now, let's transform these simple items into a handy makeup organizer!
1. Tracing and Cutting the Chopping Boards
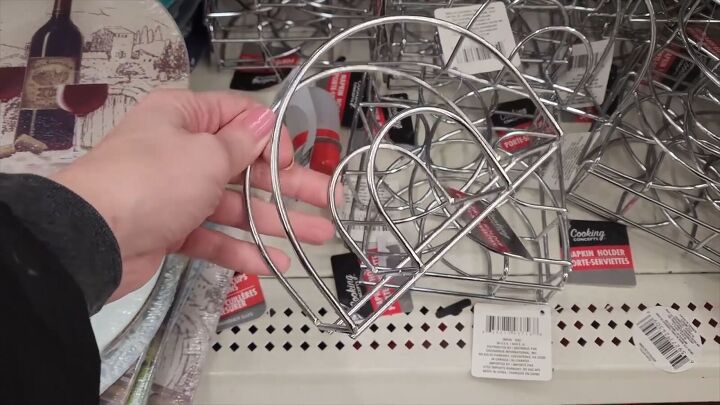
The first step is to create the makeup compartments. Take the plastic chopping boards and the chrome napkin holders.
Trace the napkin holder onto the chopping board. You'll need to do this four times to match the four napkin holders you have.
Once you've traced them, carefully cut out the half circles from the chopping boards.
2. Gluing the Chopping Board Pieces
Now, it's time to put everything together.
Use a powerful glue, like E6000, for this step.
Attach the pieces of the plastic chopping board to the sides of the chrome napkin holders. Make sure to use enough glue to secure them properly.
Let this dry completely before moving on to the next step.
3. Assemble the 2-Tier Makeup Holder
For a more efficient makeup organizer, we're going to create a 2-tiered setup.
Take two of the chrome napkin holders and glue them to the bottom of the paper towel holder.
Once that's dry, tilt it on its side and attach two more chrome napkin holders toward the top of the paper towel holder.
To keep everything steady while it dries, you can place a book or something similar to prevent it from rolling around.
4. Adding Zip Ties for Extra Security
Although the glue does a good job of securing your DIY Dollar Tree makeup organizer, a little extra security never hurts.
Use zip ties on the top two napkin holders to make sure that when you fill your organizer, it won't go anywhere.
5. Organize Your Makeup
With everything now securely in place, it's time to add your makeup. Place your most-used products, like nail polish and hand lotions, into your new makeup organizer. You can put it in your bathroom for easy access, making your morning routine a breeze.
More Homemade Organizers
DIY Tutorial: Makeup Organizer Idea
This homemade cosmetics holder is not only practical but also a fantastic addition to your bathroom. You can make your mornings more efficient while adding a touch of personality to your space.
What do you think of this DIY makeup organizer idea? Have you tried any similar projects? I'd love to hear your thoughts and experiences in the comments below!
Enjoyed the project?

Comments
Join the conversation
-
-
This is great! If you bent one side of the paper towel holder base and then just added two napkin holders to the unbent side, you could hang it on a wall. I'd have to do that to find a place for it in my tiny bathroom.
 Karen Barger Uhlich
on Oct 21, 2023
-











Frequently asked questions
Have a question about this project?