


How to Turn an Old Desk Into an Extra Large DIY Craft Desk
A DIY craft desk does not have to start with expensive furniture or a brand-new build.
This thrift flip turns an inexpensive secondhand desk into an extra-large workspace using the original cabinet sections and a new butcher block top.
This post was transcribed by a member of the Hometalk editorial team from the original HometalkTV episode.
Tools and Materials:
Secondhand desk
Disclosure: Hometalk may receive a small affiliate commission from purchases made via links in this article but at no cost to you.
Table of contents
1. Remove the Drawers and Back Panels
Desks like this often show up on places like Facebook Marketplace and usually cost very little. To begin the project, remove all the drawers from the desk and set them aside.

Next, carefully remove the wooden panels from the back of the desk with a hammer. Try not to break or crack them, because you will reuse them later in the project.

2. Take Off the Original Desk Top
The next step is removing the top of the desk. Use an extension for a drill to remove all the screws from the braces located inside the top section of the desk.

Once you remove the screws and braces, flip the desk back up. The top two pieces should come off easily after that.

3. Separate the Desk Into Two Cabinets
After removing the top, use a screwdriver to pry off the front molding. This helps open up the structure so you can separate the desk base.

Then use a jigsaw to cut the braces in the middle. Once the braces come off, the original desk turns into two separate cabinets that can support the longer desktop.

4. Prepare the New Butcher Block Top
To create a longer workspace, use a 74-inch-long by 25-inch-wide butcher block. This gives the finished desk much more surface area for crafting projects.
Sand the butcher block quickly with 220-grit sandpaper, then wipe it clean.
Apply two coats of polyurethane to both sides of the butcher block, sanding lightly between coats and allowing enough drying time for each side.

5. Measure and Attach the Cabinets
Before attaching the cabinets to the new tabletop, take careful measurements. Draw the measurements in pencil directly onto the butcher block so you know exactly where each cabinet should sit.

 Using a speed square simplifies this type of measuring and planning. This one is highly rated, comes in various size options and has 1/4" scribing notches.

SWANSON Tool Co S0101 7 Inch Speed Square, Blue
Place the braces into position on the cabinet, then flip the cabinet upside down onto the butcher block. Make sure the cabinet lines up with the pencil marks before tracing the internal braces.

Remove the cabinet, line up the braces with the marks, and pre-drill holes into the butcher block using the existing holes on the braces.

After drilling the holes, glue the braces in place on the cabinet with wood glue. Then position the cabinet back onto the butcher block, lining it up with all the markings again.

6. Reattach the Back Panels
Once the cabinets are attached, reattach the wood panels to the backs of the cabinets. Use a mix of the old staples, picture nails, and new staples to secure them.
This step brings the reused panels back into the design and helps the two cabinet sections look finished again.

7. Refresh the Paint and Hardware
Since the original desk color already works, get a color match at the hardware store and give everything a fresh coat of paint. This keeps the look consistent while making the old desk pieces feel cleaner and newer.

To update the knobs and handles, spruce them up with antique gold Rub ’n Buff. This small change gives the hardware a refreshed finish without replacing it.

Here's the product I used: Rub 'n Buff wax metallic finish in antique gold. This is a DIYer favorite with high reviews. It's easy to apply and get a gradual shine.

AMACO Rub n Buff Wax Metallic Finish - Rub n Buff Antique Gold 15ml Tube
8. Assemble the Finished Desk
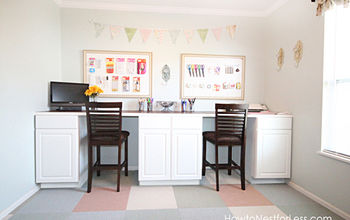
Once the paint dries, assemble the desk and set it up in place. The two cabinet sections support the long butcher block top, creating a much larger work surface than the original desk had.

Final Thoughts
The finished piece becomes an extra-large DIY craft desk made from a butcher block and an upcycled secondhand desk. This thrift flip creates a practical workspace that is perfect for crafting projects.
Looking for a beginner-friendly DIY? Try this simple cardboard hack to stop floppy grocery bags for good.


Frequently asked questions
Have a question about this project?