


Dollar Store Pot Holder DIYs You’ll Actually Use at Home
Wait until you see what you can make with dollar store pot holders. With just a few simple cuts, folds, and glue, these everyday items turn into practical and stylish home accessories.
This post was transcribed by a member of the Hometalk editorial team from the original HometalkTV episode.
Tools and materials
- Pot holders
- Scissors
- Hot glue gun
- Clothespins
- Placemat
- Twine
- Tea towel
- Pen or pencil
- Ruler
- Sewing needle or sewing machine
- Thread
- Button
- Keychain ring
Disclosure: Hometalk may receive a small affiliate commission from purchases made via links in this article but at no cost to you.
1. Remote control holder made from pot holders
I start by selecting three pot holders in rotating colors of black and taupe, placing them good side up. After cutting off all three looped hooks, I apply hot glue along the inside of one end pot holder and overlap the middle black pot holder over the glue.

I then position a black pot holder on top of the end one and move it down about an inch so the bottom has some foldable overhang.

Once everything is aligned, I flip all the pot holders over and apply hot glue to the overhang area. I fold the end up to create a clean edge and hold it until it sets.

Just like that, my new remote control holder is ready for business. I chose black and taupe because they look great with my home decor.

2. Easy pan handle protector
For this next project, I cut the loop off one taupe pot holder. I fold the pot holder in half and secure the shape temporarily with a clothespin. While the clothespin holds everything in place, I run hot glue underneath it and continue gluing all the way to the end of the edge.

After the glue dries, I take off the clothespin and the handle protector is finished. I can never complain about a pan handle being too hot ever again.

3. Mini work apron for crafting
I begin by dry fitting a pretty dollar store placemat good-side up. I place two coordinating pot holders side by side on top of the placemat.

Once I like the placement, I flip the placemat good-side down. I apply hot glue along the twine and then I fold the top edge of the placemat over into the glue and hold it in place until secure.

Next, I apply hot glue along the edge below both clothespins, making sure to leave the top edge unglued.

When everything is set, my mini work apron is ready to help me stay clean while I craft.

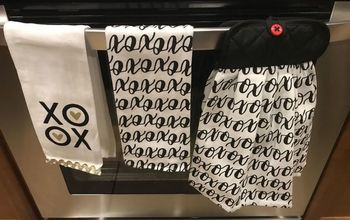
4. Hanging kitchen tea towel
To make a hanging tea towel, I place a coordinating pot holder with the pattern side facing up in the center of a pretty dollar store tea towel. I draw a middle horizontal line along the pot holder.

Then I sew a simple straight line along that mark.

Next, I fold the tea towel in half and sew a coordinating button to the top of the pot holder on the side without the loop.

Once finished, my new hanging kitchen tea towel looks stunning hanging on my kitchen stove handle.

5. Glasses holder with a pot holder
For the final project, I take a cute patterned pot holder and fold it in half, keeping the loop intact at one end. I run a line of hot glue along the open edge to close it, while leaving the top open.

When the glue sets, the result is a safe and cute glasses holder that can be attached to a keychain. The size is so perfect for glasses, you’d think a hot pad was invented for this very purpose!

I hope these DIY projects inspire you to pick up a few cute pot holders and see what you can make for your home. For more fun, home DIY projects, check out how to repurpose a bundt pan: 6 clever DIY ideas for home & garden.

Comments
Join the conversation
-
Very, very nice ideas and thank you for sharing :)


Frequently asked questions
Have a question about this project?