Adding a Second Water Line From a Refrigerator to a Coffee Maker

There is a small section of cabinets and countertop next to our refrigerator, the perfect place to create a drink station. Mostly filled with coffee supplies, it also has a basket with our bottle openers and some drink packets and such. The biggest annoyance I had with the drink station, is that in order to make the coffee, we had to pull the coffee maker all the way out to the front edge of the countertop in order to add the water and coffee grounds because of how low the upper cabinets are. We recently had to replace our coffee maker so I took the opportunity to get a slightly fancier one, where the area for the grinds swivels out instead of having to lift the lid up. The other issue was the water, so here is how I made our coffee making process super easy every morning!
Best fridge water line kit!
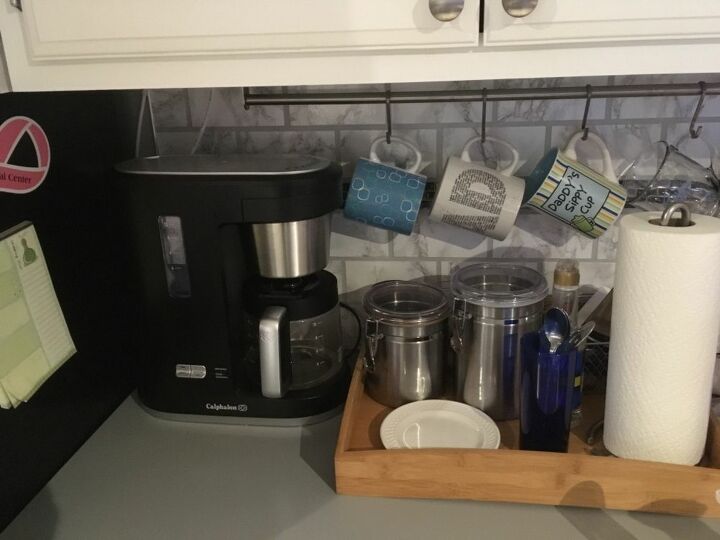
Here is our little drink station, right next to the refrigerator. Our sink is on the opposite side of the kitchen, so even though it isn’t particularly far to go to refill the water tank, it is a hassle to move the coffee maker back and forth on the countertop to be able to fill it.
So, I added in a second waterline, branched off of the line for our refrigerator.
***Before you read any further, please remember, I AM NOT A CERTIFIED PLUMBER! I am a home DIYer, so PLEASE ask a professional if you have concerns about your plumbing!***
This is what was originally running between the water supply and my refrigerator; a 10’, 1/4” hose. Most refrigerator supply lines (or ice maker supply) are either 1/4” or 3/8”. Please check the size of your water supply and refrigerator to see which size you need. If either is a different size, there are adapters you can purchase separately.
I found this kit online, (search for fridge water line kit) specifically designed to add in a second line to an existing one. This one in particular says it is for an R.O. system, but it also works for dividing the water from the fridge supply. Because my hardware was all 1/4”, I purchased the kit with all 1/4” tubing and hardware. Again, please check the sizes for your own equipment.
First step- shut off the water supply. You can also turn off the main supply to your house if you wish. Open up a sink or bath faucet to remove some of the extra water in the pipes. I also mostly emptied the fridge line by filling a glass with water from the fridge door.
In addition to the ice maker kit shown above, you will also need pliers or a wrench and something to cut the tubing. I also grabbed a bucket and towel, and needed another set of compression hardware (~$1 total for the three pieces), which I will explain more on later. I also wanted to attach my tubing to the wall and cabinet to keep it in place, so I bought a pack of 1/4” clamps (~$2 for 18).
The kit instructions shows you exactly how to set up the compression fittings. My kit came with one set (which I used to connect to the supply at the wall), and I had to buy an additional set to connect the tubing to the refrigerator. If you already have this type of tubing, you can ignore the next few steps and skip to placing the quick connect tee.
Starting at one end of the tubing slide on the nut first, then the sleeve, and finally the insert.
The sleeve and insert compress around the tube, and the nut will slide over the other two and attach to your supply. *You may also need to add threading tape here if your connection leaks after everything is put together.*
Decide how long you want the tubing to be from the wall to the refrigerator. My kit came with 20 feet of tubing, and I used 10 ft here so I could still easily pull my fridge out from the wall. It’s okay to have extra to trim down later, but you don’t want to cut it too short. You also want to make sure you have enough tubing to get from this line to your coffee maker.
Once you decide on length, make a clean, straight cut. After cutting, apply your second set of compression fittings to the end and attach to the refrigerator.
This is what my fridge connector looks like. I ran the tubing through the attached metal clamp on the fridge, and then attached the tubing to the water inlet.
Now decide where on your tubing you want to splice in your second line. I wanted mine fairly close to the wall supply end, but not so close that I could not move the T fitting around if needed. (This will make more sense later). My trick was to wrap a twist tie around the hose where I thought I might want to cut it so I could easily measure and adjust as needed.
Once you decide where to place the quick connect tee, cut the tubing and push each end into one section of the tee. In the third section, push in one end of the remaining bit of tubing. Gently pull out on each piece to make sure it is well attached, then apply the included locking clips to each connection. I used a clamp here to attach the tubing to the wall directly above the water supply box.
Decide where your shut off valve should go and cut the tubing for the tee-to-valve section and the valve-to-coffee maker section. Push in the tubing ends and apply locking clips. **If you need to remove the connectors for any reason, remove the locking clips and push in the outermost section of the connector while pulling the tubing out. You can remove and reinsert as needed.**
I used masking tape to hold the tubing up while I added the clamps to hold the tubing in place along the wall and under my cabinets.
Our valve was fastened underneath the top cabinets, directly above our coffee maker. You want the valve somewhere easy for you to get to, but not where it can be accidentally bumped.
Now you can feed the remaining end of the tubing into the water reservoir of your coffee maker. Ours fit perfectly in the overflow hole. How you feed yours will depend on your individual machine. I have seen some people carefully drill a hole just big enough for the tubing in the lid of the reservoir.
Learn how to clean a Nespresso machine here.
When it is time to fill the reservoir, we simply turn the valve until the water reaches the desired level, then shut off the valve, add grounds, and start brewing! It is so nice not having to be particularly coordinated right after rolling out of bed! 😁
Recap and cost breakdown:
-Fridge/ice maker water line kit ($10-15 depending on brand and where purchased)
-Additional set of 1/4” compression fittings (insert, sleeve, and nut; totals about $1)
-1/4” cable clamps ($2 for a large pack)
_________________
$15-20 and about an hour of your time!











Frequently asked questions
Have a question about this project?