How to Easily Create Gorgeous Mosaic Walls

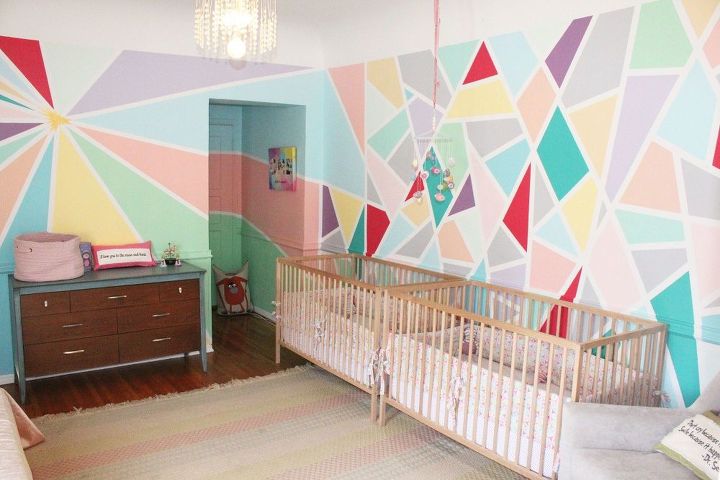
There is something very modern and funky about unique geometric patterns. They are not only the perfect paint treatment to add depth, dimension, and pattern to a statement wall but can make a nursery look absolutely delightful.
There is no right or wrong way to do this project and that is what I loved from the beginning. I was able to create the pattern for our nursery as I worked and didn’t have to worry about doing something wrong. I also loved that by creating this geometric pattern in the nursery it not only looked great now but would work in the room as the girls grow.
Tools and Materials
- Small paint pots (twelve colors)
- Paintbrushes (1" or chip brushes)
- Low tack painter's tape
- Utility knife
- Lint free cloth
- Dish
- Water
Tape the Walls
To start creating the pattern for the nursery walls the first thing I did was tape off large areas that would eventually make the smaller geometric shapes. I began working at the top of the walls and worked down creating slanted lines with the low tack painter's tape.
We varied the pattern for each wall but tried to run the patterns from wall to wall in order to create continuity and flow.
Create Smaller Shapes
Once the large slanted lines were all taped off, I wanted to create smaller shapes. I used the same low tack tape to then divide and break up the larger shapes. This can be completely random and again, there is no right or wrong. I just kept dividing the large shapes until I liked the design I had created.
The best part about using the painter’s tape is that if you end up not liking a shape, you can easily peel it off and reapply it in a different direction until you get what you like.
Create Pinwheels and Starbursts
To give each of the walls a different feel, we decided to create pinwheels on one and starbursts on another. We wanted the pinwheels to feel like they had a 3D effect so varied the width and thickness of the outside edges.
Creating the varied thickness was easy by adding additional layers of tape until the edges were the width we wanted. Once they looked good, we used a utility knife to clean up the edges of the tape so that they were all straight and even.
To create a large starburst on another wall we picked a focal point and then ran lines of tape away from the center. The tape lines will start out close together at the center and will be far apart at the outer edges.
Paint the Shapes
Before painting the room, don’t forget that the tape needs to be sealed. Painters tape is designed to keep your painted edges neat and clean, so you don’t want the paint to leak under it. In order to seal the edges, dip a cloth in a bowl of clean water and ring it out. Run the damp cloth over all of the edges of the low tack tape and allow it to dry.
With the taping finished, it was finally time to paint! I chose to use 12 different light shades of paint, but you could use as many as you think work in your space. I would recommend the colors all be of the same shade though so that there is some uniformity to the design when you are done.
For ease of use, I also used 12 different chip brushes so that I didn’t have to clean them in between each color.
I began the painting process by dabbing the color I thought I wanted in each of the shapes. This allowed me to get a general feel for the pattern and colors before filling it completely in. If you decide you don’t like a color where you have placed it, you can easily paint over your dab with a little white paint, allow it to dry and then try again.
Once you have the pattern the way you like, give each shape two coats of paint being careful to keep each color in its assigned shape.
Peel off the Tape
I allowed the walls to dry overnight and then once they were completely dry to the touch began peeling the painters tape. I carefully peeled the tape in sections until it was all off.
If you did happen to get any bleed through under the tape, you can use a small artist brush to cover it up with the paint you used on the base coat of your wall.
That’s it!
Here's how the pinwheels came out! Cute, right?
The combination of all the patterns is so bright and fun!
For the cost of 12 small pots of paint and several rolls of painter’s tape, I was able to create gorgeous, unique walls that my girls can enjoy for years to come.
Enjoyed the project?
Resources for this project:
See all materialsComments
Join the conversation
-
-
 Robyn Garner
on Mar 17, 2021
Your twins are going to LOVE this wall! Plus, you've given them some great colors and shapes to name as they grow.

-
-











Frequently asked questions
Have a question about this project?
My kids room was painted purple elastomeric paint and finished it with acrylic emulsion,what kind of paint suitable for my kids room to create like yours?
Are those pentagrams painted in a babies room?
How to clean pot brun on the outside