How to Build a Backyard Waterfall up a Slope

Greatest Mother's Day present ever -- was building a waterfall in our backyard together with my son. Thanks also go to another older son who contributed a few heavier rocks as well, and my hubby who was in charge of hooking up the plumbing aspects and critiquing as we went along.
We now have something beautiful that we all did together to enjoy for many years to come. Here's how the project developed with most of the back-breaking labor handled over a long weekend.
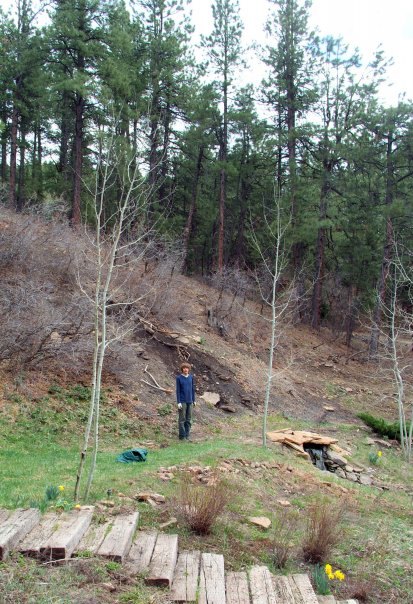
Here's the site with my son Mike in front. He's 6' tall, the fall will be 22' total length with a 6' basin pond below for the circulating water.
Here's what the fall will connect to. A koi pond we built a few years back and established with aspen trees, cotoneaster, water lilies and irises.
I want the falls to look like they sprang up out of nature to cascade into the pond below.
Step 1 Dig it out. Determine a natural flow that works with gravity and nature. Dig full length, one to three feet deep into the hillside. 22' long, roughly 10' high, plus 2' deep x 6' ellipse basin. Took me about five hours to dig.
Step 2 Create a strong skeleton. Contour a Stair-stepping foundation for the stone work and cascades. I used cement block where two 30" drops will be: one at top, one at basin. Landscape timbers used for ten stair-step drops of 9" to 18"
Timbers to the side show where ground terracing will be.
Treated lumber and cement blocks used for this foundation, then filled in with the surrounding dirt.
Side view shows how the staircase foundation has a natural flow to it.
Step 3 Put an underlayment over the groundwork. This prevents the stones from damaging the rubber liner.
Underliner clearly shows the full area for the new waterfall. This padding goes over the dirt, blocks and rock and under the rubber liner.
P.S.: After I took this pic, Rich talked me into extending the basin with a 6' creek between the falls instead of going "pondless" A bit more digging, but now the final result appears to connect the top fall to the older pond with a creek. A good call!
Look it up -- "pondless" -- creating a deep basin for circulating the water, rather than an open pond -- and decide which works best for you.
Step 4 Roll out the rubber liner -- overtop full length and up over the basin wall.
Step 5 Rock it in. Use rocks to encourage flow and drops. I also leave plenty of excess with the rubber liner to ensure that water flows away from the sides so it is not wasted or blown in the wind. Not everyone does that -- they seem to prefer flatter surface areas and let the rocks provide the direction.
Step 6 Bury the pipe used to connect the pump to the waterfall at the top. You can see the pipe on the mid to lower left-hand side. I just ran it alongside the stream up the hillside and covered up the rest of it with dirt and rocks.
Step 6 Test the water flow & tweak your rock design. Arrange the rocks to maximize flow while you check for leaky corners or edges. You may need to add more dirt or rocks around outside wall to ensure that your steps are water-tight and secure. Watch also for creating too much wasteful splash. Mix in pebbles. Even small elements will direct water in big ways. I also integrate logs and driftwood into the design to ensure a very natural spontaneous look.
Step 7 Add plants. You can see I started adding them in Step 6 when I was building up my dirt to secure the rock wall. Junipers, irises, lilies, ground covers. View with rocked in mini-pond and plants added.
This shows the view dropping into the connecting mini-pond which is where our pump in stored.
We chose to naturalize the waterfall at the top so that it really looks like water is just trickling from the top of the hillside.
If you stand at the top... here's what it looks like looking over and toward the larger old pond below.
SO COOL!
Side view from basin a month later with lilies integrated into the natural landscape. I'll add some pics in the comments section showing how this area has matured.
I can assure you that this water feature has lasted for many years now without a leak of a bit of trouble. (Even after a bear adopted it as a staircase to the coal mine above!) We turn it off when below freezing in the winter and back on in the spring through fall, whenever we want to enjoy it. Just as Mother Nature does with the natural waterfalls in our area after snow-melts and big rains.
The larger pond with fish, below this waterfall feature, circulates water 24/7 x 365.
You can find details on how that was constructed with a tribute to my landscape helper on this youtube video.
https://www.youtube.com/watch?v=RHY9J9WQ094
SUPPLIER INFO:
http://www.halfoffponds.com/Default.asp
I worked with Andrew at halfoffponds.com
Enjoyed the project?
Comments
Join the conversation
-
 Adele Kurtz
on Jun 25, 2019
Definitely worth it for us as the entire water feature has become the most important aspect of our property. If I couldn't have waterfront property -- then we brought the water TO our property ;)
-
-
 Julia Hocking
on Jan 16, 2021
I love this! Thanks for posting so much detail. I'm in Australia and planning to do something very similar (but without the bears) so this is great inspiration for our project!
-
















Frequently asked questions
Have a question about this project?
What if “you had a bad storm an lots of rain, won’t this flood the back yard , or is the water hole deep enough to hold all that water 💦, I would love to install this gorgeous falls.🤗
What size pump did you use? Absolutely stunning!
What's the distance from top of waterfall down to the pond. I am working on building a 20×20 pond but i have a steep slop on the side of my house leading down to the backyard where i will be building the pond, and i was looking for some ideas because i want to use the slope to build a waterfall and this design is kind of what i have in mind. Does the liner comes with the underlayer? Nice work. I attached a couple pics, in need of some ideas. Thanks