DIY Wine Barrel Market Light Posts (with ABS Pipe)

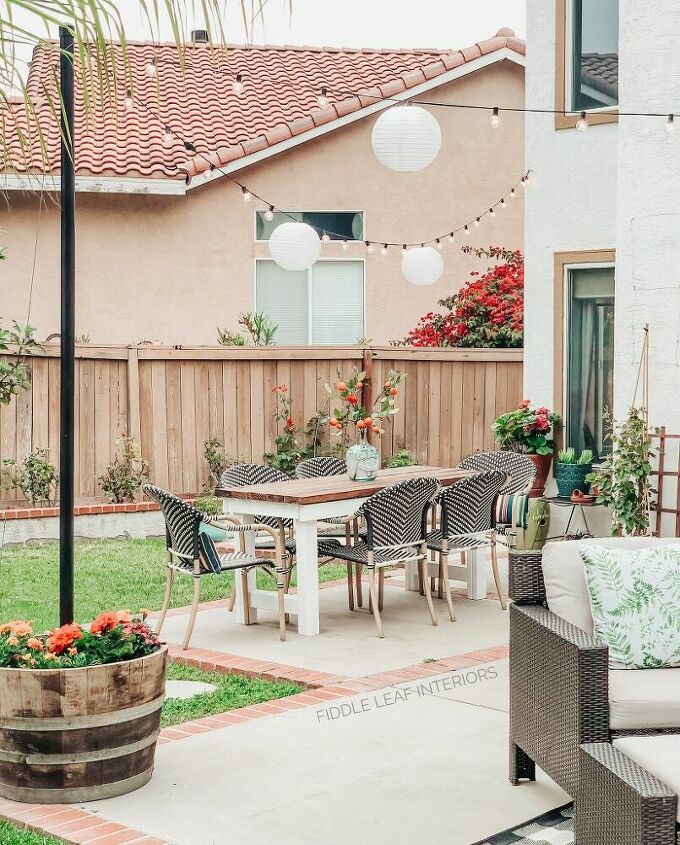
Hello friends! While we may be quarantining it up right now, that doesn’t mean that Spring isn’t in the air. And that means summer is just around the corner. Here at the Fiddle Leaf House, we spend so many days and evenings out on our patio as the weather gets warmer, so adding some light and ambiance was key! If you can believe it, these wine barrel market light posts were our very FIRST DIY in this home when we moved in 3 years ago! I wasn’t blogging back then, so I didn’t take any photos. But when we replaced our original faux wine barrels for real ones this past summer, I took a few photos of the process for you! I hope you'll visit me on my blog for more fun projects!This is a GREAT quarantine project because you can order materials online and then try out your local hardware stores curbside pickup for the bigger things, like the whiskey barrels, dirt, and plants. Many local nurseries are also doing local delivery right now too. And of course, if you’re reading this after quarantine life is over, then all you have to do is make a quick run to your local hardware store to pick up everything you need!
EDIT: Little did I know, this is ABS pipe not PVC pipe. Thanks for the correction. On that note, we have had no issues with it bending over time due to the heavy gauge wire in place. We have made small adjustments on one occasion. As a reader noted, you can seal PVC pipe to protect it from the sun - I would still spray with spray paint as I did here and then add a clear top coat as well.
Hometalk Recommends!
Quickly, before we get started, let me say this. I have seen similar projects done in many different ways, the most common being using wood posts that are attached to the bottom of the barrels. Let me tell you WHY we did this project differently. Over time, your barrels WILL rot – they are wood, and it’s inevitable. Same with any wooden post – over time, the post will give out. Sure, it might be several years, but how annoying to have to completely remake the entire project. And what a waste too if only the post or only the barrel is rotting! The way we did it, with the ABS pipe inside of a bucket, you don’t have to worry about this. First, the ABS pipe is plastic, so you don’t have to worry about rot. And when your wine barrels eventually rot (we predict the genuine ones will last 4-5 years), all you have to do is remove the plants/dirt, pull out your buckets/pipes, and place them into new wine barrels. Replant, adjust your heavy gauge wire, and you’re good to go. We had to do this process last summer as I mentioned because our faux barrels rotted, and the original project time was cut in less than half!
This step is easier with 2 people. Cap one end of your ABS pipe. (Edited: We used 2" ABS pipe and caps). Mix up your quick set concrete. While one person holds the ABS pipe in the middle of the bucket, the other person should pour the concrete. You’ll have to stand holding the pipe for about 10-15 minutes, but with quick set concrete, it shouldn’t take too long before it has hardened enough to let go. Repeat for however many barrels you are making. You see dirt on top of the concrete here because we had just pulled it out of the original wine barrel.
Once the concrete has set up enough for you to move the bucket/pipe, do so. Move to an open area where it won’t matter if you get spray paint in the surrounding air. Before painting, screw your cup hook into the top of the ABS pipe and secure with super glue. Give the super glue about 10 minutes to set up, and then spray paint your ABS pipe/cap black. We only did this because ABS pipes generally come with writing on them, which we didn’t want to see, and I overall wanted a more sleek look. It also adds a bit of weather protection for the pipe, and the paint hasn't faded at all in the past 3 years. Allow to dry.
While your paint dries, you can prepare you wine barrels. Using standard black garbage bags, line the inside of your barrels about 1/3 of the way up. We did this to help prevent rot at the bottom. However, you still need a place for water to escape, especially during those crazy winter rains! So drill several holes in the middle of the sides of the barrel. We drilled about 8 per barrel, most of which are on the backside facing into the grass. We did this so we don’t have dirty water spilling onto our patio all the time!
Once your ABS pipes are dry, place your bucket and pipe in the center of the wine barrel.
Attach your market lights by placing them in the cup hook at the top. Here, you can see our lights are attached to the outside of the house as well. You don’t HAVE to do this. You could always make 3-4 of these wine barrel market light posts and connect your market lights in a big triangle or square without having to worry about drilling into the side or your house.You’ll notice here that the ABS pipe isn’t straight – dont worry, we’ll fix that in a minute!
Fill your wine barrel up with potting soil, leaving about 3 inches at the top. OPTIONAL: Before adding dirt, you can prop your barrels up on risers, which will also help prevent rot. This is helpful if you live in a particularly wet climate.
Wrap your heavy gauge wire around the top part of the ABS pipe, above your cup hook. Use one of your stainless steel wire clamps to secure tightly. Cut off any excess wire, so that you have one short end and one long tail of wire.Now screw another cup hook INTO the inside of your wine barrel, open side facing down.
This step is easier with 2 people. Pull your long tail of wire down and through the cup hook you just drilled into the inside of the wine barrel. Pull tightly to the point where your ABS pipe is standing up straight. There will be pressure on the pipe because your market lights are pulling on it. This wire is being installed to counter-balance that pull of the market lights. Secure the bottom of the wire with your second stainless steel wire clamp. Leave about 2-3 inches of excess wire, and then trim. After many months or various weather (especially wind) you will occasionally need to adjust your wire to pull the ABS pipe back into place. You will always make that adjustment at the clamp inside the wine barrel, not at the top. Having a couple of inches of wire at the bottom will help make any future adjustments easier.
I have added a diagram here (forgive the poor drawing) to try to help explain the cup hook and wire installation.
Add a bit more dirt to cover the wire/clamp. Plant your barrels with whatever you like and give them a good water! We replant ours every Spring, and I enjoy getting to swap out the flowers for a different look each year!
Wait for dusk and then turn those babies on! Instant ambiance and pretty flowers to go with it! OPTIONAL: Tie paper lanterns to your lights for some extra ambiance! You can add these just for a special occasion, or in warmer drier parts of the year, they can last up to 3 months without taking them down,
I hope these help you enjoy your outdoor space just a little bit more! Comment below if you make your own wine barrel market light posts – I’d love to hear about it! And I hope to see you over on the blog soon! (P.S. cost estimate is for two of these and not including power tools)
Enjoyed the project?
Resources for this project:
See all materials
Comments
Join the conversation
-
 Jill Cmc
on Dec 29, 2021
@Comet I've never thought about using the half wine barrel for a fountain. I love that idea! I have some antique watering cans with spouts and I think I'll make a fountain with that and get another wine barrel. Thanks a bunch for sharing that. I'm not surprised that yours has lasted 20 years.
-
-
 Cara Larey
on Aug 27, 2025
ABS pipe + bucket = swap barrels, not the whole post.
-











Frequently asked questions
Have a question about this project?
Would this be sturdy enough to hold a fabric sun shade?
$135 for one wine barrel! This is way out of my budget. Any ideas on where you can get a couple of reasonably priced wine barrels?
How long are these pvc pipes?