Stacked Planter Fountain

The inspiration for this project came from one of my favorite people, my Mom. She has her back porch set up perfected, a covered gazebo, beautiful green grass, an oasis of a garden with an included water feature surrounded by lush floral and evergreens. Shes even painted her concrete slab to look like over sized terracotta tiles... Creativity runs in my blood, I'm convinced.
I have really been trying to create a back yard space that we want to be in. We have almost an acre fenced out back and so far the only thing we have done with it is occupy it with my pet chickens. They have a 10x14 foot coop off the the side of my backyard and are now contained to one corner of the space with a fenced off run, don't worry, they have more than enough room, and I will likely be doing a tutorial on their upgraded fence soon! If any of you own chickens, you know containment is the only hope you have for any kind of garden bed. So now that these landscape destroyers are contained I can finally create the beautiful backyard I've been dreaming of since I bought my home in 2015!
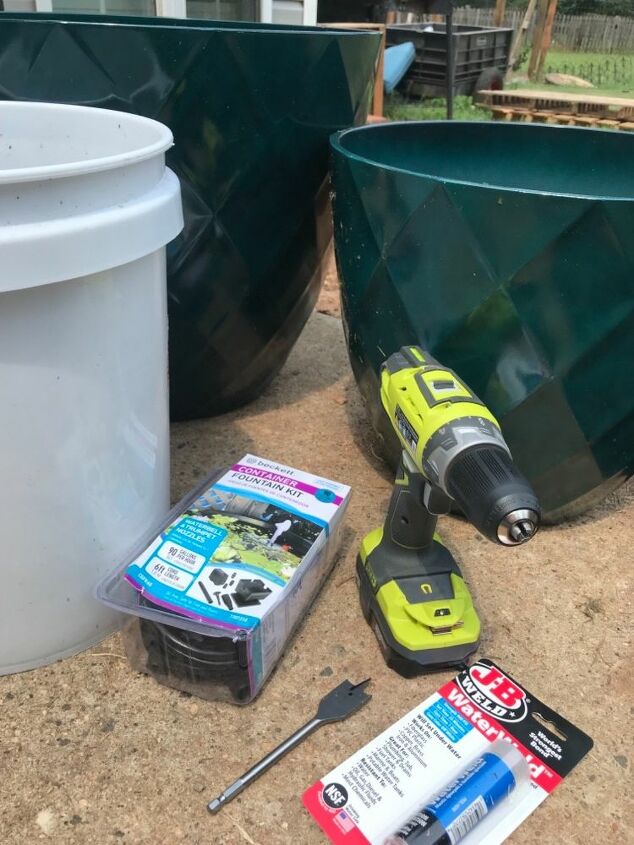
I started researching fountains, and OH MY are they pricey! I wanted something on the larger scale to really be the focal point of my patio transformation, but most in my price range were tiny, like the kind you may sit in the middle of a patio side table.... I thought I may have to put my fountain on the back burner and save for the one I really wanted. I was searching pinterest for other ideas, decorative planters and so forth when inspiration struck! A stacked flower pot fountain! There were a couple posts on pinterest about assembling one on your own but nothing that really fit the bill. I wanted it as simple, yet, substaintal as possible! Here is what I collected for this project:
Best fountain pump!
Supplies:
-2 larger resin (or really whatever type pot you have, or purchase, you want 2 different sizes ideally, mine were 20" and 16" and came from walmart on clearance and for the 2 of them cost me around $25!)
-5 gallon bucket, or large pot to hold up the top pot
-Fountain pump- mine came from home depot, but they also have them at lowes and on amazon.
Hole drill bit and drill if your pot doesnt have a large drainage hole your cord can fit through
-Any type of water proof sealer- I just JB Weld made for boats, also from Home Depot
-an extension cord, if needed to reach your outlet, make sure its rated for outdoor use
-any large rocks you have laying around, or you can purchase these as well
-plants of choice- I chose Creeping Jenny for a nice contrast with my teal pots
Best natural weed killer!
Start by preparing your space for the garden, this was probably the most challenging part of this whole project for me, these weeds made themselves at home and it really was a battle to kill them! Once all your weeds are killed, level the spot where your fountain will sit. I set mine on top of a stepping stone I had laying around because this spot in our yard was very rocky and I couln't get the pot to sit level without it.
Weed free and ready to go! I actually left the stepping stone exactly where it was and put black weed barrier right over the top so I didn't risk it not being level once i moved it! AND leaving it under meant I wouldn't have to worry about it peaking through the mulch once everything was all said and done! Once your loaction is ready its time to start working on the fountain itself! YAY!
Start by dry fitting your fountain, I placed my 5 gallon bucket upside down inside my large pot, then set the smaller pot on top of the bucket, I tested my pump at this point to make sure it worked, you will want to do this before you assemble, once you caulk the cord to the pot, you wont be able to return the pump if for whatever reason it isnt working. Drill a hole in each pot, I placed my hole in the bottom toward one edge so it would be hidden completely once its in place, and also, if I want to dissemble and just use the planters at a later time they don't have huge holes in the side of them... But this step is really whatever is easier for you. Now its time to attach the pump and seal the hole! To seal the hole I used JB Weld WaterWeld, honestly becuase its what the guy at Home Depot reccommended, but this stuff is great!
Feed your cord through the hole, give yourself some slack on the cord so you can center your pump once its all assembled, mix your putty as directed and seal the hole and cord together, I really globbed it on there, haha. I've never used this product before and it was so easy! And dries in 1 hour! That's perfect for this impatient DIYer, like myself.
10 out of 10 reccommend! This stuff is so easy to use!!
Once the product has dried, position the pump, I ended up centering it and then surrounded it with rocks from my yard to keep it in its place, I did have to go back in once I filled the fountain and tweek the position a bit once the fountain was on, it was leaning to one side, but it wasn't hard, and honestly, as hot as it is here in Georgia in Mid-August, it was pretty refreshing to play in the water! Haha
Almost there guys! Fountain is in place! Cord is coming out the bottom of the top pot and runs down the bucket to the hole in the bottom pot! I purchased a drop cord for outdoor use since the pump cord was not long enough, make sure you buy a cord rated for outdoor if you need an extension cord! Next step is just planting the plants! I used a good amount of rock in the bottom pot before filling it the remainder of the way with potting soil, this will act as drainage for the plants as well as weight to keep your fountain stable! Don't skimp on this part! We don't want that beauty to blow or get knocked over! Now, get to planting! You can use whatever plants you like!
My little buddy approves! I have Creeping Jenny planted in the pot, and just love this color pop, and little did I know this plant also gets small yellow flowers! What a happy surprise!
I'm so pleased with how this all came together! In this photo you have 2 dipladenia on the right and left of the fountain, and a balloon plant out front. I also used a few different varieties of annuals for color!
How relaxing! This makes the best sounds! Let me know if you guys build your own! Follow me over on instagram @redstusticworkshop for sneak peaks on upcoming tutorials!
Thanks for stopping by!
More Gorgeous Garden Projects
Enjoyed the project?
Resources for this project:
See all materialsComments
Join the conversation
-
 Mar132144202
on Oct 15, 2024
Use a solar powered fountain, I use one in my bird bath and No Cords to worry about! ☺️
-
 Rae157281244
on May 04, 2025
Great idea… Sun is always FREE!! Can’t go wrong!! Thanks!!🌞
-
-
-
 Emily Harris
on May 18, 2025
Wow, I absolutely love this project! I’m currently working on a similar transformation in my own yard (and yes, I also had to battle stubborn weeds first). Before laying down my black fabric and mulch, I used a product from Scotts, it worked wonders, though I do recommend reading reviews first to find the best fit for your soil type. Your stacked planter fountain turned out beautifully, and I’m totally inspired to try one now.
-










Frequently asked questions
Have a question about this project?
How do you hide the cord / extension/cord.
How to clean a shower
Love this! Do you use anything in the fountain water to prevent algae/bacterial growth?