How To Make A Gorgeous Garden Gazing Ball With These Easy Tips

I had been wanting to make a garden gazing globe for a long time. There are so many wonderful examples on Pinterest and here on Hometalk. I am the kind of person that likes to figure out how to do things on my own by doing all kinds of research and through a lot of trial and error. After making a matching set of three garden gazing balls I am sharing with you my tips to keep it inexpensive, easy to do and end up with a gorgeous décor item for the garden.
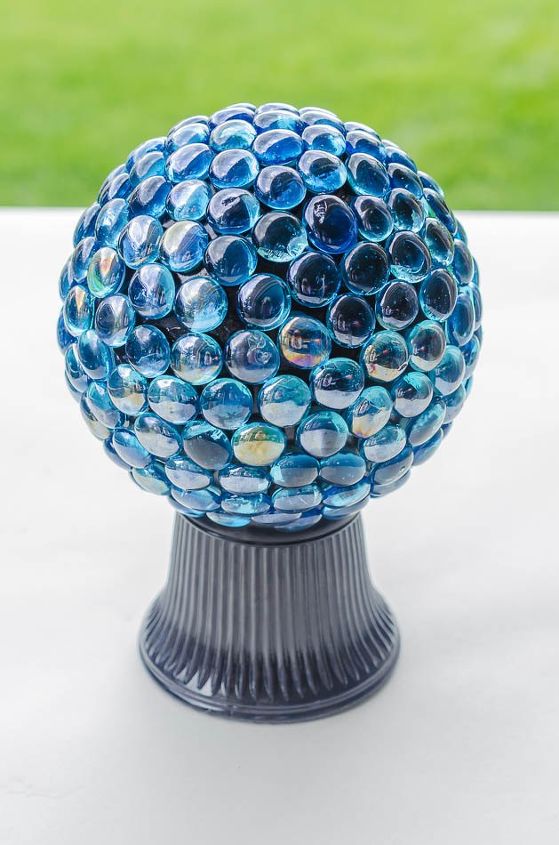
I love how the black base complements the blue turquoise glass gems!
Buy Used At The Thrift Store
In the small town I live in we have a thrift store that only carries home building supplies. Builders and home renovators can drop off the surplus or gently used home items. The shop sells the donated items and after expenses all of the profits go back into the community to help qualifying residents with affordable housing. This venture also keeps a lot of stuff out of the landfill site and is filled with all kinds of treasures! This is where I found the globe lights and lights designed for chandelier hanging lights that I used as the base for the gazing ball. The pretty turquoise glass gems were purchased at the dollar store.
Use Materials Specifically Designed For Outdoors
When I glued the globe light and the chandelier light together I used a multi-purpose glue that also was designed for outdoor use. I also used a clear silicone to glue the glass gems that came in a tube much like a tube of toothpaste that was specifically designed for the outdoors.
Apply A Spray Primer First
Before applying the black gloss paint I applied a spray primer first. This step makes it easier for the paint to adhere to the glass surface. Both the primer and paint also helped secure the globe and chandelier light together.
Apply Glass Gems In Sections
This is not a project that can be completed in one session. If you apply all of the glass gems at once you will be dealing with a lot of slipping and sliding. Start at the top of the ball. Apply one glass gem in the middle and one ring of glass gems around the centre one. Then stop and go do something else for a couple of hours so the silicone on these first glass gems can set. Come back and apply another ring or two. Go do something else so this next section can dry. Keep following this procedure. It is slow in the beginning but once you get towards the end it will go a lot faster.
More Glass Gem Ideas
Use Blue Painter’s Tape
The blue painter’s tape has two helping jobs. It helps to stop the newly applied glass gems from shifting as you are working down the curved surface. Just remove the painter’s tape as each section dries.
It also works as a great little stand when you invert the gazing ball and start applying gems to the bottom area.
Keep It Neat
All you need is a little dab of silicone per glass gem for it to adhere to the glass. I prefer to apply this little dab to the flat side of each one and then stick each one onto the globe light. This is compared to smearing the silicone directly onto the globe and then sticking the glass gems onto the silicone. When the silicone dries it will be transparent. If you apply the silicone directly on the globe light first it will be invisible but the exposed surface areas will have a bumpy look and feel.
The last tip is to find a special place in the garden for your newly made garden gazing ball. I placed my set of three in the same garden bed! I have to admit they look really pretty when the sun shines on the glass gems!
For more photographs and detailed information I invite you to visit the original blog post.
Take Care,
Thea
Enjoyed the project?
Resources for this project:
See all materials
Comments
Join the conversation
-
 Ann57600157
on Jul 08, 2023
I think this could also be done with something like a glass canister with a lid and put battery operated fairy lights inside. Might not be an actual globe shape but could be very pretty on an outdoor table. Definitely many options and possibilities.
-
-
 Gilmer Gal
on May 16, 2025
Just saw this! I'm going to Habitat. They have tons of globes. Thanks for the inspiration to make a regular globe into a work of art!!
-











Frequently asked questions
Have a question about this project?
How and where do you apply the painters tape to keep them from slipping down? I see a picture of how to use it as a stand but not the other way.
What about spray painting with metallic paint?
Thanks for sharing great tips! I'm excited to try this project, especially since I have many things to do in my garden to spruce it up. Your guide makes it seem manageable and fun. On a related note, I’m considering finishing the ball with a protective coating to improve its durability and shine. Has anyone used TWP Stain for this kind of project? I’m curious about any reviews of TWP Stain customer service and their product effectiveness for outdoor art. It’s always good to hear others' experiences before starting something new.