How To Fix Broken Canvas On A Porch Swing

by
Maura White
(IC: blogger)
3 Materials
$30
2 Hours
Easy
I've recently been brainstorming on how to fix broken canvas on a porch swing. We've had this porch swing for 8 years now. It was something I begged my husband for right after my oldest daughter was born. I wanted something to sit in and rock my newborn while I enjoyed the summer weather. My husband brought home this one at a great price from Bargain Outlet.
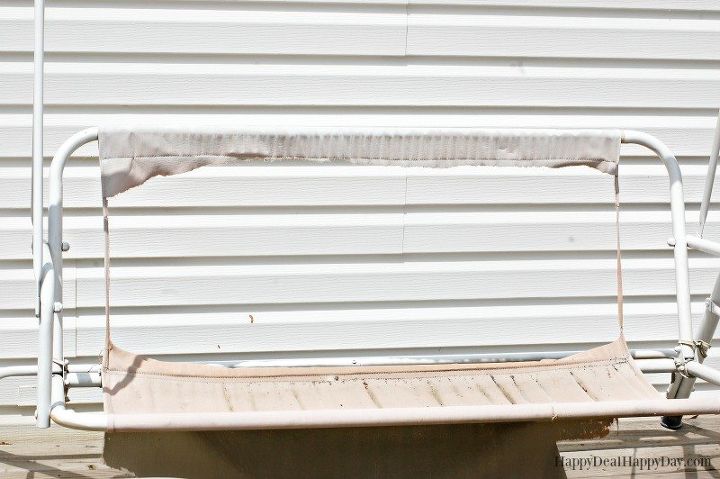
After 7 years of sun rays beating down on it, the canvas had had enough, and the material finally split.
Turns out that finding a replacement canvas is not so easy. And if you do find a place that makes them, you end up paying for a custom fit that would cost almost as much as buying a new swing altogether. I had already spray painted this swing to hide some rust. We did not want to throw out a sturdy frame, so I did some brainstorming on finding a cheaper solution to fix this. I spent about $30 for this fix, which is much cheaper than a custom canvas or obviously cheaper than buying a new swing altogether.
So today I'm going to show you how I used Polypropylene Lawn Furniture Re-Webbing with a needle and upholstery thread to get this swing back in motion.
Materials needed to fix broken canvas on a porch swing:
- Polypropylene Lawn Furniture Re-Webbing (I used 3 packs of the white)
- stapler
needle and upholstery thread
Start by cutting off the old worn out broken canvas and throw that out.
I had at one point spray painted this swing to cover some rust spots. Now that the canvas is cut off, you can see the original color that does not match the white. I did not spray paint over the tan at this point, but I wish I had. So if you want to repaint your frame at all, now is the stage in this project to do so.
When I was looking up how to install re-webbing, I found many tutorials about using metal clips or drilling holes and screwing it into the metal. I wanted a seemingly less complicated way to install it, so I simply took one end, folded over about an inch, and wrapped that around the top left side of the metal frame.
I then got out my stapler, and stapled this together to mark where the beginning is and to hold it on temporarily. (later, I took out the staples and replaced it with upholstery thread, but this was an easy way to get it installed first before sewing.)
I then took the webbing and wrapped it vertically around both the back and seat and went back and forth all the way down the swing. A little over half way, I had to staple on a second strip of re-webbing to continue the weaving.
After I completed the vertical back and forth stringing of the webbing, I made a 90 degree turn with the webbing and started weaving it horizontally on the seat. I eventually needed to attach a third strand of webbing.
Again, I used staples to attach the strands and when I was at the very end of weaving, I wrapped the last strand around to itself and stapled the end (just like the very first attachment) Before I stapled that final strand, I made sure to pull the entire webbing as tight as I could! I started back at the beginning and re-pulled each row very tight to ensure the webbing was on as securely and as tightly as I could get it.
I did not weave horizontally for the back rest portion of the swing. You totally could, but since most of the weight is held on the seat, I didn't think you need that extra webbing for the back, especially when it is covered by a cushion. Once I finished weaving and stapling, I then needed to replace the staples with a needle and upholstery thread.
I hand sewed two rows at each of the connecting places where there were staples. I used scissors to bend the staples and pull them out as I was sewing.
I had purchased replacement porch swing cushions about 3 years ago because the originals were in really rough shape. I got mine over on Amazon. Check out their selection if you are in need of replacement cushions yourself.
Once the sewing was complete, and I reattached the swing cushions, I sat down, and enjoyed a cup of tea in the early evening breeze!! :)
I had officially rescued a $130 swing for just $30!
Enjoyed the project?
Suggested materials:
- Polypropylene Lawn Furniture Re-Webbing (http://amzn.to/2uuQ0pY)
- Upholstery thread (walmart)

Want more details about this and other DIY projects? Check out my blog post!
Published July 18th, 2017 1:10 PM
Comments
Join the conversation
3 of 33 comments
-
-
 Rick
on Jun 14, 2019
I have enough jute webbing so I won't need to buy the strips. Your swing looks exactly like mine. Your post helped me see how to attach it. I plan to do it next week. Thank you for the post.
-
 Maura White
on Jun 14, 2019
Glad to hear it Rick!!!!
-
-












Frequently asked questions
Have a question about this project?
I am trying this this week. Do you know where I could a replacement frame for the canopy? The swing was given to us and I am going to rewebb the seat but would love to put a canopy back on it but the frame for the canopy is gone. Any suggestions would be appreciated
What would you do for the top part of the swing? I totally need the shade when I sit in my swing and unfortunately the top at all ripped