


How to Turn a Rug Into a DIY Storage Box (No Sewing Needed!)

I don’t know about you, but I’m always hunting for stylish storage solutions that don’t cost a fortune—or look like a plastic bin from the dollar store.
So when I found a way to turn a plain ol’ rug into a custom storage box, I had to try it out. And let me tell you, it’s a game-changer!
This DIY rug storage box is sturdy, completely unique, and honestly, a little addictive to make. The best part? You don’t need any sewing skills. Just a hot glue gun, some strong fabric glue, and a little folding magic.
Tools & Materials
- 1 rectangular rug (approx. 85 cm x 55 cm – think small entryway rug)
- Fabric scissors
- Fabric glue (strong hold recommended)
- Hot glue gun + glue sticks
- Something heavy to help secure folds (like a book or small weight)
- Optional: clips or clothespins for extra hold
Hometalk may receive a small affiliate commission from purchases made via Amazon links in this article but at no cost to you.

1. Prep Your Rug
Start with a rectangular rug – a 33x21-inch size is great for a medium storage box.
Lay your rug flat on a clean surface and snip off any tags.
If it’s wrinkled from packaging, give it a quick iron or press under something heavy overnight.

2. Glue the Long Sides Together
Now grab your glue duo. Run a line of fabric glue along one long edge of the rug. Right next to it, run a line of hot glue (this is your fast-set helper).

Quickly fold the other long edge over to create a large pocket and press firmly to seal the sides.
Leave this to set until completely cool and dry. This ensures that your storage box will retain its shape over time.
3. Fold into a “House” Shape
Open your pocket so it’s standing up on its folded edge. Now, take the top two corners of your glued edge and bring them together, flattening them down toward the middle.
This should create a triangle at the top—like a little house. If you look closely, you’ll see two overlapping triangle flaps.
Pull the tip of the front triangle flap toward you to flatten it into a square.

4. Secure the Corners
Next, apply both fabric glue and hot glue to one corner of the square (the one closest to you). Fold it toward the center and press firmly. Pop a heavy book or similar item on top.
Repeat with the opposite corner. Again, press and weight it down to set.
Let both glued corners dry fully before moving on. Patience here = a better box.

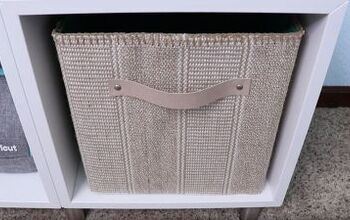
5. Flip Inside Out and Admire!
Once everything is dry and solid, gently flip the whole piece inside out. Now you’ve got a beautiful, fabric storage box with smooth edges and a sturdy base.
You can use it as-is, or add handles, a liner, or even a little label tag to customize it.
Why This Works
- Rugs are sturdy. Unlike floppy fabric, rugs have a thick weave that gives structure.
- Hot glue sets fast, while fabric glue gives long-term hold.
- Folding corners inward helps lock the box shape in place, kind of like origami but easier!
Bonus Tips:
Choose the Right Rug
Thinner woven rugs are easiest to fold, but thick felt-backed rugs will make a firmer box.
Add a Base Insert
For extra strength, slide a piece of cardboard or foam core inside the bottom once it’s flipped out.
Make Your Own Rug Storage Box
If you’ve been wondering what to do with that random rug sitting in your closet—this is it!
Turning a rug into a storage box is easy, practical, and oh-so-satisfying. Plus, every box ends up looking totally different depending on the rug you use.
Give it a try this weekend and tag me with your creations—I’d love to see how yours turns out!


Frequently asked questions
Have a question about this project?