No Kitchen Pantry? Upcycle an Old Bookshelf Into THIS!

If you're tired of cramming food into your pantry, and then having to unpack every shelf to find the item you're looking for, then you are not alone!
I was so tired of having too little pantry space, but I wasn't in the market for a pantry expansion or buying new cabinetry. Instead, I I spotted an old bookshelf and had a spark of inspiration.
Here's how I turned an old bookshelf into the extra pantry space I needed. The best part of this little functional flip? It's not just a space-booster, it's a style-booster too, thanks to some chicken wire and farmhouse fairy dust!
Check out the video for more how-to's!

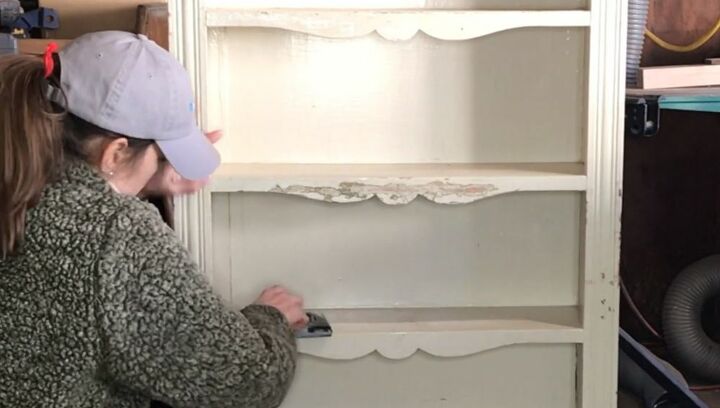
Start by sanding every surface of your bookshelf. I wanted a rough, rustic look, so I didn't stress about sanding to too smooth of a finish, but I did want the surface to absorb the paint.
Then, I added my paint. I used a charcoal grey color that I knew would mesh well in my kitchen. Again, I wasn't so careful about getting full coverage.
Next, I measured the length of the front of the bookcase and cut 4 pieces of wood to that size. These would be the sides of the 2 cabinet doors.
Then, I measured the width and cut 4 pieces of wood for the tops and bottoms of the cabinet doors.
After that, I drilled pocket holes and attached 2 long boards and 2 short boards together to create the cabinet door. I repeated these steps for the second cabinet door.
I added a light coat of walnut-colored stain, because dark wood is my favorite. I rubbed it on and then hastily rubbed away the excess, so that it left behind a lighter kind of wash. Just one coat was enough for the look I wanted.
Next, I added hinges to the tops and bottoms of the outer sides of the doors.
The final touch was stapling chicken wire on the inside of each door frame. This would help to ever so slightly hide the contents of the pantry without making them invisible, and it adds some great farmhouse charm.
After the chicken wire was all stapled down, I snipped off the excess using pliers.
Next, I attached the cabinet doors to my bookshelf. Thanks to my pre-assembled hinges, this step was a breeze.
Finally, I added 2 brushed metal handles, completing my rustic storage piece.
I had some help moving my brand new extra pantry into my kitchen, and then I loaded her up with cans and jars. Ta da!
How simple was that? A quick makeover and a quick fix to a very common problem. Hope this inspires you to DIY your own home solutions!
Enjoyed the project?
Resources for this project:
See all materialsComments
Join the conversation
-
-
 Kelli Dowdell
on Apr 19, 2021
I had this idea only not for a pantry(even though that is a great idea and I may have to get a 2nd book shelf lol) but I've had a very hard time finding a curio cabinet to fit my small space, for some reason tonight it dawned on me In my daughters' old bedroom (she moved out a few years ago) is a perfectly good bookshelf going to waste, as I don't read any more, and both of my kids are out of the house. I had the idea to make doors and use Chicken wire instead of glass or plexi. and even considered lights, either warm yellow strip lights, or how you can get the lightbulb base with an electrical cord pre attached to make lamps, I even considered solar strip lights if I can put the cabinet near the window and prop the solar panels in the window sill, so it'll give off a warm glow at night, and I wouldn't have to worry about turning it on/off. Then put all my knick-knacks in it! Seeing this pantry has helped me see my idea and I'll know for sure it'll work.
And if I find another bookshelf at a yard sale or thrift store I can make a second one for a pantry :)
Thanks for sharing.
-











Frequently asked questions
Have a question about this project?