DIY Fold-Down Counter Extension
Storage and work top space in a tiny kitchen can be a nightmare, especially when there is no more wall or floor space to extend kitchen cupboards. Often, the only solution is to install a pullout or fold-down shelf to extend the counter.
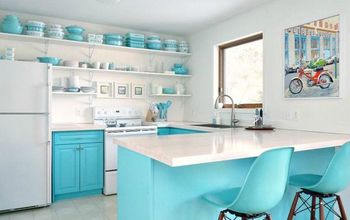
A tiny kitchen with minimal storage and severely limited work surface space (see picture below) was revamped with shelving that is used to store herbs, spices, and condiments as well as cookies, nuts, and olive oil. While this DIY project made a huge difference to the room, it was still a challenge when guests or family came for a meal.
After installing open shelving above the wooden kitchen cabinet in their smaller-than-small kitchen, a couple of DIY enthusiasts decided that the only way to extend their kitchen work surfaces was with a fold-down counter extension. They would have preferred an island unit, but there simply wasn’t space.
The solution they decided on was to match the size of right-hand panel of the cabinet with a fold-down shelf. It could then be used whenever additional counter space was required.
What You Need to Make a Fold-Down Counter Extension
Not much!
You can buy a piece of wood or medium density fiberboard (MDF) to match your kitchen cabinet and have it cut to size. Then you need to ensure the finish will match the existing unit. Finally, you will need to source a folding shelf bracket that will work for you. The most important factor is that the surface must be solid and stable, so you might need to use two brackets rather than just one.
Any reasonably experienced home handyman will be able to install the shelf with basic tools.
To do the job you will need a:
· Retractable tape measure and pencil to mark your measurements
· Bradawl to make pilot holes for screws
· Screwdriver
· Power drill with various wood bits
· Clamp/s
· Putty knife
· Hacksaw
Materials required include the:
· Shelf cut to size, sanded and stained and/or sealed
· Fold-down shelf bracket/s
· Screws and/or longer machine screws
· Wood filler
· Stain and/or sealer, or paint – and a paintbrush
The process is simple and really doesn’t need any special skills. Ordinary screws are used to attach the brackets to the cabinet. Machine screws will enable you to counter-sink them to the shelf so they are not visible.
1. Shop around for suitable fold-down shelf brackets. You might be surprised to find how widely available they are.
2. Measure and mark the position of your bracket or brackets. You need to ensure that the shelf will line up with the existing cabinet counter so take your measurement from the side of the counter and make sure the bracket is vertically straight. Use the brawl to make pilot holes for the screws and then screw the bracket to the cabinet. These brackets required screws into the vertical surface of the cabinet and then another three into the counter extension shelf.
3. If you are using more than one bracket repeat the process described above. Then clamp the shelf to the vertical leg of the clamp. You can use ordinary screws to fix the clamp to the shelf, in which case use the bradawl to make a pilot hole and then fix with the screwdriver. Alternatively, drill a pilot hole all the way through from underneath and then drill a slightly wider hole from the top to accommodate the head of the machine screw, and in this way counter-sink it just below the surface.
4. Screw into place so that the head of the machine screw is just below the surface of the shelf. Use a matching color wood filler to fill the hole. Allow to dry, wipe clean, and then give a final coat of sealer.
When the counter extension is not in use it folds down flush with the rest of the kitchen cabinet.
Neat and tidy, a fold-down counter extension might be exactly what you need for your tiny kitchen.
Enjoyed the project?
Suggested materials:
- Shelf cut to size
- Fold-down shelf bracket/s
- Screws and/or longer machine screws
Comments
Join the conversation
-
 Dic13175547
on Sep 07, 2017
I think you need closed in cupboards instead of shelves.....
-
-
 Diana Deiley
on Sep 21, 2017
Genious! Awesome job. Thanks for sharing your wonderful creation.
-










Frequently asked questions
Have a question about this project?
I guess ya do whatcha gotta do.......it really is clever. Where do you keep your dishes, cups, etc.?
In the first photo your cooktop/oven are white, but in the final shot it is black. Did you get a new one? I also noticed a metal 'gate' that, when closed, would cover the doorway of the door on the right side of the kitchen (you can see it on the right edge of the door) in one of the first photos. It reminds me of the elevators from eons ago that had a gate like that instead of solid doors that the elevator attendant opened and closed for the occupants. (Do any of you DIYers remember those days?) This makes me think that this house is not in the U.S?
Smart idea for additional counter space, by the way...
Where did you locate the shelf bracket? I have looked at both the Lowe's and Home Depot websites with no luck. This is such a GREAT idea.
Thank you,
Judith