Old Metal Shelf Becomes New Work Bench

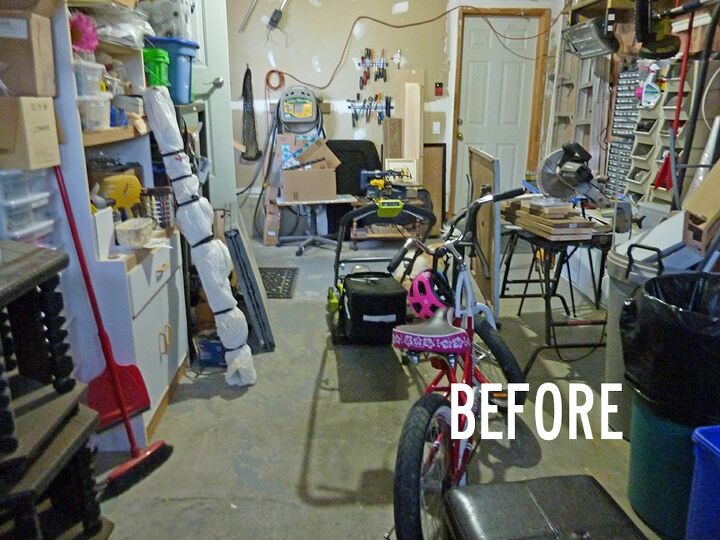
I recently started the task of cleaning up the garage (again). While I’m happy I have one, our garage has never been very pretty, nor functional. The lighting is poor. I had no designated work area. No available surfaces to lay tools on as I worked. And it had so many shelves filled with junk that it left very little floor space, for things like bicycles and a lawn mower!
So this time I was determined to address some of these issues. I had an old metal shelving unit that I was about to haul to the curb to gain more floor space, but then I had an idea. I flipped it on its side to see if it would be the right height for a work bench. And it was the perfect height for me!
Then I found an old cabinet door that was nearly the perfect size for the top. There was a small gap at the back, so I found a board in my scrap pile and screwed it to the back of the door edge to function as a lip (to prevent screws or tools from rolling in behind the shelf).
I needed to attach the top to the frame so I rummaged through my bracket container and found brackets that were originally used to attach our builder grade mirror to the wall in our powder room. I used them to attach the top to the frame.
Even though the bench felt sturdy I decided better-safe-than-sorry, so I screwed small brackets (the anti-tip ones that are included with furniture) into the wall studs and wrapped zip ties around the metal frame to make sure it never topples over.
The frame was rusty and ugly. I found a partial can of white paint that had rust in it from the lid. I just stirred the rust into the paint and painted the frame. There was enough paint to paint the frame and the wall behind it.
I wanted to add a couple of shelves to the frame. I found an old plant stand and a leftover piece from the matching cabinet door (that I used as the top). I cut the legs off the plant stand and screwed the shelf to the top.
For the next shelf, I found a board that I cut to use as brackets. I screwed them directly into the frame from the outside in. I drilled pilot holes through the metal first.
Then I cut a board to fit and screwed it on top of the support boards.
This was a much better shelf than the first one. But I wasn’t taking the other one apart now!
I added a few more hooks to the wall and organized my most frequently used tools for easy access. I also added a few flower decals I had left over from another project.
I also found some rope lighting that I strung behind the ‘lip’ at the top for up-lighting. And a task light I didn’t even know I had! It’s amazing how many items I found in the garage that I had forgotten all about. And in some cases had already replaced because I couldn’t find it! That won’t happen again. Not on my watch. LOL
Is my garage pretty now? No. No it’s not. But is it far more functional and organized? Yes!! I just love walking into the garage now and finding what I need within seconds.
I even cleaned out a tool box to use as a traveler. If I want to work on a project inside the house or at my mom’s, I can simply choose the tools for the job and place in the traveler. No more carrying a heavy tool box loaded with stuff I don’t need for the particular job.
So organized! Hands down the best work bench/station I’ve ever had! And the best part? I made it from junk and scraps!
I even sorted all my hardware bins. And labelled them alphabetically! Love! LOL
PS Given that I referenced the bike and mower, I really should have included a pic of where they ended up. I've already reached my maximum number of images for this post, so I've added one to the Questions section to show where they are! ;)
Enjoyed the project?
Resources for this project:
See all materialsComments
Join the conversation
-
 Debbie Westgate- Guyot-Sliwa
on Jun 12, 2020
I'll need to do this soon when the reno is done! Especially love your organization of misc. small stuff! We have so many bins with nails, screws, hooks etc! You did a great job!
-
 Valerie Burge
on Jun 12, 2020
I was the same, Debbie. Random small stuff in containers all over! I absolutely love that they are organized and labeled now. I can literally find out if I have something I need within seconds! It took quite a lot of time sorting them, but I've saved so much more time not searching for things anymore! It was well worth the effort! :)
-
-
-
 Kaye
on Jun 12, 2020
You did a beautiful job! I am very unorganized so I am very envious. Thanks for showing how it's done.
- See 2 previous
-
 Valerie Burge
on Jun 12, 2020
Thanks Kaye! I have a terrible memory, so if I'm not super organized I get nothing accomplished! LOL
-
 Betty Boop
on Jun 16, 2020
I know exactly what you mean. I had a stroke & can't remember short term things, I loved doing stuff like this but I can't now. I have no energy to even try it, I always get fraustrated & give up.
-
 Valerie Burge
on Jun 17, 2020
Sorry to hear that, Betty Boop! xo
-












Frequently asked questions
Have a question about this project?
How to arrange pots and pans on a big shelf.
What a great job, Valerie. I’ve never seen so many comments in response to a Home talk post before! Just goes to show that people really responded to the quality of your work and also I think people are really struggling with messy garages! We are so inspired by you! Can you tell us how long this took from start to finish? Did you need to have help with the labor? Because I am a female facing a really disgusting garage and just want to know how durable it is physically for me… And how much time I will have to spend!
Where do you park your car? Haha JK you did a fantastic job organizing!!