Anthropologie Hack & Flea Market Flip Evidence Cabinet Reveal

by
Denise Cooper
(IC: vlogger)
1 Material
$10
24 Hours
Easy
Two for one DIY's for you guys. Both are from the Flea Market. Anthropologie, was my inspiration for creating both of these awesome hacks. The first DIY is a ''Inspirational Quote Globe'' the second is a Evidence Cabinet makeover.
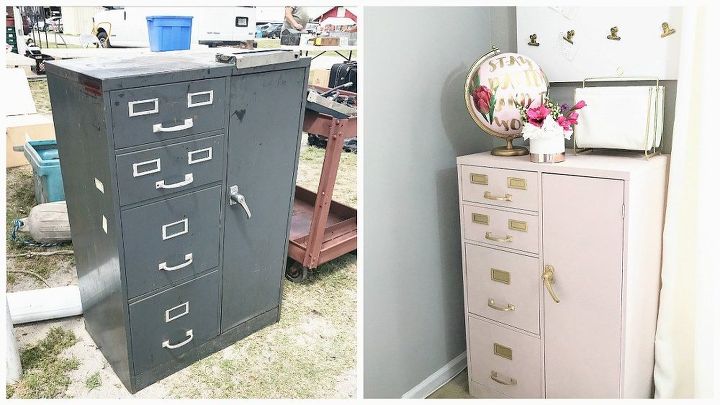
Saturday, mornings is where you can find me and the hubster. We usually go almost every week to get our Flea Market fix. When I came across this file cabinet. I know its not the prettiest, but... I saw the potential of it being a functional storage unit to store all of my craft items. The vendor told me it's an Evidence Cabinet. It was used in a police station to store evidence. See below how I gave this $15 Evidence Cabinet a makeover.
This is my Feminine Fabulous home office space where I spend a ton of time being creative. Creativity comes with LOT'S OF STUFF! Although, I love to see my items out, just not all of of it. The evidence cabinet was perfect.
First, sand off the rusty areas. This step is really important because, you want your paint finish to be smooth. Work in even strokes over the corroded area.
This cabinet was used in a police station, to fingerprint criminals. Lot's of ink was on various places on the cabinet. Grease Lighting, did a fantastic job removing all of the ink and dirt. You can purchase it from any grocery store in the cleaning aisle.
Lots of rust!
Most, spray paints come with primer made in the paint. It's optional to do this step but, this was my preference. I wanted to make sure all of the imperfections were covered before adding the final color. Slow even strokes are best when your spray painting. After spraying your primer, it's important to let the piece dry for at least 6 hours before applying the Chalky finish.
Rustoleum Chalk Blush Pink ultra matte was used as my final color for the cabinet. The color matches the rest of the colors in my home office. Apply the first coat of the chalk spray paint lightly in a sweeping motion. This ensures no ''buildup'' areas. Let, the first coat dry for at least 30 minutes. Apply a second and third coat if needed. Let dry in between coats.
The hardware was not removable so, I taped off the areas that I didn't want gold paint on. I gave a quick light coat of Rustoleum (Bright Gold) spray paint. I let the entire cabinet cure for a few days.
Here she is sitting pretty in the corner of my office.
The DIY Inspirational Quote Globe is sitting on top along with my file folder organizer and flowers.
You can see the before and after. Just click on the video to see a quick tutorial.
{
"id": "3991453",
"alt": "",
"title": "",
"video_link": "https://www.youtube.com/embed/9k5m8WlxWKc",
"youtube_video_id": "9k5m8WlxWKc"
}
{
"width": 634,
"height": 357,
"showRelated": true
}
Enjoyed the project?
Suggested materials:
- Supplies and materials you'll need are... fine grit sand paper, white primer, Rustoleum blush pink spray paint (matte finish) Rustoleum gold spray paint (bright gold) a bottle of degreaser . I'm using Grease Lighting and a bucket of clean water. (Home Depot)
Published June 27th, 2017 2:30 AM
Comments
Join the conversation
2 of 56 comments










Frequently asked questions
Have a question about this project?
how do you keep the drawers from making that horrid rusty-metal-on-metal noise?
Aside from the colore it doesn't look different or am I missing something here?
Hi! Loved the cabinet! Did you ever post a follow-up on how you organized the finished product? I would love to see it.