How We Created A Herringbone Feature Wall For Less Than $150

Oh how I love a good feature wall. There is just something about taking a space that’s already in your home and adding a major design element to it.
It’s a great way to update a room without having to add more stuff, which I always love!
When it came to my office, I had been wanting to add some kind of feature wall behind my desk since we moved in. I just wasn’t sure exactly what I wanted.
So I started to play around with some mockups and determined that herringbone shiplap was the way to go in order to have an interesting feature wall that also fit the space well.
We had never taken on herringbone anything, but I have to say it went a lot more smoothly than I expected it to! Plus, we were able to keep the costs way down for this project.
Here’s how we did it…
Hometalk Recommends!
STEP 1: Gather Your Materials & Cut Down Your Plywood
Here is what we used…
- 4 sheets of plywood (4ftx8ft sanded)
- Brad nails (make sure you read what size nails your brad nail gun takes)
- Primer
- Paint (we used Gatherings by Magnolia)
- Sandpaper
And here are the tools we needed…
- HART Tools miter saw
- HART Tools jigsaw
- Brad nail gun
- C Clamps
- Level
- Tape measure
We love figuring out ways to do projects with tools we already have on hand as to not add to the cost, so this project in total cost us under $150 for the plywood, primer, and paint that we had to purchase.
The wood came in at around $88 for our wall, which is why we went the plywood route! We priced pre-cut wood boards for our wall, and it would have cost us around $300.
Not bad for a full feature wall!
MEASURE YOUR WALL TO DETERMINE HOW MUCH WOOD YOU NEED
First things first, measure your wall and determine how much wood you need. Then, go grab all the materials you need so you can get rolling!
Pro tip: Get more wood than you think you need just in case you mess up! You can always return it later or simply use it for a future project.
DETERMINE THE SIZE YOU WANT YOUR BOARDS TO BE
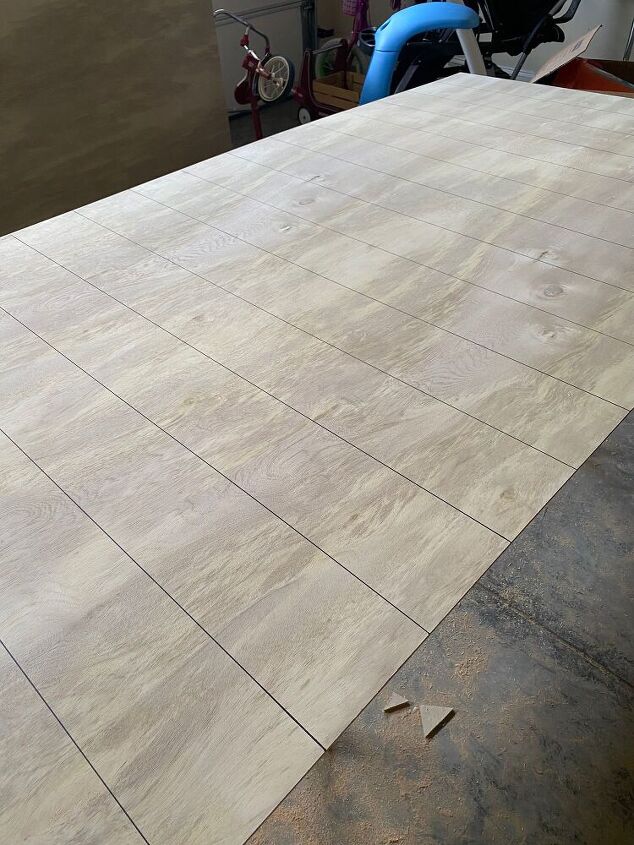
If you’re going the plywood route like we did, the next thing you want to do is determine what size boards you want to use for your wall. We went with 4’x8’x1/4″ plywood, so we decided to make our boards 4’x6″.
That way, we could get 16 boards out of every sheet of plywood.
I started by measuring out every 6 inches on the back of my plywood and making marks. I then used a yardstick to draw straight lines exactly 6″ apart. These would be my guides when it came to cutting.
CUT YOUR BOARDS
Once all my lines were drawn on my plywood, it was time to cut my boards. I used my C clamps to secure my plywood to my worktable, then I grabbed my jigsaw.
Note: You could also use a circular saw or table saw for this! I feel as if I can control my jigsaw a little better than my circular saw, so that’s what I went with!
I lined up my jig saw with one of the lines I drew, revved it up, and slowly cut each board, following the lines I drew very closely on the plywood.
After each board I would adjust my clamps and repeat!
DON'T FORGET TO SAND THE EDGES!
Once an entire sheet was cut down into boards, I would take some sandpaper and sand down the sides of each board.
Once your boards are all cut, it’s time to install! Start by measuring your wall and finding the center point.
Then, draw a straight vertical line down the center of your wall with a pencil. This will help you make sure you line up your first row of boards properly.
Using a level, lay your first full board on your wall, making sure it is at a 45 degree angle and the end is crossing over the line you drew halfway.
Once it’s ready, grab your brad nailer and secure it to the wall.
I put about 8-10 brad nails into each full board to secure it fully so it didn’t bow once I got my primer and paint on it!
After your first board is secure, grab your next full board and continue the pattern in the other direction.
Overlap the top of your second board with the end of your first board, and make sure it is also at a 45 degree angle, then secure it with your brad nailer.
Repeat and follow a herringbone pattern until you have all the full boards you can fit on the wall secured.
What we found to be most important was that every board was at a perfect 45 degree angle and that the ends of each board lined up perfectly with the next. This will help disguise any imperfections in your boards.
Then it gets a little tedious!
Once your full boards are all done, it’s time to measure and cut each board to fit on the wall.
We took a short scrap piece of wood that was the same width as our boards and used it to help show us where to make our cuts.
We would simply slide it along where the next board needed to go until it hit the ceiling or baseboard. Then we would make a mark and measure from our mark to the board it needed to rest up against and measure the same distance on the board we needed to cut.
Then we would miter the board at a 45 degree angle from the end mark to ensure it fit nicely on the ceiling.
Continue this process until all your boards are up! We used our miter saw for all the straight and 45 degree cuts, and we used our jigsaw when we needed to cut around outlets.
Next, prime your boards! I made sure to prime my boards because I wanted to make sure my paint stayed as true to color as possible, and I wanted to seal the plywood so I didn’t have to go through as much of my paint!
This step took an extra few minutes, but it was so worth it!
Choose the paint color you want your feature wall to be, then get to painting! I used a low density roller to ensure a smooth finish and added 2 coats to this wall.
I also chose to use Gatherings by Magnolia in a matte finish. I always love a good matte finish!
And that’s it! I am telling you, this wall went way more smoothly and turned out way better than we even imagined!
It was so worth it to transform this office space, and we would do it again in a heartbeat.
What do you think? Would you give this a try using plywood?
Enjoyed the project?
Resources for this project:
See all materialsComments
Join the conversation
-
-
 Barbara Luczynski
on Oct 16, 2025
I love the look, but I honestly like the plywood not painted. It has different layers and more dimension. I would have just put a poly coat on it. But good work.
-











Frequently asked questions
Have a question about this project?
Did u remove baseboard moulding? Or did u lay an extra one over the the bottom to give it a finished look?
This is beautiful. By chance did you use glue? Rather than put so many nails in the wall, or is then wood too heavy ? Thank you for sharing I appreciate it 😊. Happy and safe Holidays y'all.
How thick is the plywood?