Upcycling CDs to Night Lamp

by
Rajendra Prasadh
(IC: vlogger)
12 Materials
$10
4 Hours
Easy
Lamp shades that are semi-modern. The base and the sides are made of hard wood with clear finish. It is super soft to the touch and will add a great mood next to your bed.
{
"id": "4112343",
"alt": "",
"title": "",
"video_link": "https://www.youtube.com/embed/r4p-Qmrcq4U",
"youtube_video_id": "r4p-Qmrcq4U"
}
{
"width": 634,
"height": 357,
"showRelated": true
}
The age of CDs are over. But that does not mean they can't help us building something good looking. Today I will be turning some old CDs into a lamp that can be a bed side night lamp. It took just an afternoon to make this.
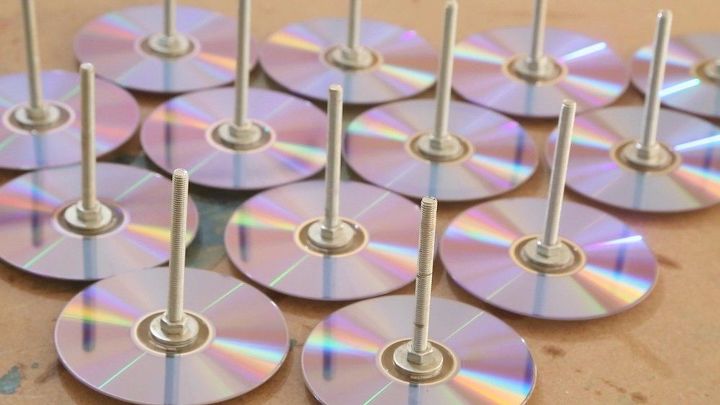
To begin with the CDs need to be prepared for painting. In order to easily handle it while painting I added these longs nuts and bolts. But you can use a wire or even just a rod.
To begin with the CDs need to be prepared for painting. In order to easily handle it while painting I added these longs nuts and bolts. But you can use a wire or even just a rod.
The CDs are painted with semi matt finish. I prefer the matt look whenever I use the object with lights. Matt finish give a rich look.
The CDs are painted with semi matt finish. I prefer the matt look whenever I use the object with lights. Matt finish give a rich look.
Now the frames to hold the CDs are made. I cut some one inch thick pine wood into strips. The height of the strips could be around 150mm. Then by clamping them together on a vice and using a hack saw the groves for holding the discs are made.
Now the frames to hold the CDs are made. I cut some one inch thick pine wood into strips. The height of the strips could be around 150mm. Then by clamping them together on a vice and using a hack saw the groves for holding the discs are made.
Once the groves are cut into these strips they can be sanded well with 120 grit sand paper. I clamped my orbital sander to the vice and sanded the strips. After sanding I finished the strips with two coats of clear spray.
Once the groves are cut into these strips they can be sanded well with 120 grit sand paper. I clamped my orbital sander to the vice and sanded the strips. After sanding I finished the strips with two coats of clear spray.
Now on to the base of the lamp. For this I used a red wood which will add contrast to the colour of the pine wood. The thickness of the base was 1.5 inches. Using a compass I drew a circle which is of the same size as a DVD.
Then following the line I can cut this at the band saw. You can use a jig saw too to make this cut. The band saw leaves cutting marks which I cleaned later by sanding it well with 80 grit sand paper and then smoothing out with 120 grit sand paper.
Time to assemble the CDs with the pine strips. To balance the CDs I slot them between two pieces of 2/4 wood. This would prevent the CDs from rolling away. Then I mixed some 5 minutes, two part epoxy and applied it between the groves. This should be enough to hold the CDs.
Here are the assembled CDs. Each stack has three pine strips arranged in a triangular way. The triangular legs balance the stack well.
Now the CDs need to be married to the base. To do that, first the LEDs have to be mounted to the base. I am going to use threaded rods to make this, on top of which the LEDs can be coiled. Make sure that the length of the threaded rod does not stick outside the CDs stack.
The threaded rods are secured to the base with a nut. You can also see that I have rounded one edge of the base and also drilled a centre hole. This would help accept the PVC pipe that I will be adding later. Also I applied two layers of clear coat lacquer to the based to avoid any finger prints. The threaded rods are covered with a heat shrink tube so that in the next step when I add led they don't have a short circuit.
The LEDs come with a adhesive back. So I can just peel off the backing and stick it to the threaded rod.
Here the led connection is made using a 23 gauge wire. Then a small hole is drilled on the side to accept the power jack. I used a 2.5mm power jack which is commonly available in any electronic store. Finally to go with the white and wood theme I covered the based with masking tape and then painted the 10mm from the bottom in white colour to give a nice accent.
Now I can arrange everything together. On top of the wooden base a white PVC pipe is added. This will hide all the wire from the LEDs to the power jack. Then on top of the I can just slide in the CDs. The CDs are not that heavy and held firmly by the pine wood. Also the CDs can rest on the PVC pipe and will look centred.
The LEDs work with a 12v, 2amp power supply. And you can see here that it gets plugged into the base. This could be a nice table lamp for home decor or bed side night lamp. I will go with the later because thats where I have kept it.
I would like you to thank you for taking time to read through this DIY. If you make this please let me know. Until next time - Happy Learning.
Enjoyed the project?
Resources for this project:
See all materials
Any price and availability information displayed on [relevant Amazon Site(s), as applicable] at the time of purchase will apply to the purchase of this product.
Hometalk may collect a small share of sales from the links on this page.More info
Published July 31st, 2017 2:08 AM
Comments
Join the conversation
2 of 167 comments










Frequently asked questions
Have a question about this project?
Amazing video! You are a master of MANY tools! Do you sell these ?
Really interesting. Love your thinking outside the box. Your very talented, thank you for sharing. Do you sell these?
Have you tried this with leaving the reflective surface bare? It would be interesting to see what light coming off of the laser surface would look like.