9 Easy Steps to Gorgeous Geode Resin Wine Glasses

Are you looking for a creative way to personalize your wine glasses? In this easy epoxy resin tutorial, I will show you how to make geode resin wine glasses. With just a few simple steps, you can decorate a wine glass by adding some of your own style and personality.
This post was transcribed by a member of the Hometalk editorial team from the original HometalkTV episode.
Grab your supplies and let's get started with our gorgeous geode wine glasses.
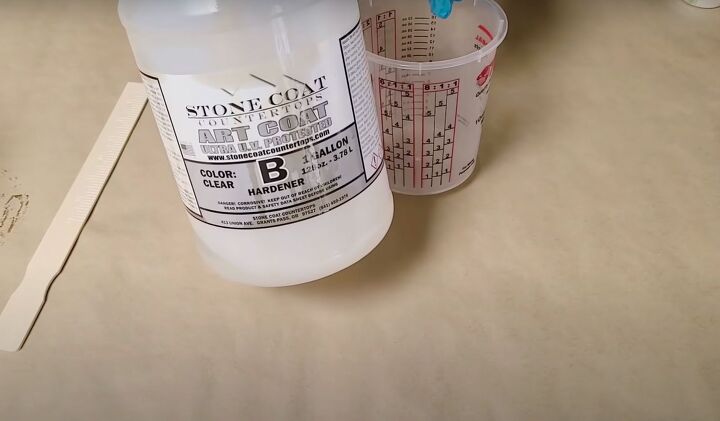
I decided to use Stone Coat Countertops Art Coat resin and hardener for this wine glass decorating idea.
1. Mix the Resin
To begin this customized DIY wine glass idea, I mixed the resin and hardener together in a 50/50 ratio. I like to put the hardener into the measuring cup first. Be sure to mix thoroughly for at least 4 minutes, scraping the sides and bottom of the container as you go.
2. Add Color and Glitter
Once you have mixed the resin, add 5-15% of the colorant to the epoxy. Be careful not to add too much, as this can cause issues with curing. Just a couple of drops of each color are enough.
I am also mixing glitter resin; for this cup, you can add as much glitter as you like, as it will only be suspended in the resin.
3. Clean the Wine Glasses
Clean the wine glasses with 91% isopropyl alcohol to ensure that they are free of any dirt and oils.
If you do not have isopropyl alcohol, I would suggest buying it as you will need it in the next step but you could also use rubbing alcohol or dish soap to clean the glasses.
4. Prep the Coaster Molds
Add a small amount of clear resin to the bottom of the coaster molds. To help eliminate any air bubbles, use a spray bottle filled with 91% isopropyl alcohol to remove them. I did not want to use a torch, as this could damage the silicone molds.
5. Position the Wine Glasses
Place the wine glasses in the center of the coaster molds and press down gently to remove any air bubbles that may be trapped beneath them.
6. Add Color and Glitter to the Glasses
Once your glasses are in place, it's time to add your chosen colors and glitter. This is where your creativity and personality can shine.
I started by pouring glitter resin into my first mold. I then poured some purple around the base of the glass and ended by adding some clear resin.
Be sure to stir the mixtures frequently to avoid them sinking, and fill the mold until the wine glass bottom is covered.
7. Repeat the Process
Repeat the process for each glass, using different colors and patterns as desired. You can use polka dots, stripes, or swirls, the possibilities are limitless.
For my second wine glass, I decided to pour the resin in a flower pattern around the base of the glass.
I then added the white resin in the same pattern and filled it in with the clear color.
Using a little stick, I gently swirled the wet resin to ensure the colors blended smoothly. Afterward, I spritzed it once again with isopropyl alcohol to eliminate any remaining air bubbles.
8. Allow to Dry
Let the resin cure overnight.
9. Unmold and Finish
My DIY wine glasses look amazing. Unmold them and sand any rough edges, if necessary. If you like, you can paint the wine glass edges with a bit of gold or silver paint for a finishing touch.
Remember to hand wash the glasses to keep them in good condition; I don't recommend putting them in the dishwasher.
More customized wine glass projects
Resin wine glass tutorial
This wine glass craft idea was such a fun project. You can create beautiful geode resin wine glasses that are perfect for any occasion. Each guest can have their own unique glass and will always know which one is theirs.
Personalize them with different colors and patterns and enjoy your new stylish and sophisticated glassware!
Don't forget to let me know how your DIY personalized wine glasses came out in the comments below!
Enjoyed the project?
Resources for this project:
See all materialsComments
Join the conversation
-
 PaperCutPlace
on Apr 29, 2024
Beautiful idea!
-
-
 Sandy Rolon
on Oct 03, 2025
Cool, now I have a quick fix for the gifted wine glass from Spain that didn't NYC make it. The bottom is chipped in a few areas.
-











Frequently asked questions
Have a question about this project?