


How to Make a Decorative Bow From a Pillow and Sheets

Want to learn how to make a decorative bow? It’s Easier Than You Think!
Making a giant bow sounds complicated, right? Like you’d need special ribbon, wire, or some serious crafting skills?
Nope!
This slouchy pillow bow tutorial is so simple, you could probably do it blindfolded (okay, maybe not totally blindfolded, but close).

Instead of wrestling with stiff ribbon, we’re using a pillow, a pillowcase, and some fabric scraps to create a fluffy, oversized bow that looks like it came straight from a fancy boutique.

Tools and Materials
- 1 pillow
- 1 pillowcase
- 1 sheet
- Fabric scissors
- Fabric glue or a hot glue gun (or a sewing machine if you’re fancy like that)
- Command hook
Hometalk may receive a small affiliate commission from purchases made via Amazon links in this article but at no cost to you.

1. Prep Your Pillow
Before we make the bow, let’s talk about the pillow. If your pillow is super puffy, it’s going to look more like a rectangle than a bow.

So, grab your scissors and carefully cut a small slit in the pillow’s seam.

Remove a little stuffing until it’s flatter and easier to work with.

2. Insert Pillow Into Pillowcase
Slide your pillow inside the pillowcase just like you normally would. It should fit snugly—if it looks too loose, tuck in the extra fabric on the open end or trim it down.

3. Shape the Bow
Now for the magic moment—squeeze the pillow in the center so it creates that classic bow shape.
Once you’ve got the look you want, take two strips of fabric and tie them around the pillow about a fingers-width apart to hold the shape.


You can use ribbon or matching fabric from your sheet!

4. Make the Bow Tails
Time to add some fancy tails!

Cut a long, thick strip from your sheet or extra fabric.

Fold it in half (right sides together), and either glue or sew along the inside edges, leaving one end open.

Once it’s dry (or sewn), cut the ends in a diagonal for a classic bow-tail look.

Then, turn it inside out and glue or sew the open end shut.

5. Attach the Bow Tails
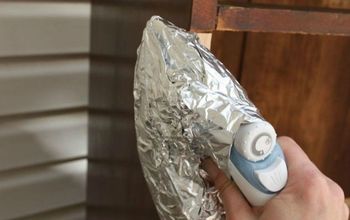
Give the tails a quick iron so they lay flat.

Then, attach them to your bow's center by slipping them through the two center ties you attached to the pillow.

6. Create the Center Wrap
Cut a wide piece of fabric to cover the center of your bow.

Fold over the edges so they look neat, then wrap it around the middle to cover the fabric strips holding the bow shape.
Glue or sew it in place.

7. Add a Hanger and Hang It Up!
Almost there! To hang your bow, attach a ribbon or fabric strip to the back.

Then, stick a Command hook on your door, wall, or wherever you want your bow to go.
Try This Clever Bow Hack

Want to make it different? Try this!
- Make it reversible: Use a double-sided pillowcase with different colors.
- Use seasonal fabrics: Think red velvet for Christmas or pastel florals for spring!
- Make a mini version: Use a small pillow or a folded towel for a tabletop bow.

I didn't like how the pillow drooped down. I had 2 options -- I could either add more stuffing into the back of the pillow to plump up the corners, or I could add a command strip to the door on either corner to pull the edges up. I went with the second option for this bow, "fluffing" out some of the extra fabric in the back.

How to Make a Decorative Bow with Bedding
Now that you know how to make this slouchy bow, you can whip these up for holiday decorations, party backdrops, or even baby showers.
If you give this DIY a try, I’d love to see it! Drop a comment below.
Comments
Join the conversation
-
Good concept, but I would have sprung for a new pillow and needed to iron the pillow and sheet first.
-
You've done a great job explaining the different steps! Thank you for spelling it out for us in a way that makes sense. I'm going to keep this in my files for when I want to make a bow for my door next Christmas!


Frequently asked questions
Have a question about this project?