


From Trash to Treasure: My Upcycled Rope Basket Planter

Okay, you know that feeling when you see someone tossing something perfectly usable to the curb, and your DIY brain kicks into high gear? That’s exactly what happened to me the other day when I spotted a lonely old stool waiting for trash pickup. It was nothing fancy—just a basic little thing—but I knew I could turn it into something beautiful.
I’d been meaning to try a rope-wrapped basket idea I saw a while back, and this stool was the perfect candidate. With a hot glue gun in one hand and some leftover rope in the other, I got to work—and honestly? I’m kind of obsessed with how it turned out.
Whether you want to store dog toys, stash cozy blankets, or create a statement planter like I did, this project is crazy versatile and super satisfying.
Tools and Materials:
- Old stool or small side table (ideally round)
- Hot glue gun + plenty of glue sticks
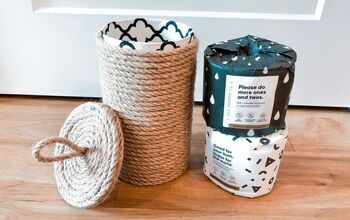
- Rope (jute, sisal, or cotton—whichever you prefer)
- Scissors
- Optional: spray paint (for base color underneath rope)
Hometalk may receive a small affiliate commission from purchases made via Amazon links in this article but at no cost to you.

1. Prep the Stool
Before you start gluing, give your stool a quick wipe down to remove dust or grime. If the base color of the stool contrasts heavily with your rope, you can spray paint it first, but I left mine as-is for that rustic vibe.


2. Start Wrapping the Rope
Grab your glue gun and anchor the beginning of your rope to the bottom edge of the stool. From there, start wrapping the rope tightly around the legs and sides.
Apply a small line of hot glue every few inches to secure it in place.
Take your time here, consistency matters! Keeping even spacing between each strand of rope is what makes it look designer, not DIY.


3. Work Your Way to the Top
Keep wrapping and gluing, slowly working your way up the stool.
This part is a little repetitive, but kind of meditative too. I took my time, sipped some iced coffee, and just zoned out a bit.
Once you reach the top, trim your rope and glue down the end neatly.

4. Style Your New Rope Basket
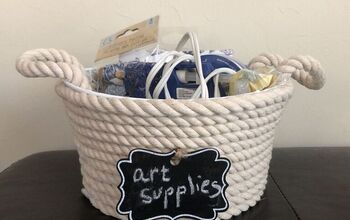
Now for the fun part—deciding how to use your new creation!
I have been using mine for dog toys and rolled-up throw blankets, but I ultimately want to turn it into a planter for my entryway.
I'll just drop a plastic liner and potted plant inside, and it will be good to go.

Bonus Tip: Why Rope Works So Well
Rope is a DIYer’s secret weapon—it’s durable, affordable, and brings so much texture to any space. Plus, the natural fibers add a cozy, earthy feel that works with tons of styles from farmhouse to boho.

Give an Old Stool New Life with This Rope Basket DIY
I love projects that breathe new life into forgotten items, and this rope basket planter might be one of my favorites yet. It’s easy, inexpensive, and the result are gorgeous.
If you’ve got a stool collecting dust (or spot one by the side of the road!), give this DIY a try. And if you do, I’d love to see how you styled yours!
Comments
Join the conversation
-
Yes, good idea if you already have rope etc on hand. But if have to purchase that amount of rope- then nope- would find a resale sh
-
Nice and doable.


Frequently asked questions
Have a question about this project?
What size jute do you suggest?