Dining Room Built in Bench With Storage

by
Kati @ Houseful of Handmade
(IC: blogger)
$100
3 Days
Medium
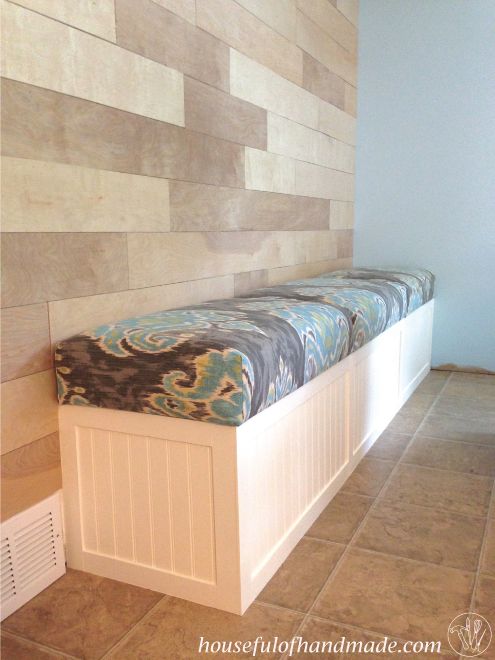
Adding more seating in our dining room was a must. I love having parties and get-togethers, but chairs are really expensive. I did buy 8 dining chairs for our table (at $100 a pop was a bit of a shock for this budget shopper), but when we have people over, we need more than 8 chairs. This beautiful built in bench was a perfect solution.
Our bench sits on the wall away from the table and acts as a sofa most of the time. A place to sit with your coffee in the morning, a comfy seat to put on your shoes, and a place to sit while chatting with the chef. But when we need to extend our table for big gatherings (like the upcoming Thanksgiving we will be hosting), we can use it as additional seating for the table. The best part is, I was able to build it mostly from scraps from my garage. But if you don't have a hoarders worth of scraps in your garage, you can still build this 8' bench for about the cost of 1 chair!
And we haven't even talked about the best part... storage! This bench offers 8' x 16" of open storage. It is big enough to store larger appliances that I don't use all the time, but don't want to get rid of. I also use it to store table cloths and cloth napkins, as well as a toddle booster seat for when I have family with kids visiting.
I secured two 2x4s again the wall into the studs, then built up a frame around it. This frame is very sturdy, I am sure it will withstand lots of use. But it was super easy to put together. I used pocket hole screws and attached them in the order in the picture. For a more detailed tutorial, make sure to check out my blog post (link below).
I wrapped the outside of the bench with beadboard, then framed it out with 2" strips of 1/4" fiberboard. I chose the 1/4" fiberboard to keep it from being too bulky of a trim.
For the cushions, I cut 3/4" plywood to fit over the 3 sections I had created in the bench. Then I build a little frame on the bottom to fit into the frame of the bench. This makes very secure bench cushion that do not move around at all, but they can easily be lifted off to access the storage. Then I used upholstery foam from old couch cushions, batting and fabric to upholster each bench top. Super comfortable and using old couch cushions from a couch that was discarded was an super inexpensive option to buying expensive upholstery foam.
All the bench needed was a couple coats of white paint and a little dry time. Then it was all done and ready for use.
If you are considering a built in bench, I would highly recommend doing it. It wasn't too hard, but the results make a huge impact! And it's super functional. We love having the extra seating and storage.
Make sure to check out my blog for a more in-depth tutorial on how I built it and upholstered the cushions.
Enjoyed the project?

Want more details about this and other DIY projects? Check out my blog post!
Published November 22nd, 2015 3:32 PM
Comments
Join the conversation
2 of 19 comments
-
-
 M&M
on May 12, 2019
Buying the plans to this and other projects would allow me to try many of the projects......
-
 Bonnie Harkonen Sauers
on Aug 13, 2019
You don't "buy" any plans.
You buy an old dresser & refurbish it. 😊
-
-

















Frequently asked questions
Have a question about this project?
You said you used upholstery foam. Did I get it right that it was from an old couch? If so how did you clean the foam before covering it.
Thank you in advance!
Could this be done by attaching to a knee wall? My knee wall separates the front entrance and kitchen which is roomy for this project.
Hello, looks like just what I need thank you for sharing. Do you have to screw anything into the floor?