How to Distress and Finish Wood Beams in 3 Steps

by
JH Wall Paints
(IC: vlogger)
5 Materials
$200
4 Hours
Medium
Wood beams add a great design element to any room. Ceiling design is a perfect addition to add in a room that needs some pizazz or elevated design. They are also super versatile to different styles. They can compliment mid century modern, French country, traditional, modern farmhouse, etc. In this post we are going to show you how to beautifully finish wood beams using pine.
{
"id": "3884954",
"alt": "How to Distress and Finish Wood Beams",
"title": "How to Distress and Finish Wood Beams",
"video_link": "https://www.youtube.com/embed/xL32dp8VwOQ",
"youtube_video_id": "xL32dp8VwOQ"
}
{
"width": 634,
"height": 357,
"showRelated": true
}
IMPORTANT: Watch this video for a step by step review of how to distress and finish wood beams using pine. Pine is inexpensive and great for distressing since it's soft. It is also rather light so when you make the beams it is easier to attach.
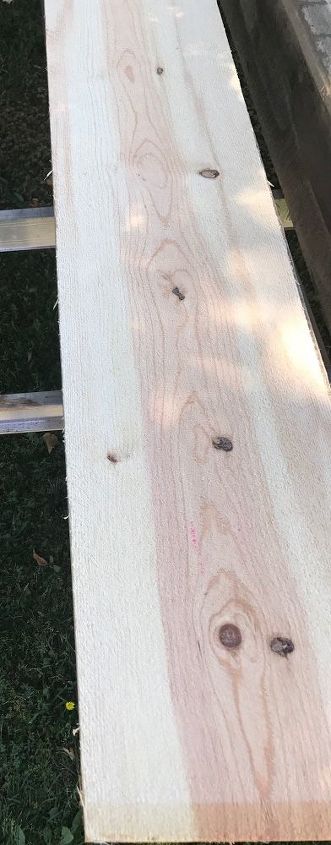
Step 1: Measure your length and cut all pieces to size. Then distress. Start by taking the sawmill in a vertical motion with the grain of the wood. Do each piece of wood including the side of the beams. WEAR protective eye glasses since a sawzall is a power tool.
Step 2: Take a mechanical wire brush tool and brush with the grain on each piece of wood. WEAR protective eye glasses as these tools are power tools. Your wood is now distressed.
You keep the inside hollow so it turns into a U shape. Two sides and the top.
Next you will use wood glue and clamp them together and let dry. Once dry, nail or screw the side pieces together.
Step 3: Your beams are now distressed and glued and nailed together. They are ready for finish.
Okay, here is the secret sauce. Put one pad of steel wool (we use since it's the softest) in one gallon of vinegar (cleaning or regular). Pick it apart and put it in the vinegar and let it soak for 1-2 hours. This creates the magical solution of aging the wood. The vinegar and steel wool mixture reacts to the tannins in the wood and creates a natural aging patina. Next brush the wood with the patina mixture. Do one coat and then see if you like the color and adjust. Make sure to test the color when it is completely dried. For the next coat we added more water for a weaker strength solution and we loved the color. The strength of the color is impacted by the amount of steel wool you put into the vinegar. So if you want it deeper, you should add maybe 2 pads of steel wool to one gallon and then test an area.
To start plan on buying a few to several gallons of vinegar and one package of steel wool so you can experiment on the strength you want.
Our color was derived from using one pad to one gallon. It came out a perfect light brown to complement the French country designed room.
Finished beams ready for install.
Keep in mind you can put these on ceilings, doorways, as a single beam as an entry border into another room. The possibilities are endless! It's a great inexpensive way to really add some design and style into your space.
Please follow these steps to a gorgeous finish on your wood beams. Watch the video to learn exactly how to do it.
Please subscribe to our YouTube Channel for more DIY finishing and painting videos: https://www.youtube.com/channel/UCRoqIYhQVUa-XUygNYitf1Q
Connect with us!
Facebook -- [facebook.com/craftsmanfinishes]
Instagram -- @craftsmanfinishes
Pinterest -- [pinterest.com/craftsmanfinish]
Enjoyed the project?
Suggested materials:
- Wood glue (https://www.craftsmanfinishes.com/woodbeamfinishing/)
- Clamps (https://www.craftsmanfinishes.com/woodbeamfinishing/)
- Steel wool (https://www.craftsmanfinishes.com/woodbeamfinishing/)
- Vinegar (https://www.craftsmanfinishes.com/woodbeamfinishing/)
- Paint brush (https://www.craftsmanfinishes.com/woodbeamfinishing/)
Published June 10th, 2017 5:29 PM
Comments
Join the conversation
3 of 14 comments
-
 Itsmemic
on Jun 20, 2017
ahhhh...thanks !! But the look is gorgeous !! You guys are SO talented !!Inspired? Will you try this project? Let the author know!
-
The video is working now. Check it out!
 JH Wall Paints
on Jun 20, 2017
-
-
-
 Leslie Malenovsky Melton
on Jun 20, 2017
Awesome idea!!! Can't wait to try it...Thanks for sharing!
-













Frequently asked questions
Have a question about this project?
How do you attach these to the ceiling?