From Wine Box to Beautiful Planter
![[re]FɄB19](https://cdn-fastly.hometalk.com/media/profile/2019/05/21/40771987_6.jpg?size=91x91)
Hello !
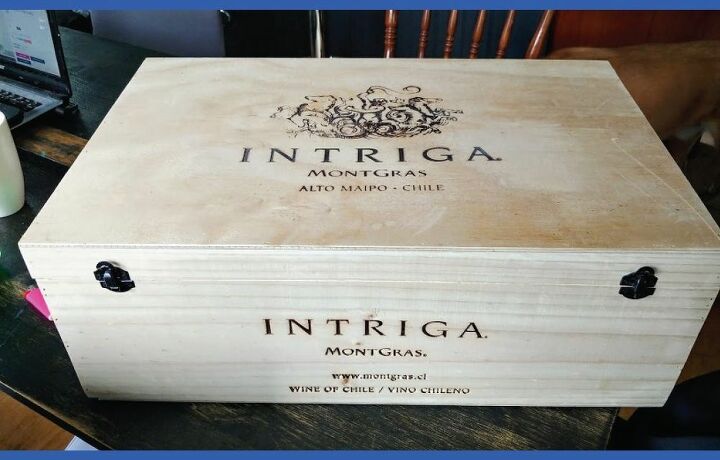
In Quebec (CANADA) we buy our liquore in a crown corporation, so they can not sell something they didn't pay for in order to make a profit. However, they sell the wooden boxes in which they receive the wine at very low prices and they give all the money to local charities. Good for me, I can sip my glass of wine while crafting, and telling myself that I'm all doing it for the cause! 
So it all started with a visit to the SAQ (Société des alcools du Québec) and it is where I found this little beauty for $5!
I was really excited to do... I didn't know what I would be doing with it, but I knew it would be great! 
The lady at the cash desk told me that she had made a planter, by simply adding legs. What a great idea! But just a basic planter? Nah ... Why make easy when you can make it (at least a bit) complicated?
I removed the bottle separators. Fortunately, they were not glued.
There were two stickers on the box. The first withdrew very easily, but the second one left a residue of glue and paper. I thought using Goo Gone but I did not want any oil to spoil the surface before staining my wood.
I simply wet a paper towel with very hot water, and I applied it on the label, well, on what was left of it! I waited about 5 minutes. The goal was to moisten and warm the glue. Waiting too long would have done no good, as the water and the glue would have cooled down. I rolled the paper under my fingers and wiped all the residue with a dry cloth. Voilà! Natural wood without glue and paper, ready to be beautify!
After removing the hardware, I mixed 2 parts of Saman Colonial stain with one part of American Walnut.
I applied the mixture as quickly as possible using a sponge brush. I then wiped off a maximum of stain with a wet paper towel and dried it with a dry cloth. That's how I got a rustic effect, with a color similar to treated wood. Pretty amazing finish I think! :)
Using opaque stain for deck, I protected the inside of the box and lid (1 coat).
- I installed 4 legs made out of 2x2 treated wood to the box. Each leg is 3' high.
- You can see the box screwed to the legs with 3 screws per leg.
- Installing the bottom shelf. To make sure I had an equal distance from ground on each leg, I used a plank of 1x6 as a guide.
- Here it goes! My planter is now standing up!!
Using a drill, I made a dozen of holes for the soil to drain well and to avoid any accumulation of water
It was the first time that I made cross bars (in cross shape!). I don't know if I have the good technique, but the result satisfies me fully!
I started by cutting and installing a crossbar. I tried to be as precise in my measurements as possible.
GOOD TO KNOW : Stop measuring and mark with a pencil. Place the piece to be cut where it should be inserted and draw a line where it should be cut. Since I use this technique, my projects are 100 times more beautiful and more straight! 
In installed geotextile in the box using staple gun, and a moulding on the top front of the box (with Gorilla glue) because the staples were too long and they were showing.
I finally applied 3 generous coats of Teak oil to protect my planter from weather and, of course, plant some plants and flowers! :)
Here's the final result...
I would have trouble explaining why, but this planter makes me so happy! I look at it & I feel better, I feel zen. It's crazy maybe, but still!
Also, and this is priceless... My husband thinks our deck has become so beautiful that we will not want to escape the city in the summer. Why go camping or rent a cottage when heaven is home? I am thinking the same!
Hope you enjoyed! 
P.S. I will try to share more photos when my flowers will have grown and spread.










Frequently asked questions
Have a question about this project?
Love, love, love this!!! It's beautiful!! I just have one question... How did you attach the cross bars in the middle? With glue or a kreg jig and screws? I want to try cross bars but have been afraid to because I have no clue how to attach them at the middle. 😂