CAMPER MADNESS: Before & Afters

by
Adele Kurtz
(IC: homeowner)
9 Materials
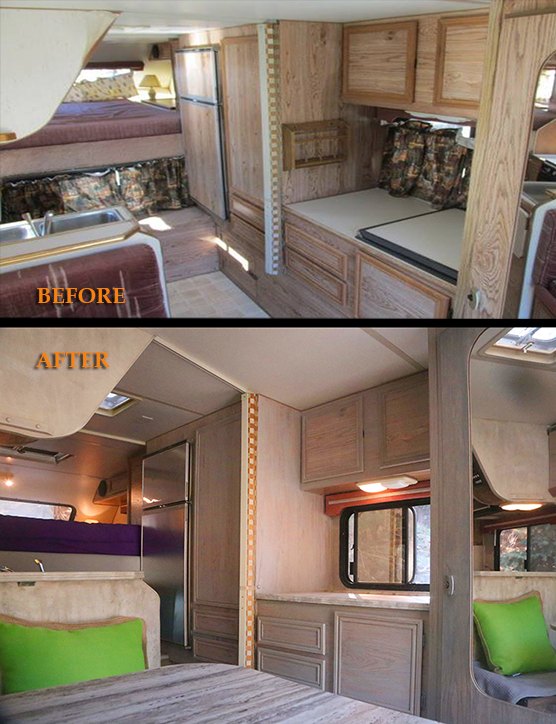
Here's an overview of what we did with our 1989 LANCE Truck Camper, plus links to more details as to how we did what we did.
Two months of redo. I handled the pretty details, which you can see below... while my hubby Rich did (the boring parts like) system overhauls and start up: Inverters, converters, batteries, fridge, heating, water etc.
Lots of chalk paint, washes of matte gray into glazes, faux stone effects.
Redo on walls, countertops, cabinets, doors, floors...
$2000 for camper with about $2000 in cosmetic reno.
Took about 60-80 hrs of actual time.
Maiden Voyage went without a hitch -- to the Grand Canyon.
Fun Times Ahead!
Before & After when you walk in...
Bath area, see separate post.
http://www.hometalk.com/diy/bathroom/mirrors/funky-old-copper-door-mirror-28425276
Oh how I love this Comforpedic Loft Beautyrest 3" Memory Foam cover $90 from Overstock.com thru Ebay.
PLUS a $40 futon cover in REAL Purple from Amazon. PLUS $20 Memory foam pillows from TJ Maxx
All just as -- or more-- comfy than my $$$$ bed at home.
Decided to open space by removing all window treatments above bed. This way I can see the stars at night. A perv would have to stand on our truck hood to peak inside anyway.
Also see this post for how I redid my lighting:
http://www.hometalk.com/diy/decorate/rooms/luminart-fluorescent-flair-28229778
The BEFORE was much worse than it seems in pictures, tho cabinets in great shape and ceiling wall-covering awesome, cleanable & solid. Kitchen area: All appliances thoroughly cleaned. Vent fan, stove top & "stainless" cover removed & repainted. Walls, cabinets & countertops redone & protected with multiple coats of wax varnish.
All countertops got faux stone treatment using glazes of stone colors then protected with multiple coats of wax varnish (day 3, week later, 3 weeks later for long cure between coats) See post:
http://www.hometalk.com/diy/kitchen-dining/kitchen-dining-furniture/marbled-walls-and-countertops-in-a-difficult-tiny-space-28431116
Cabinets got 1-2 coats of grey chalk paint, diluted with water and glaze.
If you've NEUTRALIZED your palette with grays, creams and whites, as we have -- COLOR is the SPICE to SPRING it all to Life!
Wallpaper removed on most walls. Then used Oil-based Kilz primer. Then matte gray + glaze 50:50 stippled over wall for stony effect. 1-3 coats.
CHEAP TRICK: $30 Home Depot sheet metal cut & slid over existing wood laminate.
Gray leather replaces or covers carpeting used up the walls.
Protected the area our dog will peek through with a cutoff of recycled rubber mat custom cut for entry too. Space between camper and truck filled by inflating a rubber inner-tube -- so comfy safe and quiet.
Backsplash tiles I bought for kitchen area -- decided to use as accent along window line... Then just used paint to carry the theme throughout...
The leather I used here will be used for the seating area.
Scored a great bargain on EBay, leather hides used for private aircrafts.
Here's the fresh new look of light gray leather and a tabletop.
Upholstery by Nip N Tuck Durango.
No curtains -- gorgeous views.
YES! The Maiden Voyage -- Grand Canyon: God's way of showing off...
GOOD TIMES AHEAD!
Enjoyed the project?
Suggested materials:
- Paints & glazes: light gray Chalk paint, medium matte gray latex, dead flat wax varnish, stainless spray paint, copper spray paint, decor hobby paints, (Home Depot, Walmart est $200)
- 2 leather hides (Ebay $150)
- Prep materials: Spackle, Kilz oil-based primer, silicone sealers, Tri-Sodium Phosphate TSP, sandpaper, (Home Depot, Ace est $100)
- Accents: Pillows (@$17) Throw rug ($20) recycled rubber mat ($8) (Home Depot & TJ Maxx)
- Backsplash tile, pre-glued @ $18 x 6 (Home Depot)
- Flooring click-in "Luxury Vinyl" (Home Depot special order $160)
- Table top (Ebay auction, bid $80)
- Reupholstery: jobbed out $850 for 7 cushions (Nip & Tuck, Durango)
- Sheet metal for freezer & fridge insert $30 (Home Depot)
Published April 14th, 2017 3:17 PM
Comments
Join the conversation
3 of 24 comments
-
 Ginger the farm gal
on Jun 16, 2017
Kiltz is indeed the only way to go, nice job.
-
-
 Tina Gary Carter
on Jun 19, 2017
Great job guys! Did the fridge work(used or new?)? & is it propane-we are looking @ some used propane fridges, but have heard once they are not used (sit unused) they are problematic?!? This makes me scratch my head DT the fact that most people do not use campers year round...
-
A good cleaning did the job for us. TG We too were afraid that we would have problems, but found an RV guy who blew out carbon buildup in both the fridge & heating units, showed us the ropes. 2.5 hrs. Read a post from an RV pub that says take the tube the gas flows thru out & blow it out. You'd be amazed how many folks think they need to replace the fridge, but all they really need to do is clean out the hose.
 Adele Kurtz
on Jun 19, 2017
-
-










Frequently asked questions
Have a question about this project?
Do you have pix of the outside?
You said the camper cost $2000? Where did you purchase from? We are looking but the used ones go from 25K up. If you did this to your camper you should have the brand name on it somewhere. All that we hv seen hv this information.
Was your real wallpaper or the contact type wallpaper? If it was the contact type....how did you get off?