How To Layer Paint On Furniture To Create Shabby Chic Furniture

by
Country Chic Paint
(IC: professional)
Do you love the distressed, shabby chic look? Have you ever wondered how to create this look with multiple colors? Check out this new tutorial for tips on how to layer colors on your next furniture project!
{
"id": "2953661",
"alt": "",
"title": "",
"video_link": "https://www.youtube.com/embed/LDr9d3_u7FI",
"youtube_video_id": "LDr9d3_u7FI"
}
{
"width": 634,
"height": 357,
"showRelated": true
}
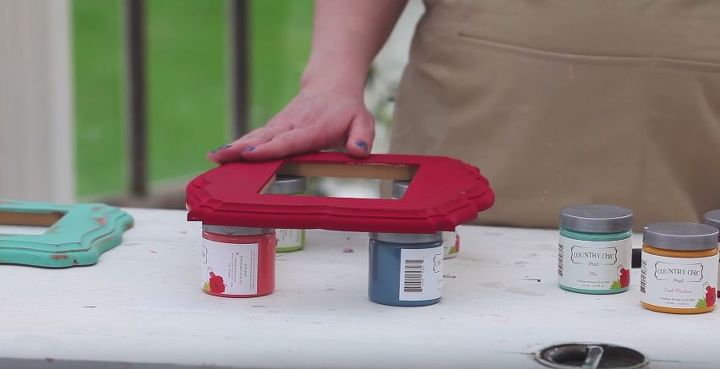
In this brand new video tutorial, we'll show you how to wet distress your project to reveal multiple layers of color.
Begin by applying one coat of the color you'd like to show up as your base layer; in this case, we chose Cranberry Sauce. If this is your first painted furniture project, check out our tutorials on surface preparation (https://youtu.be/wLTaLAAizDE) and paint application (https://youtu.be/kS1wT-yApXA) for tips to help you get started. Make sure you let your paint fully dry (overnight is best) before you move on to the next step.
Your second coat should be in a different color than the first; in this case we chose Fresh Mustard. This color will also show through on your finished project when you distress your piece. Don't worry about getting perfect coverage with this coat. Since you're distressing anyways, it doesn't have to be perfect to give you beautiful end results! Leave your piece for a few minutes before proceeding to the next step but DO NOT let it dry completely.
Using a damp, lint-free rag, begin gently rubbing your piece to remove some of the top layer. Remember that you can always add more pressure if needed, so start slowly and build up pressure from there. You can remove as much or as little of the second color as you like, then let your piece dry completely before moving on to the next step.
Your third coat of paint should be different color again; in this case we chose Bliss. As with the second layer, your coverage doesn't have to be perfect and you don't want to let it fully dry before you proceed to the final step (about 15-20 minutes should be sufficient).
Repeat the wet distressing process again, this time to reveal two colors beneath your top coat. As with Step 3, you can remove as much or as little of the top coat as you like to achieve the look you were hoping for. If you'd like to continue adding more colors, simply let your piece dry and repeat steps 4 and 5 until you like the look!
Did you enjoy our video tutorial? Make sure to Subscribe to our channel to get access to all our videos!
Enjoyed the project?
Published August 17th, 2015 12:36 PM
Comments
Join the conversation
7 comments
-
<3 that! Super cute! Thank you for sharing the steps!
 Mary Carlson
on Oct 22, 2015
- See 3 previous
-
-
 Pam
on Mar 14, 2017
I am currently redecorating my home and looking for new things and themes to incorporate. I like the shabby chic look and vibe. It's cute and classy but doesn't make people feel uncomfortable or out of place. I want to try some DIY's for picture frames like that but when it comes to furniture I'm going to buy it. I think that is the easiest process but still allows me to get a little crafting in! http://www.blackwellenterprise1.com/default.asp?dept_id=36210
-
Happy crafting Pam!
 Country Chic Paint
on Mar 14, 2017
-
-













Frequently asked questions
Have a question about this project?