An Elf on the Shelf Snow Angel: Step-by-Step Guide

When it comes to Christmas, our Elf on the Shelf always brings a lot of giggles and surprises.
This year, I decided to try something new—an Elf on the Shelf snow angel! It’s a simple, budget-friendly idea that’ll have your kids waking up to yet another hilarious elf escapade.
Honestly, this might just be my favorite of all the Elf on the Shelf snow ideas I’ve done so far. Let me show you how you can recreate this adorable scene!
Tools and Materials
- Flour or Baking soda
- Your Elf on the Shelf doll
Hometalk may receive a small affiliate commission from purchases made via Amazon links in this article but at no cost to you.
1. Prep the "Snow"
Sprinkle a generous layer of baking soda or flour on your counter or table. Make sure the space is big enough for your elf to lie down comfortably.
2. Position the Elf
Place your Elf on the Shelf doll right in the middle of the flour/baking soda.
Adjust their position so they’re lying flat, as if ready to make a snow angel.
3. Create the Snow Angel
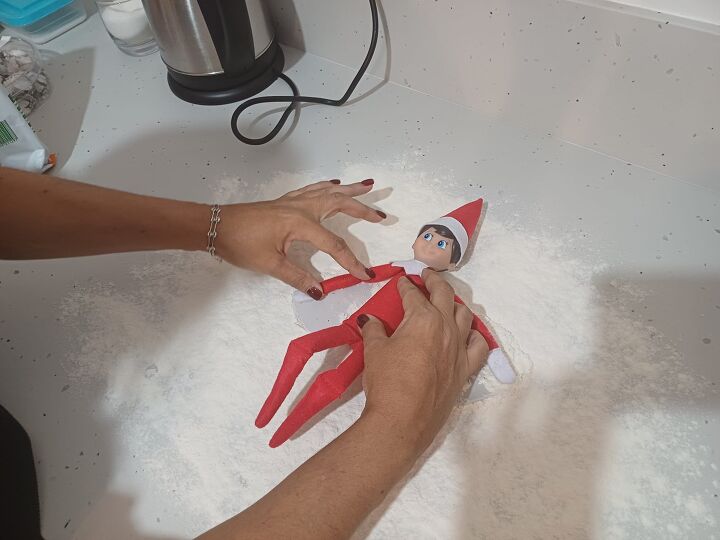
Here comes the fun part! With one hand gently hold your elf’s torso to keep him steady,
Next, move his arms and legs back and forth in the flour. Move one limb at a time to make it easier. This creates the classic snow angel design.
More Fun Elf on the Shelf Ideas
How to make a snow angel with Elf on the Shelf
Making an Elf on the Shelf snow angel is quick, easy, and guaranteed to bring Christmas cheer. It’s one of those ideas that’s so simple yet so effective in making the holiday season magical.
Plus, the kids will love imagining their elf sneaking around at night to create their snowy masterpiece.
Are you ready to add this to your list of Elf on the Shelf snow ideas?
Give it a try, and let us know how your kids react!













Frequently asked questions
Have a question about this project?