DIY Outdoor Pizza Oven for Under $150

We have a family text thread where my brothers love to talk about all things food. One day my younger brother posted this DIY Outdoor Pizza Oven idea, and I got hooked. Since then we have built two and molded different ideas into our favorite design. Here I share the step by step process of each layer, the cost break down, and our experience cooking with this DIY Outdoor Pizza Oven!
- (4) 16 inch x 16 inch Square Stone Concrete Pavers ~ $4.38 a piece
- (18) 8 inch x 12 inch Concrete Olde Manor Wall Blocks ~ $2.78 a piece
- (4) 12 inch x 12 inch Square Stone Concrete Pavers ~ $1.68 a piece
- (47) Standard Paver Bricks ~ $.48 a piece
- (6) 8 inch x 16 inch Paver Stones ~ $.98 a piece
- (2) 1.5 inch x 48 inch, 1/4 inch thick Plain Steel Bar ~ $13.98 a piece (will cut in half)
Your ground needs to be even and level so the pavers sit well. We laid 3/8 gravel rock, then flattened it out to make sure it was level. A 3 foot 2×4 helped us pat down the area.
You will start the foundation base by laying four 16 inch x 16 inch pavers. Use a level to make sure they are straight and even, and especially that they are secure.
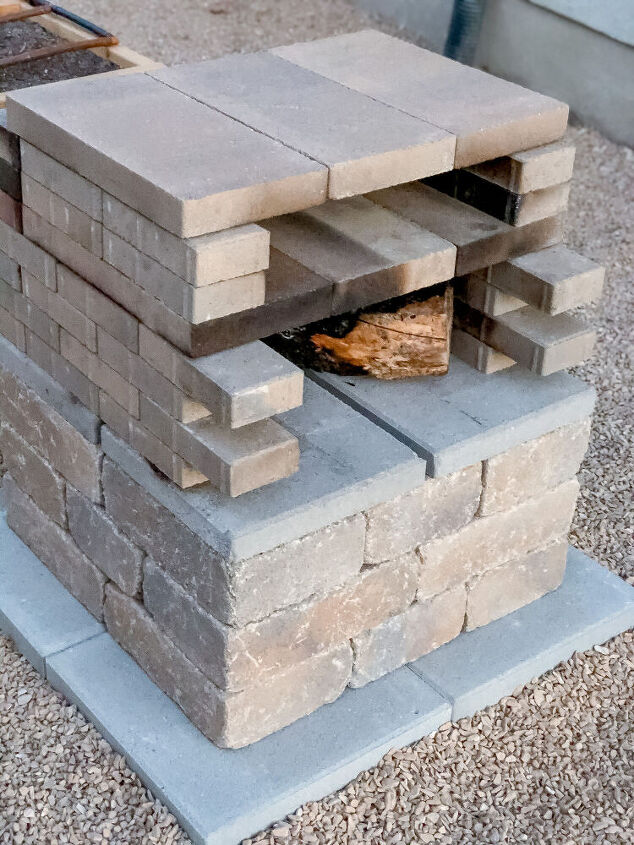
Next up is the foundation which is three layers of the 8 inch by 12 inch wall blocks (stone). You can honestly do as many layers of the stone that you would like, we just chose to do three layers. Place the first stones in the center of the foundation base and then add two onto each of the sides.
Add another layer of stone, turning the pieces this time.
Make one more layer, adding the stones in the same direction you added the first layer.
Here you place four 12 inch by 12 inch pavers to create your oven base. Make sure to space them apart about 3/4 inches to allow air to flow underneath the fire.
Place 7 bricks down onto the Oven Base, 3 in the back and 2 on each side. We reused brick we had previously cooked with hence why some have black edges already.
Place 8 bricks down on top of the first layer, but having 2 in the back and 3 on each side. You may want to use bricks to hold the end pieces into place while waiting to get the 3rd layer on.
Add 7 more bricks just like you did on the first layer, 3 in back and 2 on each side.
Lay 8 bricks, just like the second layer, 2 in back and 3 on each side
Now you add the oven top. Grab your metal braces, 3 bricks and 3 of the 8 inch by 16 inch pavers. Place the first set of two metal braces that were cut in half onto the brick first, spaced about 8 inches apart.
Then add 3 bricks to the back of the oven. The middle brick will need to be pushed back about 1 inch to allow air flow.
Once that is finished you will add your 3 pavers to the top.
Add another layer of bricks, 3 to the back and 2 on each side. Make sure the middle back brick is also moved back by one inch to help with air flow.
Add another layer of brick in the exact same way as you just did. They will be matching, except the middle back brick will now be even with the other bricks. You have created a small air tunnel.
You are almost done! Now add the other 2 metal braces at 8 or so inches apart.
Finally add the last 8 inch by 16 inch pavers to create a top. We pushed them forward so they are not flush with the back. You can add 3 bricks here if you would like to as well.
Enjoyed the project?

Comments
Join the conversation
-
 Mae Hawkins
on May 14, 2022
FANTASTIC!! Thank you!
-
-
 Marianne maggio
on May 14, 2022
YES!~!
-











Frequently asked questions
Have a question about this project?
Do you lay the dough right on the stone. What about dirt getting in there. I have landscapers and everything flies around and could get in there.
Don't you need to use fire bricks?
How do you fire it