Giant Bouncy Ball Ornaments

Who's ready for Christmas???? I know I am! It's time to pack away the Halloween stuff and start gearing up for the most wonderful time of the year! Though I'm sad to say goodbye soon to my favorite time of year (fall), it isn't such a disappointment because I know I can start making and putting out DIY Christmas decor. Wait 'til you see these jolly giant ornaments! I've seen giant ornaments you can hang on your porch but these have a little twist to them.
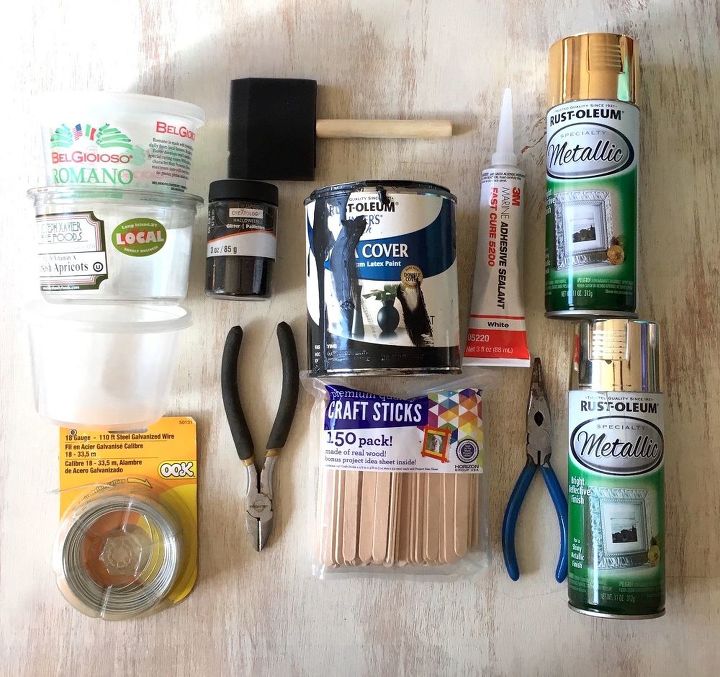
SUPPLIES:
- black paint (I used ultra cover premium latex paint I had on hand.)
- black glitter
- sponge brush
- 3 deli style containers
- metallic gold spray paint
- metallic silver spray paint
- 18 gauge wire
- wire cutters
- needle nose pliers
- craft sticks (or popsicle sticks)
- caulking (I ended up not using what is pictured here...the stuff I used is further down in the tutorial.) Not pictured: -painter's tape -super glue -box cutter (or X-Acto knife) -fishing string And of course don't forget....
...bouncy balls! I snagged three of these for $2.88 a piece at Walmart. The receipt didn't say what size they were but Rob estimated them to be 2'.
STEP 1: Mark off Santa's Belt
The first thing I did for this project was use my painter's tape to mark off Santa's belt. It's always a little confusing using tape on a round surface but I tried to step back a little as I applied the tape to ensure that the width of the belt was going to be somewhat symmetrical.
STEP 2: Paint Santa's Belt and add Glitter
Next, I used a sponge brush to paint in between the tape marks. Try not to go over the first coat too many times or it will just start looking streaky--apply a thick (but not gloppy), even coat let it dry. Then apply a second coat...
...WHILE THE PAINT IS STILL WET (very important!), sprinkle some glitter on the paint, all the way around the belt. This part of the step is obviously optional--I know some people don't want glitter everywhere but I figured since it would be hanging outside, what's the harm? The glitter should give it a little shimmer.
STEP 3: Spray Paint Craft Sticks and Deli Containers
Next, I laid out my craft sticks and sprayed both sides of them with metallic gold spray paint. You may notice some shorter sticks--I had originally thought I'd add a little extra stick to the inside of the belt buckle but ultimately decided to just keep it simple with a square buckle.
While my craft sticks were drying, I sprayed my deli containers with metallic silver spray. I only sprayed the outside.
STEP 4: Assemble Belt Buckles
Next, I used hot glue to assemble my belt buckles... Side note...if anyone has a better idea than hot glue, feel free to advise! I wasn't sure if gorilla glue or wood glue would work better, or if it really mattered. The hot glue seems to be ok thus far.
After my belt buckles were assembled, I used super glue (again, advise if there's something better to use for outdoors when adhering wood to plastic!) to attach them to the bouncy balls.
STEP 5: Make Ornament Topper/Hanger
After I allowed my belt buckles to dry, I took my deli containers and cut a small slit on either side of them with a box cutter...
...then, I fed a piece of wire (I cut my wire pieces about 9-12") through the slits. You'll want to feed in one end of the wire in...
...then, using a pair of needle nose pliers, I rolled the wire back onto itself. Do the same thing for the other side of the deli container.
STEP 6: Attach Ornament Topper/Hangers
To attach my ornament hangers, I applied caulking to the rim of my deli containers, then I stuck them on the top of the bouncy balls. I applied a little pressure, while at the same time running my finger along where the deli container and ball met so as to wipe off the excess. Let dry overnight.
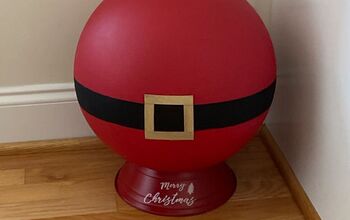
Who would have ever thought this was once a kid's bouncy ball?!
Though the wind was not cooperating with me while I took photos, I'm pretty pleased as punch at how cute these Santa belt ornaments came out! If anyone has any tips on how to keep them facing straight, I'm all ears! :)
Though the wind was not cooperating with me while I took photos, I'm pretty pleased as punch at how cute these Santa belt ornaments came out! If anyone has any tips on how to keep them facing straight, I'm all ears! :)
Enjoyed the project?
Resources for this project:
See all materialsComments
Join the conversation
-
 Lin114299110
on Nov 21, 2024
Similarly to the above, use clear fising line to hand as well as continue to run it down to the ground and anchor with fising weights, or a U hook
I’m going to give that a try. Too bad there is now way to go through the center without popping the ball.
-
-
 Mammaw
on Jan 01, 2025
I loved your ornament so much. I made one this year. Mine doesn’t hang outside. It’s a decoration inside. Couldn’t find a red ball so I had to paint my ball.
anyway, I just love it was such a simple project, but mine was a little more complicated. They have to paint it. I wanted mine to shine, but I was afraid to mix all the chemicals with it with the spray and and the paint and a rubber ball anyway I love it thank you so much for the idea. It’s such a simple idea, but I just loved it
I kept the idea a long time before I actually did it, but I’m so glad that I did. I love doing crafts and I love all the ideas I get from home talk.
I don’t know if you’ll see this because your ornament was done so long ago, but I just wanted to let you know that I never forgot.
I hope you have a wonderful new year. Stay safe and be happy.
-












Frequently asked questions
Have a question about this project?
Very cute,really good job.This is a question for Betty, I tried E 6000 glue on a table on porch did not hold,maybe I didn't let it dry long enough before I turned the table right side up?
Wouldn't the paint crack if you deflate the balls?
I was wondering if I could get beach balls, blow them up, paint them and anchor them down with sand before I blew them up. Sand would not puncher them and maybe they won't wander in the wind. I have ordered 3 blowup 24inch balls that are already Christmas balls but I still want to weight them down. Maybe marbles would work. Any thoughts?