Dresser Makeover-Star Wars Style

by
Barb Orthmann
(IC: homeowner)
2 Materials
$100
2 Months
Medium
My daughter-in-law found a dresser on Craigslist for $20 and asked if I would pick it up for her. When asked what she planned to use the dresser for, she said she thought she'd paint it black to match the crib in the nursery. I not only picked up the dresser, I offered to re-do it for her, which she gladly accepted. The whole family is somewhat obsessed with Star Wars and the nursery is Star Wars themed. I didn't have a solid plan for the dresser when I started and it pretty much evolved as I went. I took a couple of months to complete working on it when I had the time. It could have probably been done in a weekend if it didn't have to be de-stinkified! I hope you like it :)
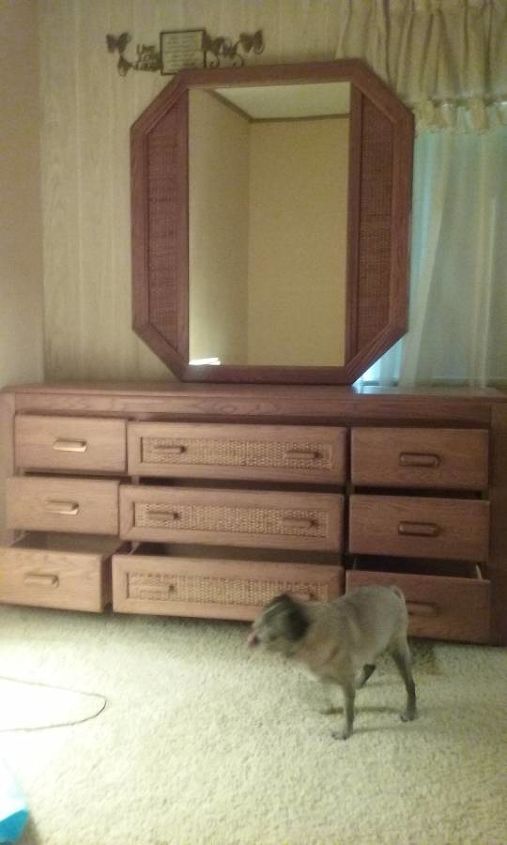
This was the original dresser at the previous owners home. Large, solid and in great shape- great buy at 20$! What I didn't fully realize, until i got the dresser home, was how bad it smelled- a cross between musty and smoke- I mean... really, really stinky! I washed it down inside and out several times using vinegar and lemon essential oil and let it sit in the FL sun for a few days. That helped a little. I put baking soda in every drawer and closed it up for a couple weeks, and that helped a lot, but it still stunk too much to use, so ultimately I sprayed it with Kilz inside and out. That did the trick!
The center drawer fronts were rattan and didn't really go with what I had in mind. I used a wood chisel to scrape the rattan from the front of the drawers. This took some doing.
The surface under the rattan was rough and I accidentally gauged it out in some places where the rattan fought me coming out. I used wood putty across the whole drawer front to smooth it out. It took several coats, sanding between each coat.
Next up- chalk paint in Inky Black. If you've never tried chalk paint before, I highly recommend for repainting furniture. Minimal prep and great coverage. Chalk paint needs sealing either with wax or poly. I chose a matte poly because the rest of the furniture in the babies room was matte and poly because it's durable and wipeable - perfect for a kids room.
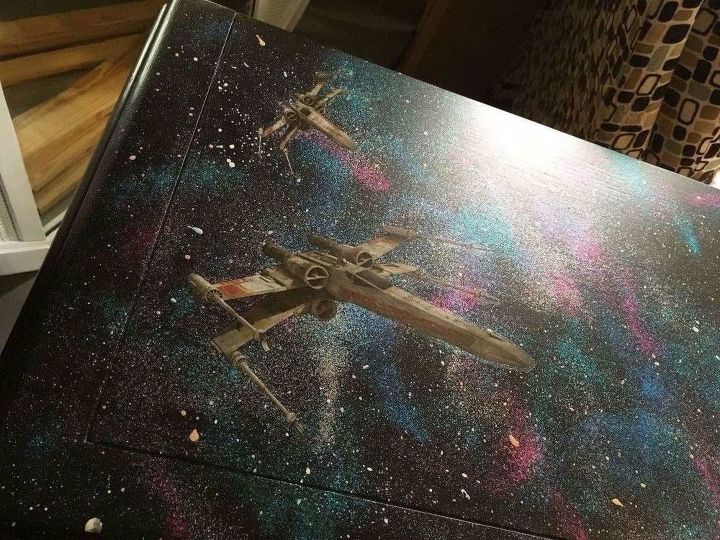
I used white and yellow paint to spatter on top by thinning the paint with water, dipping a small brush and running my thumb along the bristles to create "stars". I added a coat of the matte poly and then added the fairy dust (glitter) while the poly was still wet. The glitter I used was super fine. I held the bottle fairly high up over the dresser and gently shook it, sometimes blowing it as I shook to disperse it. Once I had it where I wanted it, I added a couple more coats of poly.
I purchased the decals for the drawer fronts from Amazon from Modern Vector. I emailed them and they custom sized it for the dresser. These folks were life savers because I applied the decals with the drawers lined up on the floor, not realizing that one drawer was upside down- I ruined the top drawer! They sent me a new one for free when I told them what I had done! This decal was about 10$.
X-wing fighters moving in on the Death Star
You can't have a Star Wars themed anything without the Death Star. Decals also purchased on Amazon for another $10
This was a labor of love for my first grandbaby- Lucas!
Enjoyed the project?
Suggested materials:
- Chalk Paint (Amazon)
- Decals (Amazon)
Published October 23rd, 2017 2:04 AM
Comments
Join the conversation
3 of 138 comments
-
 Lee
on Oct 26, 2022
What a great job! DIY projects are the best, as it is a labor of love. What a talent you have❤️
-
 Barb Orthmann
on Oct 27, 2022
thank you!
-
-
-














Frequently asked questions
Have a question about this project?
how did you apply the decals? How did you put the pink and aqua paint on the top? I know you said you did the specks with a tooth brush but I am not understanding how you got the other colors on there???
did you apply stickers after finishing the top....or before??....thanks in advance