Installing a Sloped Ceiling Wardrobe - in 2 Minutes!

by
The London Craftsman
(IC: vlogger)
2 Materials
$500
8 Hours
Advanced
With a day available to install this wardrobe, we started at 730 and completed by 330! The video at the bottom of this post show the 2 minute timelapse of this project. Everything we do is handmade. We are so proud of that and hope you enjoy our handmade sloped ceiling wardrobe.
We had previously made this in our workshop a few days prior.
The interior is all made from mdf sander to a fine p240 finish, with the option of the client painting once installed. The exterior was made from Birch ply and oiled in a raw polyx oil from OSMO brand. The interior was a mixture of adjustable shelving, hanging and drawers.
The doors were all soft close and finger pull handles and mirror were added last.
We received an email from our client who requested a wardrobe for a room that had a sloped ceiling. We received a photo of the space and a sketch of what he wanted for the space with rough measurements. We proved an initial estimate via email and then arranged for our joiner to visit the client to discuss materials and design. Following this visit we produced a computer design and a final quote.
After initially wanting a white hand painted/spray finish the client really liked the birch faced ply finish. To keep costs down the client opted for an unpainted MDF interior and a birch faced ply exterior.
After a deposit has been received our next step is to draw up a cutting list. With a sloped ceiling this can be very tricky so we use a computer programme called sketch up to draw up to scale the design.
A cutting list is drawn up and sent to our wood suppliers. We have our materials cut to size at the suppliers to save time.
After taking delivery of the materials, our first job is to sand the edges and machine the components. We pre- drill holes and machine biscuit joints.
We then construct the units in our workshop ready for fitting.
Whilst on site our first job is to lay down protection and cover all surfaces. We then fix bearers to the floor which are levelled for the units to be screwed to. The units are put in place levelled up and screwed together. We then hang the doors and fit any additional components such as push release handles. The last step for construction is to fit the trims which often take the longest. We scribe our trims to the walls which in most cases are not straight.
Once construction is complete we clean up the unit, polishing the carcasses and doors ready to be loaded up by our client.
This project was unique because of the sloped ceiling. We needed to measure each piece to size and note the height differences and slope.
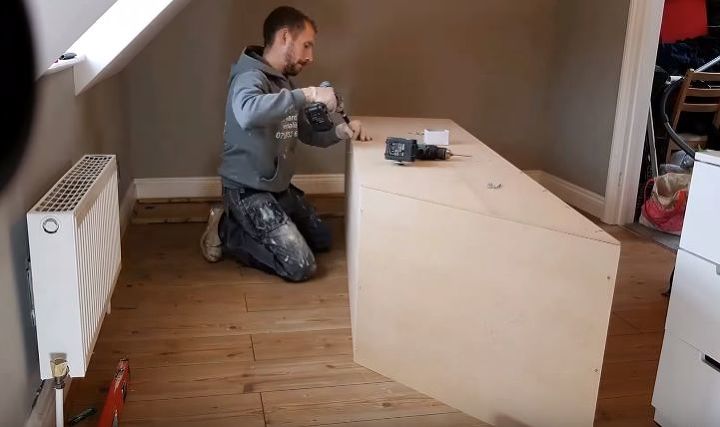
Working from the middle to the bottom of the slope to the top, the first course of action was the middle section. After measuring, cutting, and nailing it to size the section was slid against the wall.
We moved on to the bottom section of the slop and assembled the wood to fit, and moved it in to place.
We moved on to the bottom section of the slop and assembled the wood to fit, and moved it in to place.
Here is the top section after sliding it in to place
To add some flare and a nice touch, mirrors were nailed into the inner closet doors.
The doors to the closet were measured and attached.
To add some flare and a nice touch, mirrors were nailed into the inner closet doors. The doors to the closet were measured and attached.
Look how stunning it came out!
Join us in our goal of being as environmentally friendly as possible and reducing our carbon footprint.
Please check out our other videos and portfolio at https://www.thelondoncraftsman.co.uk/
{
"id": "4242157",
"alt": "",
"title": "",
"video_link": "https://www.youtube.com/embed/MHdvREHZiLA",
"youtube_video_id": "MHdvREHZiLA"
}
{
"width": 634,
"height": 357,
"showRelated": true
}
Enjoyed the project?
Suggested materials:
- Wood
- Drill
Published September 12th, 2017 10:43 AM
Comments
Join the conversation
2 of 39 comments















Frequently asked questions
Have a question about this project?
How much did this cost your client?
what materials are needed for the project
how much did it cost the client? minus the labor fee, If I were to do it myself.