


Small Bathroom Makeover Ideas on a Budget: Easy Upgrades

Transforming a small bathroom on a budget can seem daunting, but with the right approach, you can achieve a stunning result.
For this small bathroom makeover, we started with some foundational changes and ended with a show-stopping feature that completely revamped the space.
Here's a detailed step-by-step guide to our DIY small bathroom makeover.
Table of contents
Tools and materials:
- Utility knife
- Pry bar
- Scraper
- Tile cutter
- Notched trowel
- Level
- Jigsaw
- Brad nailer
- Squeegee
- New tiles
- Tile adhesive
- Grout
- Tile spacers
- Shiplap panels
- Peel and stick wallpaper (from Wall Blush)
1. Remove the old linoleum floor
To kick off our small bathroom makeover, we began by pulling up the old linoleum floor. This step is crucial to give the bathroom a fresh and modern base.
Start by cutting the linoleum into manageable strips using a utility knife. Then, use a pry bar to lift the linoleum, starting from one corner.
Scrape off any remaining adhesive residue from the subfloor to ensure a smooth surface for the new tiles.

2. Install new tiles
Choosing the right tiles can significantly enhance the look of your bathroom. Lay out the tiles to determine the best fit and pattern before applying tile adhesive to a small section of the floor using a notched trowel.
Place the tiles carefully, using spacers to maintain even gaps. Once the adhesive is set, apply grout between the tiles and clean off any excess grout with a damp sponge.
This new flooring forms a durable and attractive foundation for the rest of your small bathroom makeover.

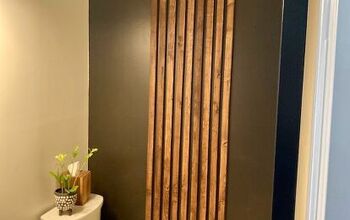
3. Add shiplap panels
Shiplap panels add a rustic and stylish touch to the walls. Before installation, measure and cut the panels to fit your bathroom walls, ensuring to cut out holes for plumbing using a jigsaw.
Start attaching the shiplap from the bottom of the wall, securing each panel with a brad nailer. Work your way up, making sure each panel is level and fits snugly against the one below it.

4. Apply peel and stick wallpaper
The real show stopper of this DIY small bathroom makeover is the peel and stick wallpaper from Wall Blush. This product is beginner-friendly and transforms the space with minimal effort.
Begin by selecting the most inconspicuous corner to start applying the wallpaper. Hang the panels in order, ensuring they line up easily. Use the squeegee provided to smooth out the panels and remove any air bubbles.
The peel and stick wallpaper adds a beautiful and professional finish to your bathroom walls.

Small bathroom makeover ideas on a budget
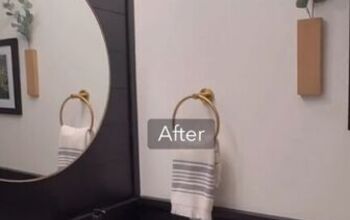
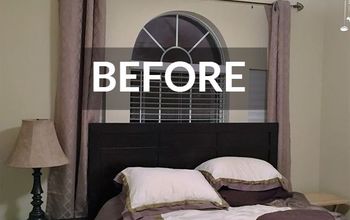
After completing the main installations, step back and admire the transformation. Here’s a before photo:

And here’s an after photo:

This small bathroom makeover not only looks fantastic but also demonstrates how effective small bathroom makeover ideas on a budget can be.

This step-by-step guide shows how a few strategic changes can lead to a stunning DIY small bathroom makeover. With new tiles, shiplap panels, and eye-catching peel and stick wallpaper, your small bathroom can look refreshed and stylish without breaking the bank.
We love the end-result and hope you do too! Share your thoughts and love in the comments below.
Follow @a_bit_unexpected_diy on Instagram for more DIY ideas.


Frequently asked questions
Have a question about this project?
I’m a big fan of the board and batten look. Love the wallpaper it looks very clean and classic which should not appear dated.
Our bath redo is tricky as it has a leak years ago and it was repaired in the bathroom above but they didn’t do anything to the drywall on the ceiling and it was covered up with paint and plaster so no idea until we moved in last year. We have decided to put cedar on the ceiling instead so that it will never be effected by heat or moisture and wondered if we should use the same technique as you used for your walls in the addition of the bead board?
Suggestions are welcome. We’ve seen some great high end spas and other bathrooms that are starting to use this method for ceiling.