Thanksgiving DIY Project: How to Fashion a Delightful Turkey Gnome

Crafting your very own Turkey gnome is the perfect way to infuse some holiday charm into your home.
Join me as I show you how to make this cute handmade ornament to adorn your Thanksgiving table.
This post was transcribed by a member of the Hometalk editorial team from the original HometalkTV episode.
Tools and Materials:
- Foam pumpkin
- Orange canvas material
- Hot glue gun and glue sticks
- Styrofoam cone
- Black canvas fabric
- BBQ skewer
- Fancy orange ribbon
- Gold Christmas ribbon
- Faux fur
- Wooden bead
- Feather garland
- Realistic-looking turkey feathers
- Scissors
Hometalk may receive a small affiliate commission from purchases made via Amazon links in this article but at no cost to you.
1. Preparing the Pumpkin Body
To kick off your DIY Gnome adventure, start with the foam pumpkin and carefully remove the stem.
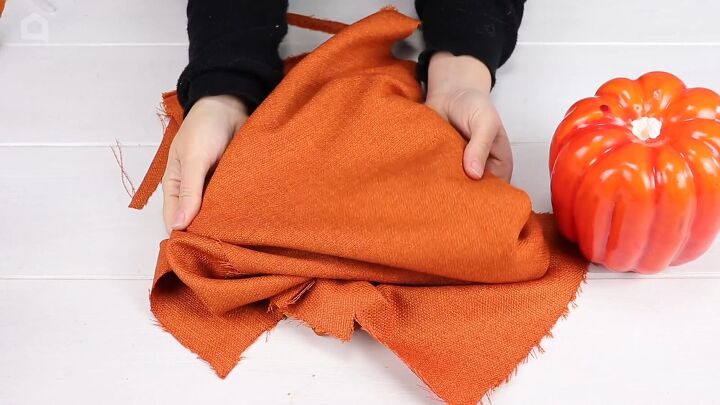
Take your orange canvas material and cut a square large enough to cover the entire pumpkin.
Use your trusty hot glue gun to secure the fabric in place, beginning with the corners and gradually wrapping it around the pumpkin.
Don't fuss too much about perfection; it'll all be concealed later in the process.
2. Shaping the Hat
Moving on to the gnome's hat, grab the styrofoam cone and snip it just where the tip begins. This will form the basis for a top hat.
Cut a circle from the black canvas fabric for the top of the hat
You will also need to cut a long piece to wrap around the sides. Leave approximately a half-inch edging along the fabric.
Start by gluing the fabric strip around the sides of your styrofoam cone.
To ensure a neat finish, fold the top edges inward.
Next, apply glue to the circular top piece and carefully attach it to the cone.
3. Crafting the Brim
Now, let's work on the brim of the hat. Trace and cut out two more circles from your canvas fabric.
To give it extra durability, glue two of these circles together.
Cut a slit in the middle of the brim of the hat.
Take a BBQ skewer and thread it through this slit.
Attach it to the top hat portion, creating the hat's distinctive form.
4. Adding Decorative Details
Make your gnome's hat stand out by wrapping it with fancy orange ribbon, and securing it in place with hot glue.
Add a square of gold Christmas ribbon for a buckle.
5. Faux Fur Beard
To make your Thanksgiving gnome truly enchanting, cut a piece of faux fur to fit the length of the body.
To preserve the fur's texture, remember to cut it from the backside.
Stick the hat on top of the pumpkin to determine where to glue the fur.
Tuck the fur under the brim of the hat, ensuring a snug fit.
6. Nose and Mustache
Attach a wooden bead to create the gnome's nose, holding it until the glue sets securely.
Cut an additional U-shaped piece from the fur, applying it under the nose to make a mustache.
Once you've successfully glued these pieces in place, apply a touch of glue beneath the hat to ensure it's firmly secured to the nose.
7. Feathers for Flair
To give your turkey gnome craft a more realistic feel, trim a piece of feather garland to match the size of the gnome's back and glue it in place.
Choose some feathers that look real.
Attach the realistic-looking turkey feathers in front of the feather garland on the back side of the gnome.
Looking to expand your Thanksgiving decor collection?
Thanksgiving Table Decor: Turkey Gnome Tutorial
Your Turkey gnome is now ready to take center stage in your Thanksgiving decor!
I hope this DIY Thanksgiving craft project brought joy to your holiday preparations. Don't forget to share your thoughts and pictures of your adorable gnomes in the comments below. I'd love to hear about your crafting adventures!
Enjoyed the project?









Frequently asked questions
Have a question about this project?