DIY Bucket A/C

Upcycle a cooler into a DIY A/C.
Please take a minute to click here to sign up for the Mother Daughter Projects weekly newsletter. You'll get notification about our new projects and what is up and coming.
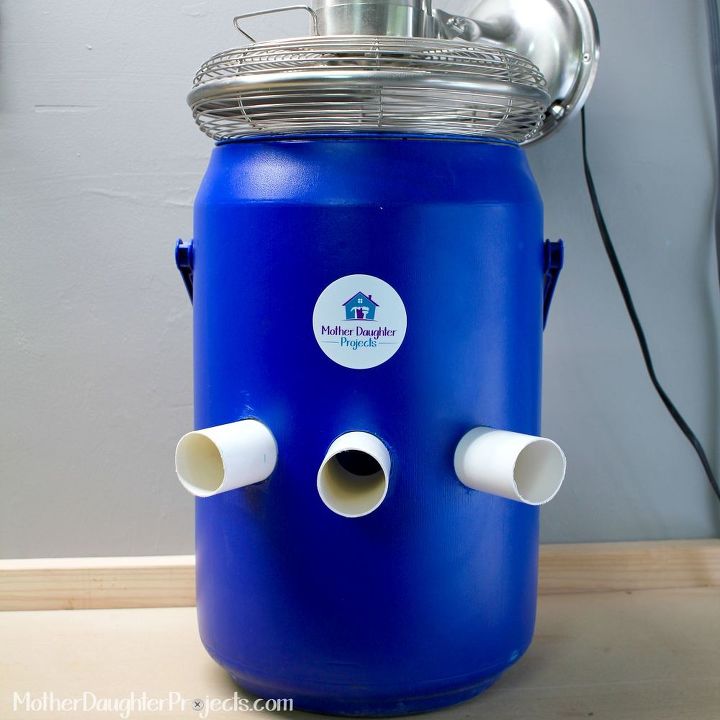
Like us, you've probably had this project pinned for some time. Anyone who has ever worked in a hot garage, in summer, in Florida knows that even a tiny hint of cold air is welcome relief! I wanted to try the project but didn't want to go to the expense and effort of ordering the needed styrofoam bucket liner that the project required. I was on the lookout for something that would eliminate the need for the liner. As luck would have it, I found this insulated vertical drink cooler that would be perfect for only $2 at a yard sale. I already had the needed plastic tubing, fan, and hole saw cutter so the expense for this project was minimal!
Materials:
- Insulated bucket (this was picked up from a yard sale for $2)
- Plastic or PVC tubing
- Tape to seal tubing (optional)
- Fan to fit top of bucket
- Jugs of ice
Watch the video!
before
Using a hole saw bit, drill three holes to match the diameter of the plastic tubing you are using near the bottom of the bucket. Mine was 2 1/8". In hindsight I should have drilled mine closer to the bottom. (I will plug the existing holes and re-drill them.) The theory for holes closer to the bottom is that cold air settles to the bottom. That way the fan is blowing out the coldest air possible. Science-go figure!
Cut three sections of plastic tubing or PVC pipe about 6" long. Place tubes into bucket. I did not secure mine, but they can be sealed into place with any number of products including wrap and seal tape.
To use:
Place frozen jugs of water into the bucket, place fan on top, turn on and enjoy the tiniest amount of cold air ever!
This really doesn't produce any discernible cooling of the surrounding area but if you are right in front of the tube vents, there is a noticeable cooling. I wouldn't say this is a fail as any sort of cooling in Florida is blessed relief but I wouldn't count on a DIY bucket A/C to keep you cool.
This was a fun project/experiment of a pinned project.
For more details and a how-to video visit our website!
Enjoyed the project?

Comments
Join the conversation
-
 Doreen Kennedy
on May 29, 2023
Basically a block of ice with a fan like my grandparents used.
-
-
 Big160177999
on Oct 12, 2025
There are antique cars that used this kind of technology to cool the air that came through the vents inside car. I do not remember what car it was but it was under the hood next to the engine. They just added more ice to the box under the hood of the car and when driving down the road, air would blow through ice before entering car. It was an option of sum car makers, just like ac is an option today.
-






















Frequently asked questions
Have a question about this project?
I live in Coastal SC and boy does it get hot! I think you did a great job! I love it! This will help cool my hobby room. I'll still use my usual fans to circulate the air. Anything helps. Plastic jugs of frozen water lasts longer than ice! And it's portable unit!
Did anyone else mention this would require plugging into a GFCI circuit? Otherwise you would have to add a GFCI plug to the fan cord.
What kind of a fan is that? Where’d u get it???