Mobile Heartache to Mobile Home!

by
MichelleB
(IC: homeowner)
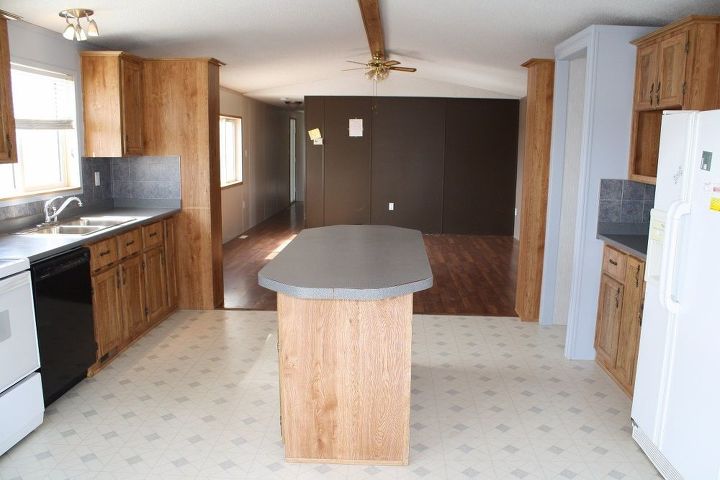
Four years ago, we moved into a 20-year-old mobile home on a farm. Being a city girl, I was at a loss with what to do with this place that had sat empty for 2 years and was being reclaimed by the critters and insects that inhabited the land. The kitchen was particularly daunting as you can see. It took me 3 years and testing the waters in all the other rooms before I could even figure out where to start in the kitchen.
When we first moved in we bought new appliances and changed the white for stainless steel. The kitchen got an industrial cleaning and de-mousing and then we used it like that until the end of winter 3 years later.
When we first moved in we bought new appliances and changed the white for stainless steel. The kitchen got an industrial cleaning and de-mousing and then we used it like that until the end of winter 3 years later.
Floors: The linoleum was staining and turning purple. If you set a chair in one place for a day and moved it there would be four deep purple squares in its place. I knew we had to do something about the flooring .
Painting: The next step was painting the cupboards. A good cleaning with TSP, a base coat of Kilz primer and then 2 coats of Behr paint in "Papier Blanc". We took countertops off as I planned to replace them.
Island: I removed the old island top and stained and used 7 coats of Varathan on a pre-cut bamboo butcher block top. I have no intention of cutting on it without a cutting board so felt this was the best way to protect it. This is the only place I feel I'd do something different as water droplets on the Varathan cloud up. So far they have disappeared but if the water sat for hours I'm worried it may not.
Countertops: We went to Ikea and picked up two inexpensive counters in a black speckle. With the help of my hubby, the cutting and installation of a new tap were a breeze. We kept the old sink.
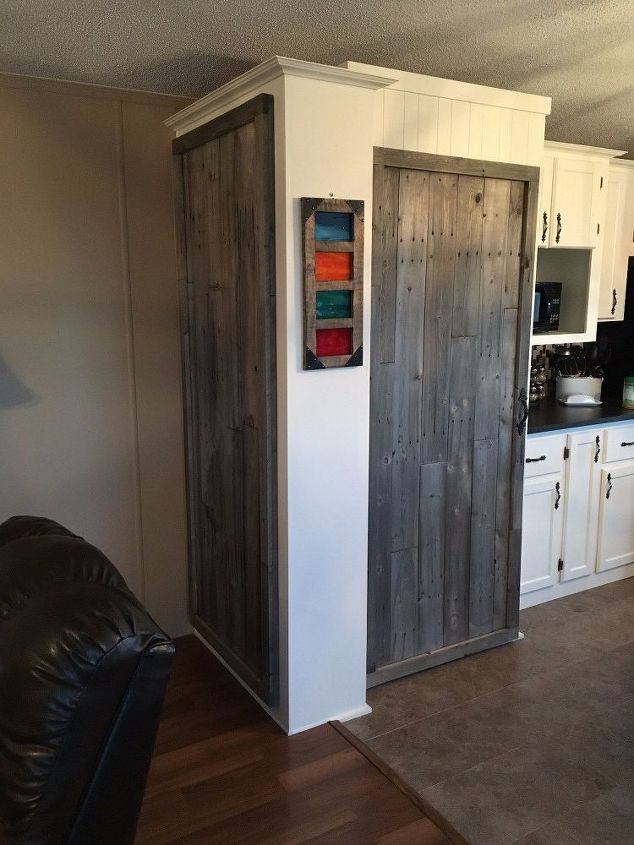
Pantry & Storage: The pantry got a header and footer put in for the barn door I had planned for it and more shelving was added so I could store more items.
Lighting: Luckily my husband has skills. We replaced an old ceiling fan and ugly track lighting with 3 lovely pendant lights!
What happened to the dining room? We decided we didn't need it. We weren't using it and the island seating has become a favourite place for us to sit and talk. We turned the dining room into what we call "Goat TV". We have a lovely sitting area in which to share time and look out at our farm animals. Spring with 4 new kids was particularly fun!
The closet by the door became my mini mud room. I used white tiles on the bottom shelf to hold shoes, put a couple of bins in to hold gloves and such, and there is a key tray and somewhere to hang jackets.
I'm so glad we tackled these projects. I finished painting the beam that goes through the middle of the house a few nights ago. Just in time to find out that we need to sell the house as we have a great opportunity in another Province.
Enjoyed the project?
Published September 10th, 2016 8:35 PM
Comments
Join the conversation
2 of 170 comments
-
-
 Pollyyy
on Jun 11, 2025
Moving into a long-abandoned mobile home and slowly reclaiming it shows real grit—especially taking on that kitchen after years of waiting. I went through something similar, and while making a place your own takes time, staying cautious is key too. I found helpful advice how to avoid real estate scams at pissedconsumer it gave me peace of mind while tackling home improvements and navigating ownership.
-












Frequently asked questions
Have a question about this project?
Thanks for showing your DIY for Mobile Homes, most ideas are for stick built homes, am thrilled that you stepped out of the norm and added what can be done for Mobile Homes. I applaud you as there are a lot of us out here living in Mobile Homes and want to make some changes, especially in the kitchen.
I do have a question though, my bedroom door has a hole in it as my son got made and used his fist to make the hole. How can I cover that hole, it's fairly high up and closer to the hinges then the center of the door. The color is a blonde wood and the door is hollow, can't replace it with a normal size door, and even if I want to wallpaper the door the hole would show up. Any suggestions sure would be appreciated .... Thanking you in advance!!
Great redo! For your kitchen lighting, was there two separate junction boxes in the ceiling? It looks like the piece of wood runs from one to the other so just wondering? Thanks!
Great result! I like it a lot! We are thinking about buying a mobile home. We've already found a good variant, but it also requires remodeling. I'll keep some of your ideas in mind. Thanks for sharing! But what are other things we should look for before making the purchase?