


How to Make a Creative DIY Key Organizer With Building Block

I used to spend way too much time doing the “where are my keys?!” dance every single morning.
One day, after checking the fridge (yes, really), I decided enough was enough. That’s when I came up with this DIY key organizer with building blocks—and honestly, it’s one of those projects that makes you smile every time you use it.
Not only does it solve the chaos of misplaced keys, but it also brings a little nostalgic joy into your daily routine. Plus, it’s ridiculously affordable and easy to make.
Tools and Materials:
- Picture frame (any size you like)
- Building blocks (various sizes)
- Building block base plate
- Drill
- Small drill bit
- Key rings
- Screwdriver (optional, for frame backing)
- Wall hooks or nails for hanging
Hometalk may receive a small affiliate commission from purchases made via Amazon links in this article but at no cost to you.
Table of contents


Head to the dollar store and grab a frame, building blocks and a block base

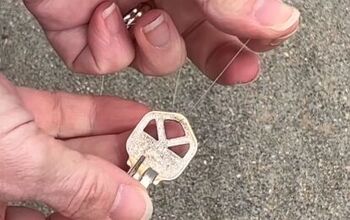
1. Drill Holes into the Blocks
Start by choosing a few building blocks that will hold your keys.


- Drill a hole through the narrow side of each block
- Then drill another hole on the opposite side of the same corner
- Make sure the holes are wide enough for your key rings

This step transforms simple blocks into functional key holders.


2. Prepare the Picture Frame
Now grab your picture frame and take it apart.

- Remove the backing and glass
- Set the glass aside (you won’t need it)
- Keep the frame and backing

You’re basically turning the frame into a display box for your block base.

3. Fit the Base Plate into the Frame
This is where it starts coming together.


- Trim the building block base plate to fit inside the frame
- Line it up neatly inside the frame
- Replace the glass with the base plate
- Secure everything with the frame backing

Now you’ve got a sturdy, mountable surface for your blocks.

4. Mount Your Organizer on the Wall
Choose a convenient spot near your door.
- Hang the frame using nails or wall hooks
- Make sure it’s secure and level
This ensures your keys always have a “home.”

5. Turn Blocks into Key Holders
Remember those drilled blocks? Time to finish them.
- Thread key rings through the holes
- Attach your keys to the rings
- Snap the blocks onto the base plate
And just like that, your keys are organized—and kind of fun to grab!

Why This DIY Key Organizer Works
It Keeps Everything in One Place
Having a designated spot reduces the chance of losing keys. According to organizational studies, visual cues and consistent placement significantly improve habit formation.
It’s Customizable
You can rearrange blocks anytime, add more hooks, or even color-code keys for family members.
It Adds a Nostalgic Touch
Let’s be honest—there’s something comforting about building blocks. This project blends practicality with a bit of childhood joy.

Bonus Tips for an Even Better Organizer
Use Larger Blocks for Heavier Keys
They provide more grip and stability.
Add Labels for Each Family Member
Use stickers or a label maker to assign spots.
Keep Extra Blocks Nearby
Great for guests or spare keys.

DIY Key Organizer with Building Blocks
This DIY key organizer with building blocks is one of those projects that checks all the boxes. It’s affordable, easy to make, and actually solves a daily problem. Plus, it adds personality to your space in a way store-bought organizers just can’t.
If you try this project, I’d love to hear how it turns out! Share your version, get creative with colors, and make it your own.
And hey, no more checking the fridge for your keys.


Frequently asked questions
Have a question about this project?