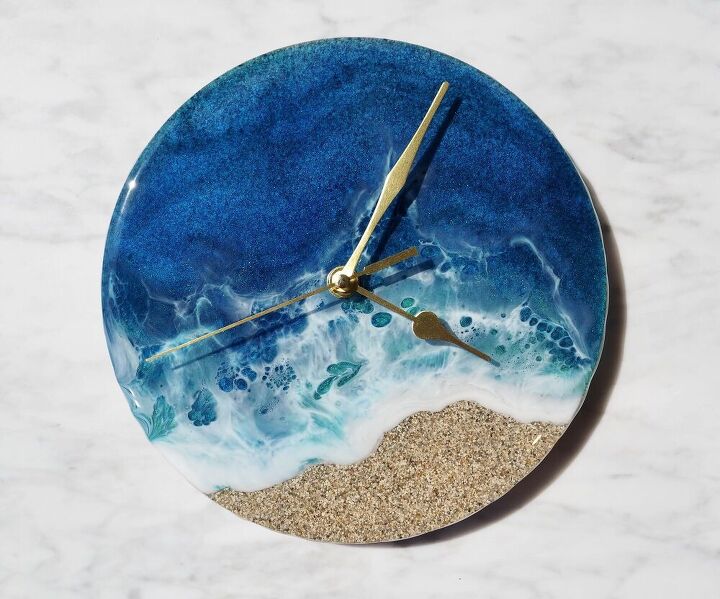
Resin Ocean and Miami Sand Clock

If you want to learn how to make a super professional looking piece that absolutely doesn’t take a professional to make then read on guys 
As always, if you’re feeling kinda nervous about venturing into the world of resin then I URGE you to take the plunge. I have a 10% DISCOUNT CODE with a resin company that also offers FREE SHIPPING so their products are very affordable too!
See below for further details 
- Resin - 4 Star Coating Resin. FREE SHIPPING! Use my code HANNAH at checkout for a further 10% off your order too
- Sand
- Clock mechanism
- Gloves and protective wear
- Measuring containers and mixing sticks
- Heat gun
- Blow torch
- Drill with a drill bit that is slightly thicker than your clock mechanism thread
- Round silicone mold
- Colourants and pigments
- Liquid latex or tape

 This project is up on my YouTube now!

Simply click play in the video above to view.
Please also visit my channel and subscribe for future tutorials 
For my 9 Inch mold (8.5 inch inside measurements) I poured 200mls of fully mixed resin, so 100mls of hardener and then 100mls of resin (in that order) into my mixing jug.
After mixing my resin for at least 5 mins, very thoroughly, I gradually added in my sand bit by bit so that it was easy to mix in. I ended up with about twice the volume I started with so I probably added In 200mls of sand in the end but I did this by how it felt and by then consistency I wanted rather than making it too scientific!
I then spooned the mixture out into the mold and spread it out around the base evenly. I let the mixture set for at least 12 hours before moving onto the next step.
After the resin has fully set, I pull it free from the mold.
To protect the underside from future resin drips, either tape off the edges with strong waterproof tape or, like I’ve done, add a generous layer of liquid latex around the edges which can be satisfyingly peeled off later.
Next, I mix up another batch of resin measuring 100mls (so 50mls of hardener and 50mls of resin). I mix this thoroughly and separate into 5 containers.
I leave a small batch clear and add white to the other small batch. With the 3 larger batches I make a mix of blues using green, blue and purple liquid pigments and 2 blue mica pigments for a sparkly shimmery undertone.
One by one I add my blues to 2 thirds of my clock base overlapping and intertwining the layers to create a natural look. I then use a mixing stick to blend the lines and add more waves.
After adding my blues I add a thin layer of clear resin along my ‘shore line’.
I then add a layer of white on the very outside of the clear resin line making sure that the white makes contact with both the clear resin and the cured sand base.
Give your resin and quick blast with your blow torch to get rid of the bubbles and then grab your heat gun to start making your waves.
Hold the heat gun at about a 45 degree angle directed at the white and blow the white into and over the blue to create broken waves.
Lastly, use your blow torch to create cells in your waves with short quick blasts over the white patches.
Allow to set for another 12 hours.
Find the center of your clock base and drill a hole there. My mold created a little circle anyway but if yours doesn’t then use this method shown in the diagram.
Draw three random lines across your base and measure those lines exactly. Mark the halfway points on those lines and then draw perpendicular (90 degree) lines that intersect those at the halfway mark. Where those lines meet in the middle is your center.
Mix your last batch of resin to coat your entire clock base so that there’s no more step-up from the sand base to the resin waves (if you want). If you like the step then you don’t have to do this step.
Again, allow to set for at least 12 hours.
Peel off the latex carefully and then pick off all the drips from the edge which should be fairly easy and clean. There may be a slightly rough edge left over so sand this smooth.
Then lastly assemble the clock mechanism to your clock base as per the instructions on the packet and voila!
Although this project is quite time consuming, there’s nothing that hard about any of the steps and if you’re prepared to put the time in you can end up with a really special and unique piece of decor at the end.
Thanks so much for reading!
I also have an Etsy store where this clock and many other items are currently for sale. Please click to take a look.
Thank you and happy crafting! X
Enjoyed the project?
Resources for this project:
See all materialsComments
Join the conversation
-
 Mary
on Jul 29, 2022
Thank you!! These are great directions and a wonderful video! You are a wonderful teacher! I have been wanting to try doing a resin beach scene and you have given me the tool and confidence to give it a try!! 👍☺️💕
- See 1 previous
-
 Hannah Somerville's Crafty Tutorials
on Jul 29, 2022
Oh that's amazing! I'm so pleased! Let me know if you have any questions ☺️❤️
-
-













Frequently asked questions
Have a question about this project?
Very nice - although the clock aspect takes away from it a tad.
Why not just make if a lovely objet d’art to reveal all the beauty?
PS: do you make these to sell? You should!!
Can you list the dyes you used?