10 Clever Ways to Fake High-end Looks With Dollar Store Finds!

These DIY home décor ideas mean you don’t need to spend big to decorate with style. Follow these 10 easy tutorials for making ornaments and furniture that are both functional and chic. Pick up what you need from the dollar store and give your living room or garden the upgrade they deserve. Learn several cool techniques, which you can then experiment with to achieve the effect you desire.
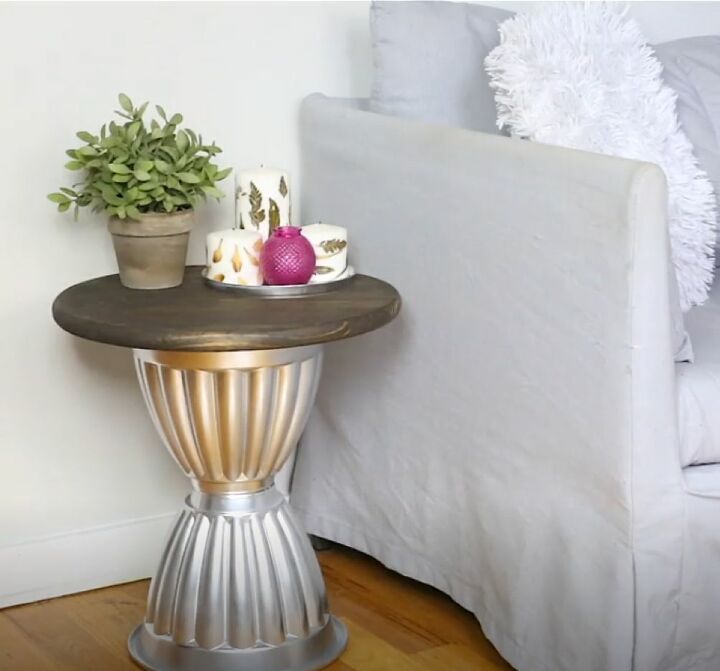
Side Table
Tools and Materials
- Two plastic pots
- Spray paint
- Glue
- Round wooden panel
- Wood varnish
Step 1: Gather Your Materials
Keep all the tools you need close at hand. This way your DIY home decor project will be done faster and without any hitches. An important assurance since you’ll be playing with glue. I used E6000, but any equivalent product will get the job done. The pots need to be identical, at least, in dimensions.
Step 2: Create the Base
Turn one pot upside down and add glue to the base. Stick the second pot onto it the right way up. Bases of the same size allow a uniform effect. Another factor to consider is that the pots need to be wide and strong enough to support the wooden top without falling over.
Step 3: Paint
For the high-end look I wanted, I used Rust-Oleum’s silver metallic finish. A gold or copper color would shine just as well. Spray a uniform layer onto the glued pots. Then get your wooden panel and add the varnish. Once everything is dry, it’s time for the project’s final step.
Step 4: Attach the Top
Add glue to the rim of the upper pot and then stick on the panel. A light-weight top and centralized placement will make sure your side table stays upright when more items are put on it. One way to glue the two parts together with precision is to mark the underside of the panel first
DIY Basket
Tools and Materials
- Candlestick
- Round glass coaster
- Basket
- Spray paint
- Burner cover
- A knob-like item
Step 1: Gather Your Materials
I used a glass candlestick and coaster for their shape and weight. As the base of this DIY home décor, they need to be able to support the basket, lid, and whatever contents are added when the project is completed. The spray paint I applied is a Krylon pale green.
Step 2: Create the Base
Get your E6000 glue, stick the coaster onto the candlestick, and the basket onto the coaster. I chose a metal basket to give my project a more stable structure. Let the glue dry and then add the spray paint. Make sure it’s a uniform layer all over, including inside the basket.
Step 3: Create the Top
It doesn’t matter what the burner cover looks like because you’ll be painting over it. What’s important is that it’s the right size to serve as a lid for the basket. Glue whatever you chose for a knob onto the top of the burner cover. And paint it all the same color as the base.
Step 4: Assemble
Use the DIY basket as storage for keys or fill it with more decorative materials, like moss or fairy lights. Try different combinations of dollar store finds and colors to create the perfect ornament to complement your home. Why not make two? Each set on either side of a balcony.
Fake Topiaries
Tools and Materials
- Plastic pot
- Spray paint
- Pebbles
- Floral foam block
- Dowel rod
- Styrofoam ball
- Moss
Step 1: Gather Your Materials
If you ever wanted topiaries of your own, this is your chance. All the tools you need are easy and cheap to find. Create a couple of these decorations to put around the house or patio for a chic natural look without the hassle of fallen leaves and pruning.
Step 2: Paint
Get the pot and spray paint it. I chose a metallic cream color from Krylon’s line, but, once again, it’s up to you to decide what hue best matches the space the topiary will be in. There are beautiful ranges of green, orange, and even purple, so have fun designing your DIY home décor!
Step 3: Stabilize the Base
Put the pebbles in the pot and the floral foam block on top, adjusting it as necessary. Because of the towering materials to follow, the weight of the stones is especially important in keeping the topiary stable. If placed outside, for example, a sturdy base will help it better resist winds.
Step 4: Create the Tree
Take a darkly varnished dowel rod. Make a small hole in the Styrofoam ball, add glue, and insert the rod. The other end of the rod goes in the foam. Make sure the tree stands well on its own. Finally, glue fake leaves on the ball and pile moss on the base.
Step 5: Decorate
Add faux flowers or go for an entirely different Styrofoam shape. They include stars, hearts, and even birds. How about a flamingo? Paint on the beak. Glue pebbles on for eyes. Replace the leaves with feathers and the moss with water-colored fabrics. Think about what your topiary could look like!
Rope Bowl
Tools and Materials
- Cling wrap
- Bowl
- Mod podge
- Hot glue
- Paintbrush
- Rope
- Styrofoam ball
- Moss
Step 1: Gather Your Materials
For a simpler DIY home décor project, try this one. The result is a bowl of unique and tasteful style that fits in anywhere around the house. It’s also a practical feature, not to mention durable, that would look quite at home in the garden. Here’s how to make it.
Step 2: Wrap with Saran Wrap
Get a bowl of any kind and cover it in cling wrap, especially the underside. This is to protect the dish from the glue as much as the integrity of the rope during the final stages of the project. Also, the bigger the dish, the grander the rope bowl can become.
Step 3: Glue on the Rope and Seal
With a brush, apply a generous layer of glue on the underside of the dish. Mod Podge was my preference. Add some hot glue to the end of the rope, stick that at the center of the bowl’s curve, and start coiling it against the dish. While progressing lather the rope with Mod Podge, until it’s saturated. Let the rope bowl seal.
Step 4: Create Decorative Balls
Once your cool new bowl is ready, it’s time to fill it with a bit more flair. Get four small Styrofoam balls that can sit snuggly inside it. Glue moss onto two of them and gold leaf on the others. The second material is slightly trickier to apply, but far more striking when finished.
Step 5: Decorate
What you should end up with after following my project is a charming decoration for indoors or out in earthy browns and greens with some dazzling gold catching the eye. Different materials and colors will have different effects, of course. See what high-end inspiration can be found at the dollar store.
Mini Greenhouse
Tools and Materials
- Picture frames
- Glue
- Scotch tape
Step 1: Gather Your Materials
This clever project is even easier than the last. All you need are picture frames and good glue, the first of which you may not even need to buy. If you have a specific plant in mind that you’d like to put in your mini greenhouse, get frames of its approximate size.
Step 2: Attach Frames
Line with glue the two ends of each frame that will serve as part of the greenhouse wall. Stick them together to form a square and apply some scotch tape until the glue sets. Glue frames of any size onto the top edges of this square and lean them in to form the roof. Mini greenhouse complete!
Step 3: Fill with Plants
The only thing left to do is add a plant. Since there’s no bottom to the DIY greenhouse, you simply, but carefully, lift and place it over your choice of flora. Something to experiment with is styles, colors, and shapes of frames that contrast or complement the plant and room.
Lattice Plant Décor
Tools and Materials
- Artificial hedge trellis
- Wooden diamond trellis
- Glue
- Scissors
Step 1: Gather Your Materials
Another simple DIY home décor project, but one needing slightly more special materials. An artificial hedge trellis and wooden diamond trellis can usually be found in the gardening products section of most stores. If the dollar store proves to be short of such things, a local gardening center should be better equipped to help you.
Step 2: Attach Fake Plants
Once you have what you need, take the artificial hedge and cut it up into sections. Rectangles and squares are better because these can then be glued onto the diamond trellis’s narrow strips of wood. Fill every inch of it with bright green foliage. There are also many other trellis styles to consider!
Step 3: Decorate
Since its greenery is fake, your lattice plant décor can be mounted on any wall, both inside and out. This decoration is perfect for those fed up with just hanging up pictures and wall clocks. Add a unique nature-loving touch to your home by trying different sizes, angles, and hedge types.
Hula Hoop Shelves
Tools and Materials
- Two hula hoops
- Spray paint
- Two wooden panels
- Electric screwdriver
- Two dowel rods
Step 1: Gather Your Materials
The hula hoops don’t need to be brand new. Unless you can find second-hand ones, buy the cheapest you can find. All the materials are important as this project results in a handy and chic shelving unit. Its size, dependent on the diameter of the hoops, will need appropriate space.
Step 2: Paint
The first stage involves spray painting the hula hoops on a protected surface. Rust-Oleum’s copper color fit my plans perfectly, but the range has several hues waiting to be experimented with, such as black, red, or green. Apply a generous layer of the paint until the hoops’ original designs are completely covered.
Step 3: Attach Shelves
Then come the wooden panels. A dark color will match the copper hula hoops better. With the electric screwdriver, nail either end of the top shelf to the desired height of one hoop and the bottom shelf below it. Then attach the second hoop. Preparation and markings make things easier.
Step 4: Stabilize
Two dowel rods are needed now, painted the same color as the hoops. Glue them to the bottom of your shelving unit, connecting and stabilizing them. Planning will, once again, ensure they’re set at the right distance from each other to keep the furniture from rolling about or falling over from the weight.
Step 5: Decorate
Place your new shelves anywhere that suits and decorate with plants or utensils. As an impressive work of DIY home décor, it can dominate a room, so consider your options carefully. An alternative design could entail setting the rods so the shelves lean, so you can hang things from them or add some ivy.
Popsicle Stick Wall Décor
Tools and Materials
- Popsicles
- Glue
- Paint
- Paintbrush
Step 1: Gather Your Materials
Get as many popsicle sticks as possible and have all other tools around you for a faster process. Think about a wall you want to decorate and what design would look best on it. To start, arrange the popsicles on the floor or even draw a rough plan of them - this helps to avoid mistakes when glue becomes involved.
Step 2: Lay Out Your Design
It’s time for that glue. Put a small amount between the connecting ends of popsicles, start from one end of the design you’ve laid out and work your way to the other end. I went for a honeycomb pattern, which can be extended in any direction you wish.
Step 3: Attach Shelves
I then chose to give the wall décor a bit of practicality with little shelves. Glue stacked popsicles on the design where items of a relatively small size would sit nicely. Then, glue the sticks (around 30) onto the selected bases. The shelves should extend far enough to accommodate at least a small plant or candle.
Step 4: Paint
For this project, you need black paint, which ends up looking quite striking when the wall décor is hung up. Use a brush and cover the entire honeycomb design; front and back. Pay special attention to the shelves and cracks between popsicles. The paint also acts as an extra binding measure besides the glue.
Step 5: Hang
Let the whole thing dry before you place it on its wall, and then proceed to add ornaments to the shelves. If you’re a traveler, this DIY home décor project is perfect for your souvenirs. Why not paint it in inspiring blues and yellows to resemble sunlit clouds in the sky?
DIY Candlesticks
Tools and Materials
- Candlesticks
- Jar lids
- Glue
- Spray paint
- Gold leaf
- Candleholders
Step 1: Gather Your Materials
This project upgrades unused and unwanted candlesticks. A few simple materials are needed and, if you’re the type that holds on to jars, you may already have lots of lids ready and waiting for creative uses. Make sure you match candlesticks with lids that are slightly wider than their tops, where candles would normally go.
Step 2: Create the Base
Add glue to the rim of a candlestick and attach it to the bottom of its allocated lid. Prepare as many bases as you want. Since you’ll be painting over them, it doesn’t matter what they look like. However, my glass candlesticks made for sturdy bases with classic chic sharp angles.
Step 3: Paint
When the glue is dry and the base definitely stable, add the spray paint. A metallic gold always serves well if aiming for a high-end style. This is where the shape of the candlestick can really shine. As a special touch, glue on some gold leaf for extra gleam and embossed effect.
Step 4: Attach the Candleholder
Finally, complete the project with a delicate glass candleholder on the top. Depending on what kinds of candles you want to use these ornaments for, design the DIY candlesticks accordingly. For example, the tip of a toothpick would be glued and painted on to hold pillar candles instead of tea lights.
DIY Shell Mirror
Tools and Materials
- Food coloring
- Bowls
- Water
- Vinegar
- White shells
- Round mirror
- White cardboard
- Glue
- Scissors
Step 1: Gather Your Materials
This DIY home décor project comes in two stages, so free yourself enough time to complete it all. The first part requires the bowl, food coloring mix, and shells. It’s only in the second part that the glue, cardboard, and other materials are needed. Protection for surfaces is especially important while making this ornament.
Step 2: Create the Dye
I filled two bowls with water and vinegar and added a few drops of food coloring to each, one to make blue shells and the other to make green. If you want additional colors, prepare as many bowls as necessary. Mix the dyes to get shades of purple and orange. Play around!
Step 3: Dye the Shells
Submerge white shells in the bowls. Leave them to absorb the coloring and then scoop them out to dry. There’s a limit to how many shells will fit across the mirror’s frame, so you could estimate based on the size of the mirror and the thickness of the frame.
Step 4: Create the Backing for the Mirror
Now, place the mirror on the white cardboard and draw the circumference of the intended frame. Whatever size suits you best. Cut it out with scissors or a paper cutting knife. Cover the back of the mirror with E6000 glue and stick it onto the cardboard backing, as centralized as possible.
Step 5: Attach Shells
The final stage simply involves decorating the frame with the colored shells. Add glue to each shell and arrange them around the mirror as necessary. An extra fun suggestion is to spray paint the backing before attaching the mirror so its color can break through those of the shells. Beautiful combinations can be made!
Allow the clever techniques of these faux high-end DI Y home décor projects sink in. Enjoy creating these exact ornaments or set your imagination loose and try different versions. Think about how you’d like to decorate a specific room or space and visit a local dollar store for materials. Decorating your home to perfection doesn’t have to be expensive.
Continue experimenting, and share your favorite creations with us and your friends!









Frequently asked questions
Have a question about this project?