Make a Neon Sign

by
Amanda C, Hometalk Team
(IC: paid contributor)
7 Materials
$30
2 Hours
Easy
I don't know about you, but I love a good neon sign. I met a girl who literally makes neon signs as an art form and I still can't get over how awesome that is... Anywho, why not make a faux one for your home in the words of your choice? This neon sign is super simple to make and can be made to say anything you would like! With some el-wire and a piece of plywood you can make a neon sign for any size and space. We want to help you DIY, so some of the materials in this post are linked to sellers. Just so you know, Hometalk may collect a small share of sales from the links on this page.
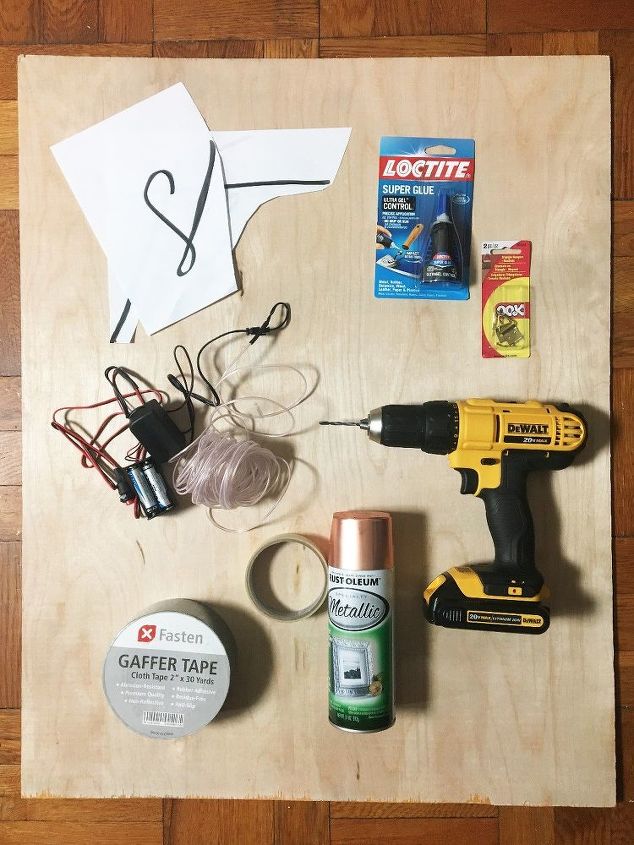
SUPPLIES: -Printed out word / phrase in the font of your choice -Battery Powered El Wire ( I used white and bought a 30ft one just in case) -Drill -Gaffe Tape -Paint in the color of your choice (optional)(I used Rustoleum copper spray paint) -Picture Hangers -Loctite Gel Super Glue
STEP 1: Paint your plywood Paint your plywood if you want to have a painted sign. If you want to keep it as raw wood that is perfectly fine!
STEP 2: Add your words Once your paint has dried it is time to add the words!! Take your print out and arrange it as you would like it to be on your board. I cut each letter out at first thinking I might want to wiggle them around, but wound up just keeping them together just like they were printed.
STEP 3: Secure your words Tape down your words so that they don't move around for the next step.
STEP 4: Drill holes for the wire Grab your drill and drill holes that are large enough for the diameter of the el wire that you purchased to fit through. You will be drilling holes at each entrance and exit point of your letters so that the wire will only be seen on the front to define the words and then feed through the back for all empty spaces in between.
STEP 5: Feed your wire through the holes Once your holes are drilled you will start with the first letters entrance point and feed the el-wire through from the back. Be sure to pull all the wire through the hole.
STEP 6: Tape down the battery pack Tape down the battery pack to the back of the sign with some gaffe tape.
STEP 7: Glue down your el-wire Grab your gel super glue and begin carefully and neatly gluing the el-wire down to the board in the shape of the letter you printed out.
Continue gluing the letter down remembering to shape it as the letter is seen in your printout. If you need you can place the letter back under the wire to use as a guide and then just pull it out from under the wire just before you glue it down.
Once you have your letter shaped out it is time to feed the wire through to the back through the exit point you made for that letter. Pull the wire tightly through so that all the excess is then in the back. You will then move along and repeat this process for each letter feeding the wire through the first point to the front and through the last point to the back. Some letters are trickier than others and may need several enter and exit points. For instance, I used 4 points for the letter t since there are 2 separate lines.
STEP 8: Once you have shaped out all of your letters, tape down any excess wire you have to the back of the board with your gaffe tape.
STEP 9: Hang up your sign (optional) If you want to hang the sign versus just setting it on a dresser or something you will need to add some picture hangers to the back. I added these triangle hooks to the top. *If the battery pack you have is too thick, you can add a small piece of wood to the back with wood glue and then attach the picture hangers on top of the additional wood so that the sign hangs flush. (I had to do this and it worked great!)
Now simply hang you sign where you wish and light it up to enjoy! I think mine is missing something so I may add a frame or some sort of design around it, however I am planning a mural for this wall so it may be nice to keep it simple...
This thing looks pretty great in daylight, even though it is clearly more fun in the dark. I chose a white light, but if you had pink or something it would show up even more during daylight against the wood panel.
The pictures above were when it was still daylight, but when it was pitch black this thing really came to life! I want to make 20 more of these guys! My husband was a bit disappointed at how thin the wire was, but honestly it is about a 4th of the cost of the thicker el wire so I say it's economical... even though I agree hehe...
{
"id": "4094777",
"alt": "",
"title": "",
"video_library_id": "8000",
"thumbnail": "https://cdn-fastly.hometalk.com/media/2017/07/31/4094777/make-a-neon-sign.jpg"
}
{
"width": 634,
"height": 357,
"showRelated": true,
"noautoplay": ""
}
[{"sources":[{"type":"video\/mp4","src":"https:\/\/video-cdn-prod.b-cdn.net\/hometalk\/2021\/12\/15\/15560\/15560_source-720.mp4","label":"720p"},{"type":"video\/mp4","src":"https:\/\/video-cdn-prod.b-cdn.net\/hometalk\/2021\/12\/15\/15560\/15560_source-1080.mp4","label":"1080p"},{"type":"video\/mp4","src":"https:\/\/video-cdn-prod.b-cdn.net\/hometalk\/2021\/12\/15\/15560\/15560_source-406.mp4","label":"406p"}],"poster":"https:\/\/cdn-fastly.hometalk.com\/media\/videos\/2021\/12\/15\/15560\/thumbnail.jpg","media":{"video_library_id":15560,"thumbnail":"https:\/\/cdn-fastly.hometalk.com\/media\/videos\/2021\/12\/15\/15560\/thumbnail.jpg"}},{"sources":[{"type":"application\/vnd.apple.mpegurl","src":"https:\/\/video-cdn-prod.b-cdn.net\/hometalk\/2021\/12\/01\/9239\/RvRwP5Ib.m3u8","label":"HLS"},{"type":"video\/mp4","src":"https:\/\/video-cdn-prod.b-cdn.net\/hometalk\/2021\/12\/01\/9239\/9239_1080p_h264.mp4","label":"1080p"},{"type":"video\/mp4","src":"https:\/\/video-cdn-prod.b-cdn.net\/hometalk\/2021\/12\/01\/9239\/9239_720p_h264.mp4","label":"720p"},{"type":"video\/mp4","src":"https:\/\/video-cdn-prod.b-cdn.net\/hometalk\/2021\/12\/01\/9239\/9239_406p_h264.mp4","label":"406p"},{"type":"video\/mp4","src":"https:\/\/video-cdn-prod.b-cdn.net\/hometalk\/2021\/12\/01\/9239\/9239_270p_h264.mp4","label":"270p"},{"type":"video\/mp4","src":"https:\/\/video-cdn-prod.b-cdn.net\/hometalk\/2021\/12\/01\/9239\/9239_180p_h264.mp4","label":"180p"}],"poster":"https:\/\/cdn-fastly.hometalk.com\/media\/2021\/09\/28\/7815566\/thumbnail.jpg","media":{"video_library_id":9239,"thumbnail":"https:\/\/cdn-fastly.hometalk.com\/media\/2021\/09\/28\/7815566\/thumbnail.jpg"}},{"sources":[{"type":"video\/mp4","src":"https:\/\/video-cdn-prod.b-cdn.net\/hometalk\/2023\/02\/10\/24226\/24226_source-406.mp4","label":"406p"},{"type":"video\/mp4","src":"https:\/\/video-cdn-prod.b-cdn.net\/hometalk\/2023\/02\/10\/24226\/24226_source-720.mp4","label":"720p"},{"type":"video\/mp4","src":"https:\/\/video-cdn-prod.b-cdn.net\/hometalk\/2023\/02\/10\/24226\/24226_source-1080.mp4","label":"1080p"}],"poster":"https:\/\/cdn-fastly.hometalk.com\/media\/videos\/2023\/02\/10\/24226\/thumbnail.jpg","media":{"video_library_id":24226,"thumbnail":"https:\/\/cdn-fastly.hometalk.com\/media\/videos\/2023\/02\/10\/24226\/thumbnail.jpg"}},{"sources":[{"type":"video\/mp4","src":"https:\/\/video-cdn-prod.b-cdn.net\/hometalk\/2023\/03\/23\/25087\/25087_source-406.mp4","label":"406p"},{"type":"video\/mp4","src":"https:\/\/video-cdn-prod.b-cdn.net\/hometalk\/2023\/03\/23\/25087\/25087_source-720.mp4","label":"720p"},{"type":"video\/mp4","src":"https:\/\/video-cdn-prod.b-cdn.net\/hometalk\/2023\/03\/23\/25087\/25087_source-1080.mp4","label":"1080p"}],"poster":"https:\/\/cdn-fastly.hometalk.com\/media\/videos\/2023\/03\/23\/25087\/thumbnail.jpg","media":{"video_library_id":25087,"thumbnail":"https:\/\/cdn-fastly.hometalk.com\/media\/videos\/2023\/03\/23\/25087\/thumbnail.jpg"}},{"sources":[{"type":"video\/mp4","src":"https:\/\/video-cdn-prod.b-cdn.net\/hometalk\/2023\/08\/09\/28372\/28372_source-406.mp4","label":"406p"},{"type":"video\/mp4","src":"https:\/\/video-cdn-prod.b-cdn.net\/hometalk\/2023\/08\/09\/28372\/28372_source-720.mp4","label":"720p"},{"type":"video\/mp4","src":"https:\/\/video-cdn-prod.b-cdn.net\/hometalk\/2023\/08\/09\/28372\/28372_source-1080.mp4","label":"1080p"}],"poster":"https:\/\/cdn-fastly.hometalk.com\/media\/videos\/2023\/08\/09\/28372\/thumbnail.jpg","media":{"video_library_id":28372,"thumbnail":"https:\/\/cdn-fastly.hometalk.com\/media\/videos\/2023\/08\/09\/28372\/thumbnail.jpg"}}]
Enjoyed the project?
Resources for this project:

STARSHINE 30ft 10m Neon Light El Wire w/ Battery Pack

OOK 20 lb. Brass-Plated Ring Picture Hangers (2-Pack)
Any price and availability information displayed on [relevant Amazon Site(s), as applicable] at the time of purchase will apply to the purchase of this product.
Hometalk may collect a small share of sales from the links on this page.More info
Published January 14th, 2017 6:45 PM
Comments
Join the conversation
2 of 49 comments
-
 Veralucia Santos
on Jan 06, 2018


-
-
 Dl.5660408
on Jan 07, 2018
Wow, I’ve never seen this type of project and boy, is it impressive! Thank you so much for sharing it!
-










Frequently asked questions
Have a question about this project?
Love this but can't find the el wire for less than $100. You mentioned $30. Can you point me in the right direction?