How to Make Your Own DIY Dollar Tree Farmhouse Kitchen Decor

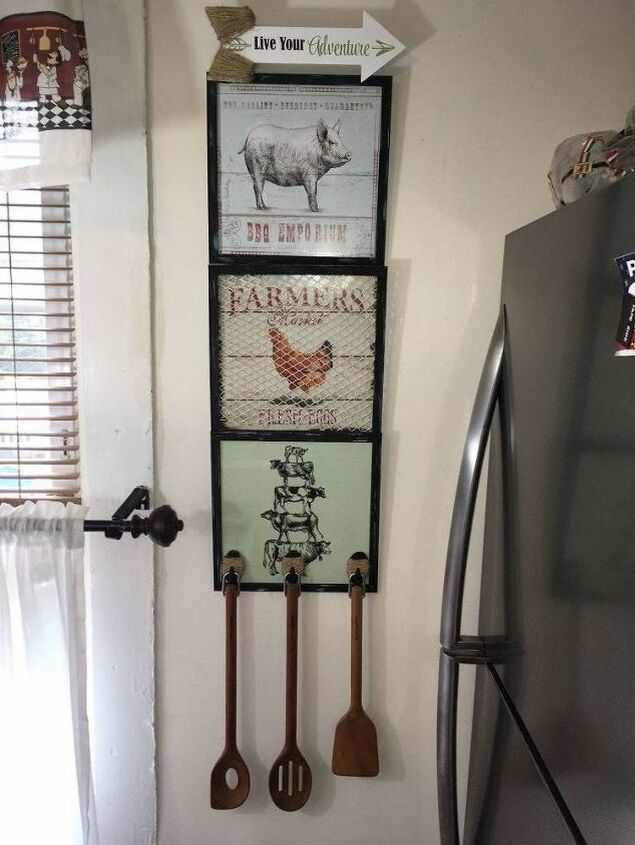
It might seem contradictory, but sometimes the best in modern farmhouse kitchen decor means taking a step back into the past. That's the idea I had with this DIY project, which has made a fantastic addition to my home, as it could for yours! As a simple three-part setup, these can be moved to fit many empty spaces, to bring a little color and fun to an otherwise boring or empty wall.
I used mine next to my kitchen door, but with a little modification these can also be a perfect fit next to a mantle place, in a hallway, or any area which needs livening.
Step 1: Gather Your Materials
The tools required for this project are going to be unavoidably necessary, but there is a lot of flexibility when it comes to the pictures you want to use for materials. Your farmhouse kitchen decor ideas and tastes might be different to mine, and that's perfectly fine!
One other thing you'll need to keep in mind is the space you want to fill before you start. I had a vertical line of space available so I chose three even square pictures to place on top of each other, but you might have a different area to work with, which could require a different set of picture sizes and shapes.
Tools and Materials:
- Paint brush
- Wire cutters
- Hot glue gun
- Three farm pictures in frames
- Wire waste basket
- Black chalk paint
- Twine
- Three utensil hooks
- Three pairs of wall hanging hooks
- Top decorative piece (I chose an arrow)
I found all my material at Dollar Tree, but most other DIY stores or larger chain stores like Walmart will also have what you need for cheap.
Step 2: Remove Pictures from Frames
The first step of this project meant that I had to remove the pictures, the backing, and the glass from my frames. Since I'm going to paint these frames, it's best to get this out of the way. Be sure when you're doing it that you're careful, as we're going to reinsert and use the individual components later, and we don't want them damaged.
Step 3: Paint the Frames and Utensil Hooks
With my frames removed, I got to painting them and the utensil hooks with my black chalk paint. You can use whatever color you like here, but I wanted one that would stand in contrast with my white kitchen wall, so I chose black. You can also go with whatever consistency you want for these - I chose a rough finish.
Once these frames are dry you can fully reassemble two pictures, leaving out one which you think will be best suited for the chicken-wire style front. Naturally, I chose the one with a picture of a chicken.
Step 4: Cut Wire to Size
I decided that for my wire I was going to use a repurposed basket rather than traditional chicken wire. Real chicken wire is more authentic, but the wire I'm using from a wastebasket is already painted and treated, so it will look better overall in the long and short term.
Starting from the top rim, I cut all around the basket until the upper rim detached. I then did the same to remove the bottom rim and cut down the middle of the basket so I could unfurl it. Finally, I then flattened the wire and laid it out onto the frame so I could cut away any excess and create a general fit.
Step 5: Attach Wire to Frame
Once I ensured that the wire was the right size, it was time to put the remaining picture back together. This meant placing the wire between the front panel of glass and the picture and using my cutters to bend the remaining wire around the backing of the picture. If you have better wire cutters than I do you could finely trim these edges, but mine weren’t great so I used the bend method.
Step 6: Wrap Decor with Twine
With the most difficult part out of the way, I turned my attention to sprucing up the decorate arrow which would sit atop of the piece. With my chosen arrow I decided to wrap twine around the end so that the images on the decor wouldn’t be hidden. I then sealed off the end of the twine with hot glue, so that I wouldn’t have to rely on a knot.
Step 7: Attach Decor to the Frame
Now that my decor was complete, I needed to attach it to the top of the picture frame that would sit at the highest point of my finished project. All this needed was a couple of globs of glue and a firm hand until the sticking process was complete.
Step 8: Wrap Hooks with Twine
At this point the only major part left was preparing my painted utensil hooks. Using three of these, I wrapped twine to even levels down each of the hooks to ensure consistency between them. You can use more or fewer hooks if you like, just be sure that there will be enough rooms below your lowest picture so that whatever they hang will properly fit.
Step 9: Assemble Your Kitchen Decor
For the final step, I first hot-glued my hooks onto the glass of my lowest picture. One these were set I simply assembled by pictures one above the other onto my wall, using the pairs of wall hooks. When these were in place, I hung three of my favorite wooden cooking tools on the utensil hooks, but you can also use decorative utensils if you prefer.
And with that, my farmhouse kitchen wall decor was complete. What I love about this project is that it has so much flexibility to add your own individual styles and flavor, so please don't feel you have to copy my work exactly! Just remember to follow the key steps I outlined above, and you’ll have an easy time making farmhouse kitchen decor that will make a fine addition to any classically styled home.
If you found this tutorial helpful then feel free to share it with a friend, and leave us a message below if you plan to use this guide yourself, or tell us what twists you put on your own creation. Best of luck, and may your DIY be as fun and rewarding as ours!
Enjoyed the project?
Comments
Join the conversation
-
 Sheila Penney
on Sep 01, 2018
love the whole ptoject but esprcialky the hook idea!
-
-
 Teresa Loyola
on Aug 01, 2020
Thanks for sharing! I’m going to do this as a Christmas gift for my mother-in-law!
-
 Couponing4ever
on Aug 01, 2020
Awesome 😎
-
-









Frequently asked questions
Have a question about this project?
Are those Command hooks? And did you attach pictures to each other?
Great Project!!! AWESOME Idea!!! So versatile too! #another$🌳lover.
I love this idea!
I have bought several license plate type farm pictures from Temu….any idea how to do something similar with these??