How To Paint A Floor With A Tile Stencil

by
Cutting Edge Stencils
(IC: professional)
10 Materials
$100
2 Days
Easy
Patterned tile floors are super trendy and also super pricey. Don't toss your tiled dreams aside before reading this painted floor tutorial! This project is an easy and affordable way to give your flooring a stylish look.
We'd like to introduce Erika, a creative DIYer from Cutting Edge Stencils. Erika had builder beige tiles. She longed for a pretty patterned floor similar to the ones she had seen in her Instagram feed. Since her budget was tight, Erika decided to paint and stencil her builder beige tiles.
{
"id": "4753063",
"alt": "",
"title": "",
"video_library_id": "6888",
"thumbnail": "https://cdn-fastly.hometalk.com/media/2018/03/29/4753063/how-to-paint-a-floor-with-a-tile-stencil.jpg"
}
{
"width": 634,
"height": 357,
"showRelated": true,
"noautoplay": ""
}
[{"sources":[{"type":"video\/mp4","src":"https:\/\/video-cdn-prod.b-cdn.net\/hometalk\/2024\/02\/14\/33112\/33112_source-406.mp4","label":"406p"},{"type":"video\/mp4","src":"https:\/\/video-cdn-prod.b-cdn.net\/hometalk\/2024\/02\/14\/33112\/33112_source-720.mp4","label":"720p"},{"type":"video\/mp4","src":"https:\/\/video-cdn-prod.b-cdn.net\/hometalk\/2024\/02\/14\/33112\/33112_source-1080.mp4","label":"1080p"}],"poster":"https:\/\/cdn-fastly.hometalk.com\/media\/videos\/2024\/02\/14\/33112\/thumbnail.jpg","media":{"video_library_id":33112,"thumbnail":"https:\/\/cdn-fastly.hometalk.com\/media\/videos\/2024\/02\/14\/33112\/thumbnail.jpg"}},{"sources":[{"type":"video\/mp4","src":"https:\/\/video-cdn-prod.b-cdn.net\/hometalk\/2022\/12\/08\/22532\/22532_source-406.mp4","label":"406p"},{"type":"video\/mp4","src":"https:\/\/video-cdn-prod.b-cdn.net\/hometalk\/2022\/12\/08\/22532\/22532_source-720.mp4","label":"720p"},{"type":"video\/mp4","src":"https:\/\/video-cdn-prod.b-cdn.net\/hometalk\/2022\/12\/08\/22532\/22532_source-1080.mp4","label":"1080p"}],"poster":"https:\/\/cdn-fastly.hometalk.com\/media\/videos\/2022\/12\/08\/22532\/thumbnail.jpg","media":{"video_library_id":22532,"thumbnail":"https:\/\/cdn-fastly.hometalk.com\/media\/videos\/2022\/12\/08\/22532\/thumbnail.jpg"}},{"sources":[{"type":"video\/mp4","src":"https:\/\/video-cdn-prod.b-cdn.net\/hometalk\/2024\/03\/05\/33535\/33535_source-406.mp4","label":"406p"},{"type":"video\/mp4","src":"https:\/\/video-cdn-prod.b-cdn.net\/hometalk\/2024\/03\/05\/33535\/33535_source-720.mp4","label":"720p"},{"type":"video\/mp4","src":"https:\/\/video-cdn-prod.b-cdn.net\/hometalk\/2024\/03\/05\/33535\/33535_source-1080.mp4","label":"1080p"}],"poster":"https:\/\/cdn-fastly.hometalk.com\/media\/videos\/2024\/03\/05\/33535\/thumbnail.jpg","media":{"video_library_id":33535,"thumbnail":"https:\/\/cdn-fastly.hometalk.com\/media\/videos\/2024\/03\/05\/33535\/thumbnail.jpg"}},{"sources":[{"type":"video\/mp4","src":"https:\/\/video-cdn-prod.b-cdn.net\/hometalk\/2022\/12\/13\/22720\/22720_source-406.mp4","label":"406p"},{"type":"video\/mp4","src":"https:\/\/video-cdn-prod.b-cdn.net\/hometalk\/2022\/12\/13\/22720\/22720_source-720.mp4","label":"720p"},{"type":"video\/mp4","src":"https:\/\/video-cdn-prod.b-cdn.net\/hometalk\/2022\/12\/13\/22720\/22720_source-1080.mp4","label":"1080p"}],"poster":"https:\/\/cdn-fastly.hometalk.com\/media\/videos\/2022\/12\/13\/22720\/thumbnail.jpg","media":{"video_library_id":22720,"thumbnail":"https:\/\/cdn-fastly.hometalk.com\/media\/videos\/2022\/12\/13\/22720\/thumbnail.jpg"}},{"sources":[{"type":"video\/mp4","src":"https:\/\/video-cdn-prod.b-cdn.net\/hometalk\/2021\/12\/29\/15743\/15743_source-406.mp4","label":"406p"},{"type":"video\/mp4","src":"https:\/\/video-cdn-prod.b-cdn.net\/hometalk\/2021\/12\/29\/15743\/15743_source-720.mp4","label":"720p"},{"type":"video\/mp4","src":"https:\/\/video-cdn-prod.b-cdn.net\/hometalk\/2021\/12\/29\/15743\/15743_source-1080.mp4","label":"1080p"}],"poster":"https:\/\/cdn-fastly.hometalk.com\/media\/videos\/2021\/12\/29\/15743\/thumbnail.jpg","media":{"video_library_id":15743,"thumbnail":"https:\/\/cdn-fastly.hometalk.com\/media\/videos\/2021\/12\/29\/15743\/thumbnail.jpg"}}]
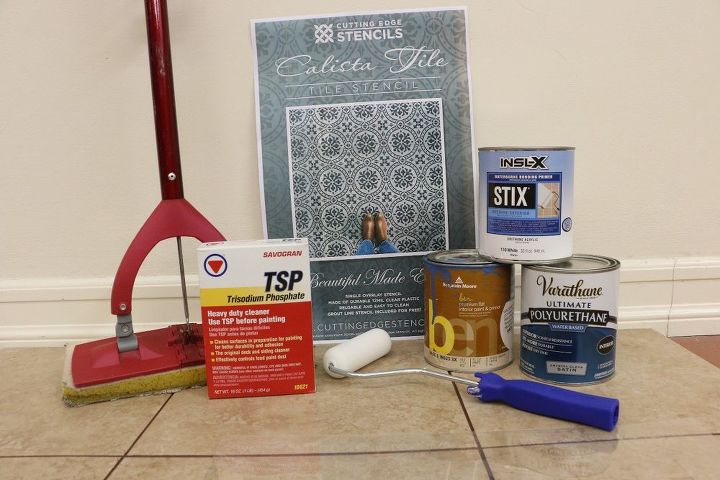
She gathered up all of the materials for this project. Let's walk through all of the steps for this super easy project.
The first thing Erika did was clean her floor using Savogran Trisodium Phosphate (TSP) to ensure there wasn't any debris. She followed the instructions on the TSP packaging for cleaning.
Erika used blue painter's tape to tape along the edges of the floor. This would ensure she did not get paint onto her trim. Once the floor had been properly cleaned, Erika primed it using Stix Waterborne Bonding Primer by Insl-x. She used a foam roller to apply the paint and a paint brush to paint along the edges.
Cleaning and prepping the floor is key to completing a painted floor that will last for years.
Two coats do the trick! STIX primer is perfect for a project like this. It adheres to the tile and provides a great base for painting and stenciling.
After the primer was dry, Erika applied her base coat of paint. She painted the base coat using Benjamin Moore Ben flat in Navajo White.
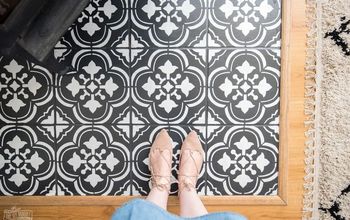
Now she was ready to start stenciling. Erika chose our Calista Tile Stencil. Since her existing tiles were about 12 inches, Erika used the Large stencil pattern because it fit perfectly over her tile.
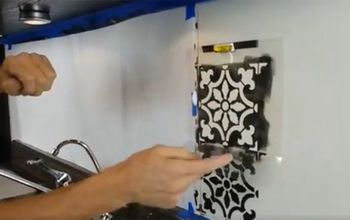
Erika sprayed the back of the stencil with repositionable spray adhesive. We like Stick It Spray It repositionable spray adhesive. You could use any respositionable spray adhesive that is typically found in a craft store like Michaels.
Erika placed the stencil pattern on top of the tile. She rolled her dense foam roller into the paint (Benjamin Moore New York State of Mind). She made sure the roller was evenly coated and then rolled off excess paint onto a piece of paper towel. Erika then painted the stencil pattern with the roller.
After each section was complete, Erika would un-tape the stencil and reposition so she could paint all of her tiles.
She applied two coats of blue paint over each stencil pattern. The paint dried rather quickly so this did not slow her down!
Once the entire floor was stenciled, Erika applied a two coats of Varethane waterbased polyurethane to increase durability.
Give the top coats time to dry and then step back to admire your beautiful work! We think she did an amazing job transforming builder beige tiles using a stencil and paint. Don't you agree?
We want to help you DIY, so some of the materials in this post are linked to sellers. Just so you know, Hometalk may collect a small share of sales from the links on this page.
Enjoyed the project?
Any price and availability information displayed on [relevant Amazon Site(s), as applicable] at the time of purchase will apply to the purchase of this product.
Hometalk may collect a small share of sales from the links on this page.More info
Published September 15th, 2017 3:02 PM
Comments
Join the conversation
2 of 181 comments
-
 KainnBency
on Jun 18, 2025
I used painter’s tape like you and still had some bleed, but I fixed it with a tiny craft brush after everything dried. Make sure your stencil sticks all the way down each time—using a spray adhesive helped me a lot. I also found some useful tips on craftsmanssealpainting.ca that made the whole process smoother, especially with sealing the final look to keep it from scuffing.
-
-
 Kathy Allen
on Jun 20, 2025
I suggest a roller with a pole
-









Frequently asked questions
Have a question about this project?
How do I place the stencil on the next tile without it smudging the last one.? Do I have to do 1 and then wait till it dries and then do another? It will take a long time.
Can you use the prep step on cement floors? It will be my front porch.
There appears to be paint outside the stencil and painters tape. How do you keep the paint just on the stencil without it being super tedious?