


Cutting Board Soap Station: DIY Soap Dispenser Stand
Tired of soap and sponge puddles stacking up on your counter? This DIY soap dispenser stand guide will show you how to use a simple bamboo board and a scrap of lumber to create a neat, raised platform that keeps everything off wet surfaces.
You only need basic tools, and in under an hour, you’ll have a stylish sink organizer riser ready for use. Give your sink area a neat, raised spot for dispensers and sponges.
This simple bamboo cutting board upcycle idea uses scrap wood and a water-resistant finish to keep counters clean and dry.
This post was transcribed by a member of the Hometalk editorial team from the original HometalkTV episode.
Tools and Materials
- 1 bamboo cutting board (Dollar Tree)
- Scrap 2×6 lumber (length equal to board width)
- Miter saw or handsaw
- Sandpaper (120 grit)
- Fusion Mineral Paint White Stain & Finishing Oil
- Clean rag for wiping stain
- Hot glue gun + glue sticks
Hometalk may receive a small affiliate commission from purchases made via Amazon links in this article but at no cost to you.

1. Cut & Sand the Base
Measure the width of your cutting board and mark that length on the 2×6 scrap.

Use a miter saw (or handsaw) to make a straight cut.


Then, run sandpaper along all edges and surfaces of the wood strip until they feel smooth and splinter-free—this will prevent scratches on your countertop and give a neat finish under the board.

2. Glue Underneath
Heat up your glue gun and test a small drop on scrap to ensure it flows well.
Flip the cutting board over and apply a generous line of hot glue along the top edge of the 2×6.

Press the wood strip firmly against the board’s underside, holding for about 15 seconds until the glue cools.
The board should now sit evenly on its new wooden feet.
3. Seal with White Stain & Oil
Using a clean rag, apply a thin coat of Fusion’s White Stain & Finishing Oil all over the exposed 2×6, wiping off as you go.

Work in the direction of the wood grain, then immediately buff away excess stain with a fresh section of rag.
This creates a subtle whitewash look and a moisture-resistant seal that protects the wood in damp sink environments.

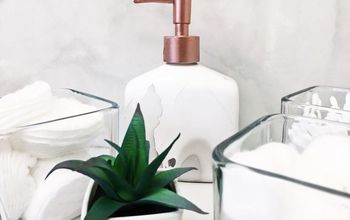
4. Stage by the Sink
Once the sealant is fully dry (about 1 hour), flip your riser right-side up and place it beside the faucet.
Arrange your soap dispenser, scrub brush, and sponge on top.

Looking for Another Cutting Board Craft Idea


DIY Soap Dispenser Stand Tutorial
You’ve just crafted a handy sink organizer riser that uses simple cuts, glue, and stain. This DIY soap dispenser stand makes cleanup easier and adds a neat touch to your kitchen or bathroom.
Which sponge or scrub brush will you display? Drop a comment below and share your setup!


Frequently asked questions
Have a question about this project?