


How to Make a Stunning Rope Candle Holder From Dollar Tree Bowls

I don’t know about you, but I love when something from Dollar Tree ends up looking like it belongs in a high-end coastal boutique.
That’s exactly what happened when I started experimenting with two clear bowls and some nautical rope. What began as a simple craft turned into a gorgeous rope candle holder that honestly looks designer.
If you’ve been searching for the perfect rope bowl, you are going to love how easy and affordable this project is. It’s budget-friendly, beginner-friendly, and gives off those breezy coastal vibes we all adore.
Let’s dive in!
Tools & Materials You’ll Need:
- 2 clear bowls (Dollar Tree)
- Nautical rope (Dollar Tree)
- Hot glue gun
- Glue sticks
- Scissors
- Optional: Flameless candle or pillar candle
Hometalk may receive a small affiliate commission from purchases made via Amazon links in this article but at no cost to you.

1. Create the Bowl Tower Base
First, flip one of your clear bowls upside down. This becomes the base of your candle holder.

 Be sure to find nautical rope that's meant for crafts so that it's a workable size and not to rough. This nautical cotton rope from Amazon is perfect for crafting projects.

jijAcraft 1/3 Inch Nautical Cotton Rope Crafts
Using your hot glue gun, generously apply glue around the bottom of the inverted bowl. Then carefully place the second bowl on top, right-side up, pressing firmly to secure.

Hold it in place for about 30–60 seconds so the glue sets properly. You’ve just created a pedestal-style tower using two simple bowls!

Why this works:
Stacking the bowls creates height and dimension, instantly giving that “designer candle stand” look without paying boutique prices.

2. Wrap the Bottom Bowl with Nautical Rope
Now for the fun part.
Start at the bottom of the inverted bowl. Apply a small section of hot glue and immediately press your nautical rope into it. Work in small sections to keep the glue from cooling too quickly.
Continue wrapping the rope tightly around the entire bottom bowl. Keep the rope snug against each previous row to avoid gaps.
Once the bottom bowl is fully covered, continue wrapping about halfway up the second bowl.


Tip:
Rotate the piece as you work instead of moving your glue gun around constantly. It makes the process smoother and keeps your lines even.

3. Add a Decorative Rope Detail (Optional but Gorgeous!)
When you reach the end of your rope, don’t trim it just yet.
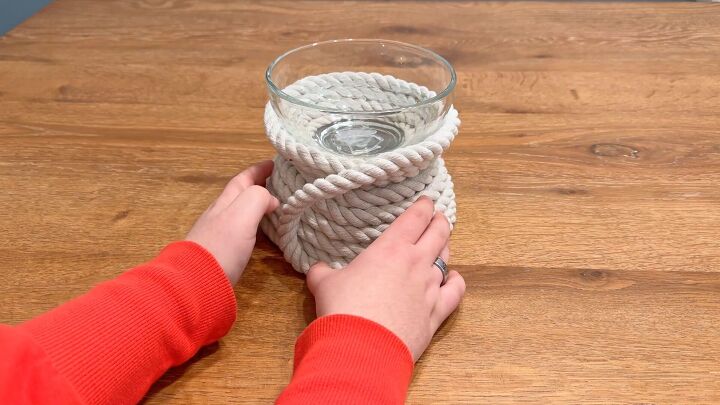
Instead, leave a bit of excess rope to create a decorative detail on the front. You can:
- Create a simple loop
- Tie a small knot
- Twist it into a soft wave
Secure it with hot glue so it stays in place.
You can absolutely skip this step if you prefer a cleaner look. But that little rope accent adds character and makes it feel even more custom.

Why This Rope Candle Holder Looks So High-End
There’s something about rope that instantly says coastal charm.
Nautical rope has a natural texture that adds warmth and dimension. Interior designers often use rope in beach-style or farmhouse decor because it softens hard surfaces and adds organic contrast.
By combining clear bowls with rope, you’re mixing sleek and rustic elements. That contrast is what makes this DIY candle holder feel intentional and elevated.
Bonus Tip:
Use a flameless LED candle if your bowls are plastic. Safety first! If you plan to use a real candle, make sure it’s contained in glass and doesn’t directly touch the plastic.

Styling Ideas for Your DIY Rope Candle Holder
- Add it to a bathroom vanity for spa vibes
- Use two on a dining table as coastal centerpieces
- Place it on a mantel with driftwood and greenery
- Pair with blue and white decor for a nautical theme
You can even make different heights by using slightly different bowl sizes if available.

How to Make a Rope Candle Holder with Dollar Tree Bowls
Isn’t it amazing what two clear bowls and some rope can turn into?
Now you know exactly how to make a rope candle holder with Dollar Tree bowls, and it only takes a few supplies and a little hot glue. It’s affordable, customizable, and gives you that high-end coastal look for just a few dollars.
If you try this DIY, I would love to see your version! Did you add the rope detail or keep it simple?












Frequently asked questions
Have a question about this project?