


DIY Faux Planter Trash Can & Upcycled Stool Project
Turn an ordinary trash can into a stylish faux planter and give a thrifted wooden stool a fresh makeover. This project combines easy crafting with upcycling to create functional, beautiful home décor.
This post was transcribed by a member of the Hometalk editorial team from the original HometalkTV episode.
Tools & materials:
For the faux planter trash can
- Beige trash can
- Cake carrier with lid
- Floral foam blocks
- Faux greenery stems (bunch)
- Nautical rope
- Awl or sharp tool
- Scissors or craft knife
- Hot glue gun + glue sticks
- Pencil or marker
For the upcycled thrifted stool
- Small wooden stool
- Citrus-based paint stripper
- Plastic wrap
- Paint scraper
- Orbital sander + sandpaper
- White house paint
- Dark wood stain
- Paintbrushes
Disclosure: Hometalk may receive a small affiliate commission from purchases made via links in this article but at no cost to you.

1. Prepare the cake carrier lid
Using a pencil, find and mark the center of the cake carrier lid placed upside-down. Measure 2 inches to the right and left of the center and mark those points as well. Use an awl (or sharp tool) to puncture each mark, then enlarge the holes by cutting an “X” with scissors.

2. Attach the nautical rope handle
Thread a piece of nautical rope through one of the holes and tie a secure knot on the inside to anchor it. Pull through the opposite hole and knot tightly so the handle sits centered on the lid.

3. Glue floral foam on the lid
Cut the floral foam into smaller blocks that fit snugly around the handle area on top of the lid. Use a hot glue gun to adhere four pieces in a square or circular pattern, ensuring they create a stable base for inserting greenery.

4. Decorate with faux greenery
Start placing the trimmed faux greenery stems into the floral foam, focusing on the outer edge first. Insert each piece firmly so it stands upright and stays in place.

5. Fill in and trim
Continue inserting stems until the entire lid is covered, working methodically to eliminate any empty gaps. Once the foam is full and lush, go back and trim any pieces that look too long to create a neat, balanced arrangement.

6. Remove paint from the thrifted stool
Apply a liberal coat of citrus-based paint stripper on the stool’s surface and cover it with plastic wrap to seal in the chemicals. After 30 minutes, use a paint scraper to remove softened paint. Repeat stripping and scraping as needed until most paint is gone.

7. Sand the stool
Once the stool has dried, use an orbital sander to smooth the surface and remove remaining paint. Finish with hand sanding for a refined look, paying attention to edges and details.

8. Paint and stain the stool
Paint the stool legs and base with white house paint to create a bright, fresh appearance. Let it dry thoroughly, then apply dark wood stain to the seat surface to add contrast and elegance.
More Waste Bin Planter Ideas
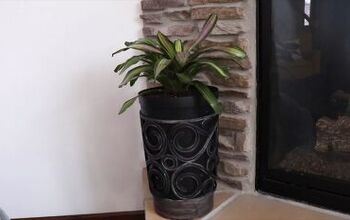

9. Assemble and display
Place your faux poultry planter lid onto the trash can, using it as both a lid and decorative planter top. Position the upcycled stool nearby and display them together for a coordinated, functional accent piece—perfect for greeting guests or enhancing backyard décor!
You’ve just transformed ordinary household items into charming statement pieces that are both practical and stylish. This DIY project is budget-friendly, creative, and perfect for adding personality to any room or patio. Thanks for crafting along with Home Talk—see you next time!
Now that you have your faux planter trash can, check out How to Clean Faux Plants the Easy Way


Frequently asked questions
Have a question about this project?